 跟着官方示例学习Next.js
# 开始
# 创建项目
npm install -g pnpm

npx create-next-app@latest nextjs-dashboard --example "https://github.com/vercel/next-learn/tree/main/dashboard/starter-example" --use-pnpm
# 目录结构
/app:包含应用程序的所有路由、组件和逻辑/app/lib:包含应用程序中使用的函数,例如可重用的实用程序函数和数据获取函数。/app/ui:包含应用程序的所有 UI 组件,例如卡片、表格和表单。为了节省时间,我们为您预先设置了这些组件的样式。/public:包含应用程序的所有静态资源,例如图像。- Config Files:您还会注意到配置文件,例如位于应用程序的根目录。这些文件中的大多数都是在您使用。在本课程中,您无需修改它们。
next.config.js、create-next-app
# 启动开发服务器
# 安装依赖
pnpm i

# 启动
pnpm dev
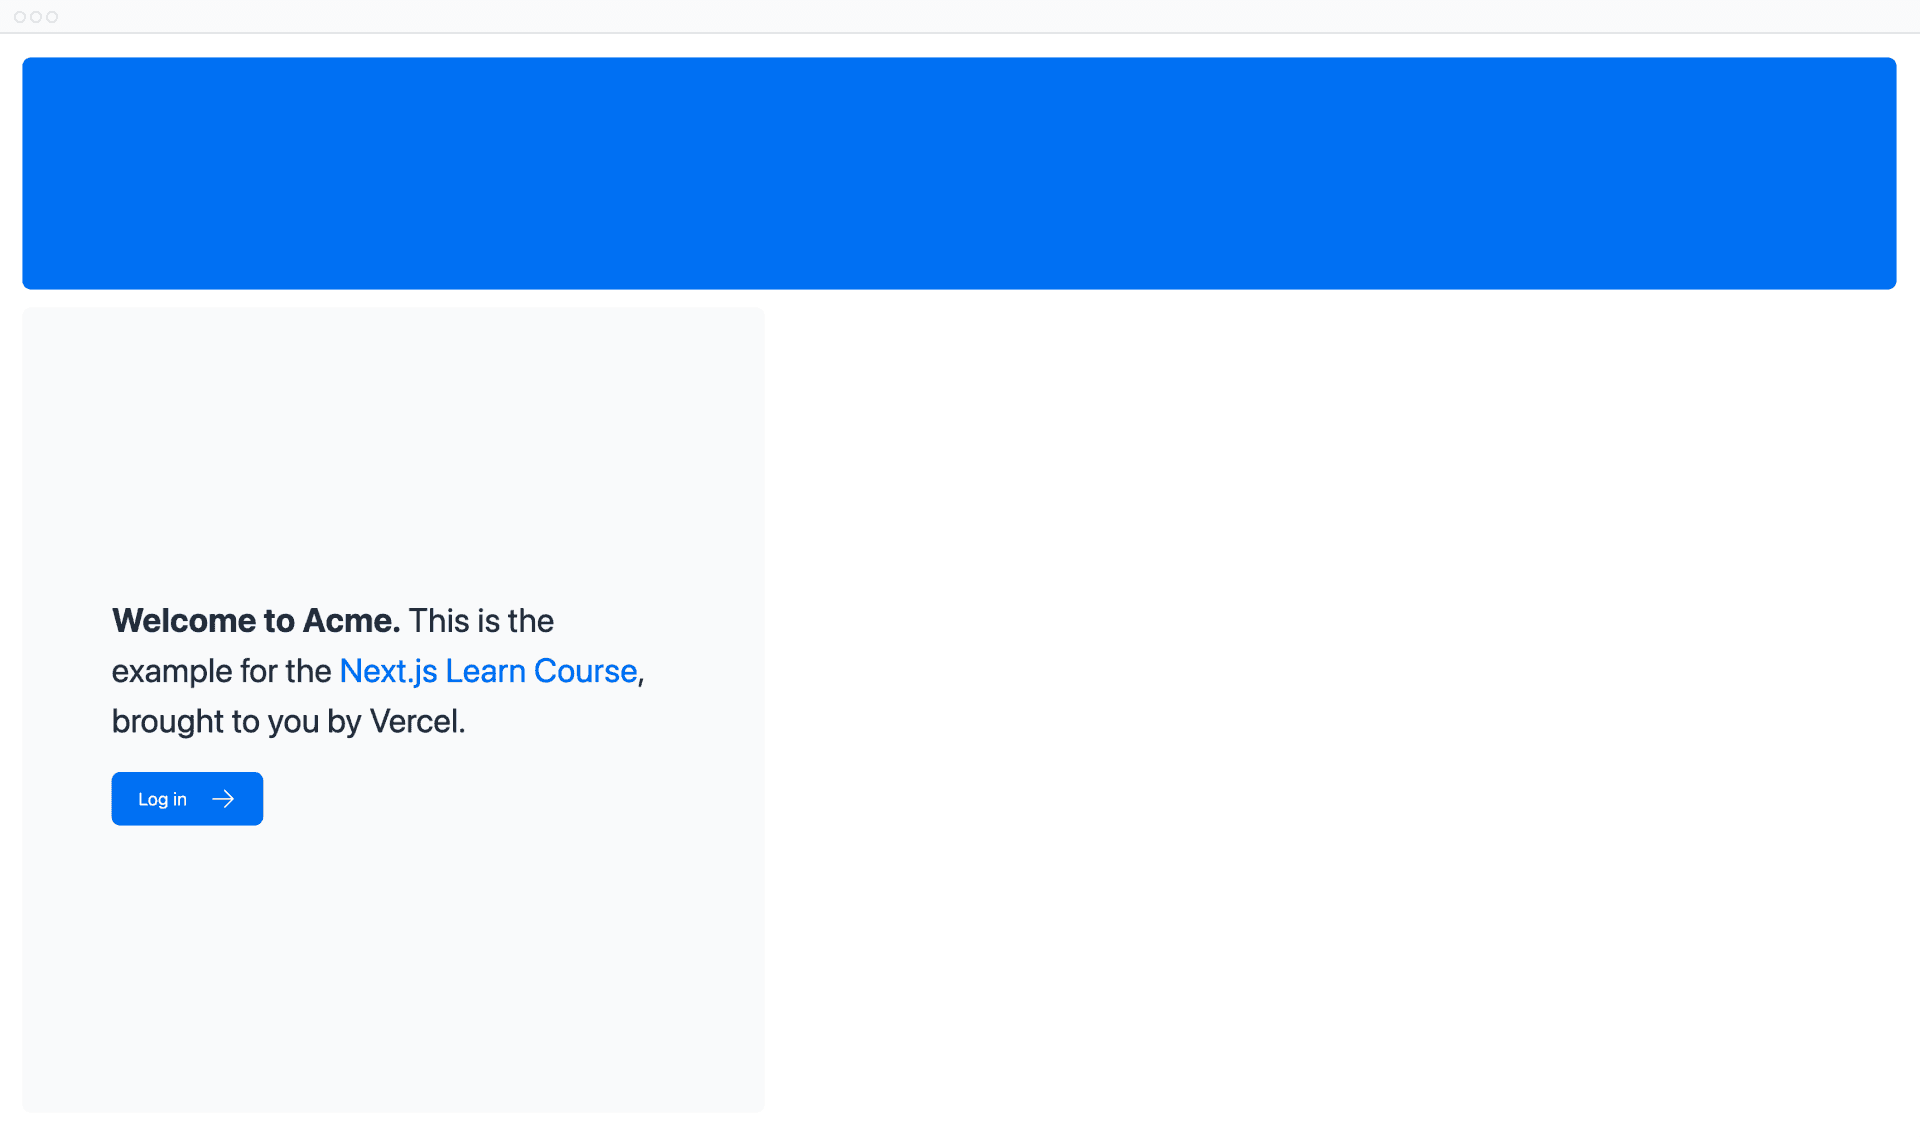
能在浏览器打开,即可,此时展示的内容丢失样式是正常的。
# CSS 样式
# 全局样式
app/ui/global.css在根布局文件(
app/layout.tsx)导入global.css
import '@/app/ui/global.css';
- 至此,浏览器中的页面样式显示正常。
# Tailwind
Tailwind CSS - Rapidly build modern websites without ever leaving your HTML. (opens new window)
而在 global.css 中仅有 3 条 CSS 规则,显然无法仅靠其实现效果,这归功于头 3 行引入的 tailwind :
@tailwind base;
@tailwind components;
@tailwind utilities;
打开
app/page.tsx,不难发现在元素中使用了大量的 class,如果使用过 bootstrap,这并不会感到陌生。将下面 HTML 复制到页面中的
<p>标签上方,将得到一个黑色三角形
<div
            className="relative w-0 h-0 border-l-[15px] border-r-[15px] border-b-[26px] border-l-transparent border-r-transparent border-b-black"
        />
提示
在创建一个 next.js 项目 create-next-app 时会询问是否使用 tailwind 。
# CSS 模块
除了使用 Tailwind,也可以手写 css。
- 在
/app/ui,创建home.module.css
.shape {
  height: 0;
  width: 0;
  border-bottom: 30px solid black;
  border-left: 20px solid transparent;
  border-right: 20px solid transparent;
}
- 回到
/app/page.tsx,引入样式,替换添加的div标签
import styles from '@/app/ui/home.module.css';

....

<div className={styles.shape} />
# clsx 库 - 类名控制
跟
classnames类似
import clsx from 'clsx';

export default function InvoiceStatus({ status }: { status: string }) {
  return (
    <span
      className={clsx(
        'inline-flex items-center rounded-full px-2 py-1 text-sm',
        {
          'bg-gray-100 text-gray-500': status === 'pending',
          'bg-green-500 text-white': status === 'paid',
        },
      )}
    >
    // ...
)}
- 如果是
status === 'pending','bg-gray-100 text-gray-500'生效……
除此以外,nexs.js 还支持 Sass 、 CSS-in-JS ,详情查看:Building Your Application: Styling | Next.js (opens new window)
# 优化字体和图像
# 字体
Optimizing: Fonts | Next.js (opens new window)
为什么要优化字体?
在使用自定义字体时,需要额外加载自定义字体资源,会影响网站访问速度,进而影响 SEO。
而使用 next/font 模块时,Next.js 会自动优化应用程序中的字体。它在构建时下载字体文件并将它们与其他静态资产一起托管。这意味着当用户访问您的应用程序时,不会出现会影响性能的额外网络请求字体。
# 添加主要字体
以
Google 字体为例
- 创建
/app/ui/fonts.ts,引入Inter字体,并指定字迹latin(拉丁语)
import { Inter } from 'next/font/google';

export const inter = Inter({ subsets: ['latin'] });
- 编辑
/app/layout.tsx - 将
Inter添加到<body>元素,该字体将应用于整个应用程序- Tailwind 的
antialiased(opens new window) 不是必要的,但它可以使字体平滑(抗锯齿)
- Tailwind 的
import '@/app/ui/global.css';
import { inter } from '@/app/ui/fonts';

export default function RootLayout({
  children,
}: {
  children: React.ReactNode;
}) {
  return (
    <html lang="en">
      <body className={`${inter.className} antialiased`}>{children}</body>
    </html>
  );
}
# 添加辅助字体(Lusitana)
需求:在 fonts.ts 文件中,导入名为 Lusitana 的辅助字体,并将其传递到 /app/page.tsx 文件中的 <p> 元素。除了像以前一样指定子集之外,您还需要指定字体粗细。
/app/ui/fonts.ts
import { Inter, Lusitana } from 'next/font/google';

export const inter = Inter({ subsets: ['latin'] });

export const lusitana = Lusitana({
  weight: ['400', '700'],
  subsets: ['latin'],
});
- 编辑
/app/page.tsx- 引入
lusitana - 在
p标签上添加 class
- 引入
import { lusitana } from '@/app/ui/fonts';

// ...
<AcmeLogo />

// ...
    <p
      className={`${lusitana.className} text-xl text-gray-800 md:text-3xl md:leading-normal`}
    >
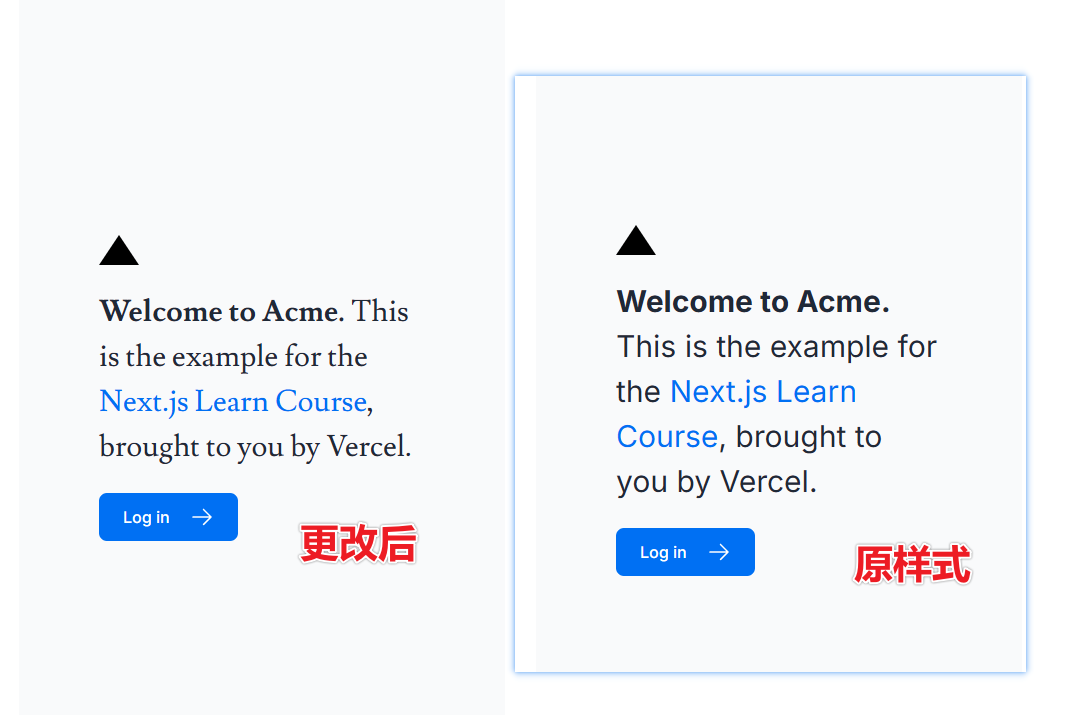
- 取消
<AcmeLogo />的注释:这个组件也用到lusitana字体,因此需要在引入lusitana后才可以取消注释
# 添加辅助字体(中文)
原文中导入一个
Lusitana字体作为辅助字体,本文改导入 Google 中文字体。
- 通过 Browse Fonts - Google Fonts (opens new window) 搜索,可知简体中文字体为
Noto Sans Simplified Chinese - 通过一番查找,得知在
next/font对应的字体为Noto_Sans_SC
/app/ui/fonts.ts
import { Noto_Sans_SC } from 'next/font/google';

export const notoSansSc = Noto_Sans_SC({ subsets: ['latin'] });
/app/page.tsx
import {notoSansSc} from '@/app/ui/fonts';

// ....
<p className={`${notoSansSc.className}`}>你好</p>
参考:
# 图像
Optimizing: Static Assets | Next.js (opens new window)
为什么要优化图像?
项目静态资源存放在 /public ,使用常规 <img> 引入图像资源,无论在什么尺寸的屏幕下,都会加载同样大小的原图。
<img
  src="/hero.png"
  alt="Screenshots of the dashboard project showing desktop version"
/>
可以使用 next/image 组件自动优化图像,而不是手动实现这些优化。
# image 组件
特性:
加载图像时自动防止布局移动。
调整图像大小以避免将大图像传送到具有较小尺寸的设备。
默认懒加载(图像在进入窗口时加载)。
以现代格式(例如 WebP) (opens new window)提供图像和 AVIF (opens new window) (当浏览器支持时)。
# 添加桌面端主图像
/public目录下准备了hero-desktop.png和hero-mobile.png,一个用于桌面端,一个用于移动端。/app/page.tsx- 引入
next/image - 添加
Image
- 引入
import AcmeLogo from '@/app/ui/acme-logo';
import { ArrowRightIcon } from '@heroicons/react/24/outline';
import Link from 'next/link';
import { lusitana } from '@/app/ui/fonts';
import Image from 'next/image';

export default function Page() {
  return (
    // ...
    <div className="flex items-center justify-center p-6 md:w-3/5 md:px-28 md:py-12">
      {/* Add Hero Images Here */}
      <Image
        src="/hero-desktop.png"
        width={1000}
        height={760}
        className="hidden md:block"
        alt="Screenshots of the dashboard project showing desktop version"
      />
    </div>
    //...
  );
}
- 设置图像的
width和height以避免布局移位,宽高比应与源图像相同。 hidden用于在移动端隐藏图像,md:block用于在桌面端上显示图像。
至此,在桌面端可显示桌面端主图,在移动端不显示
# 添加移动端主图像
/app/page.tsx ,同理添加移动端图像
    // ...
    <div className="flex items-center justify-center p-6 md:w-3/5 md:px-28 md:py-12">
      {/* Add Hero Images Here */}
      <Image
        src="/hero-desktop.png"
        width={1000}
        height={760}
        className="hidden md:block"
        alt="Screenshots of the dashboard project showing desktop version"
      />
      <Image
        src="/hero-mobile.png"
        width={560}
        height={620}
        className="block md:hidden"
        alt="Screenshot of the dashboard project showing mobile version"
      />
    </div>
    //...
至此,在桌面端可显示
桌面端主图,在移动端显示移动端主图
# 创建布局和页面
# 嵌套路由
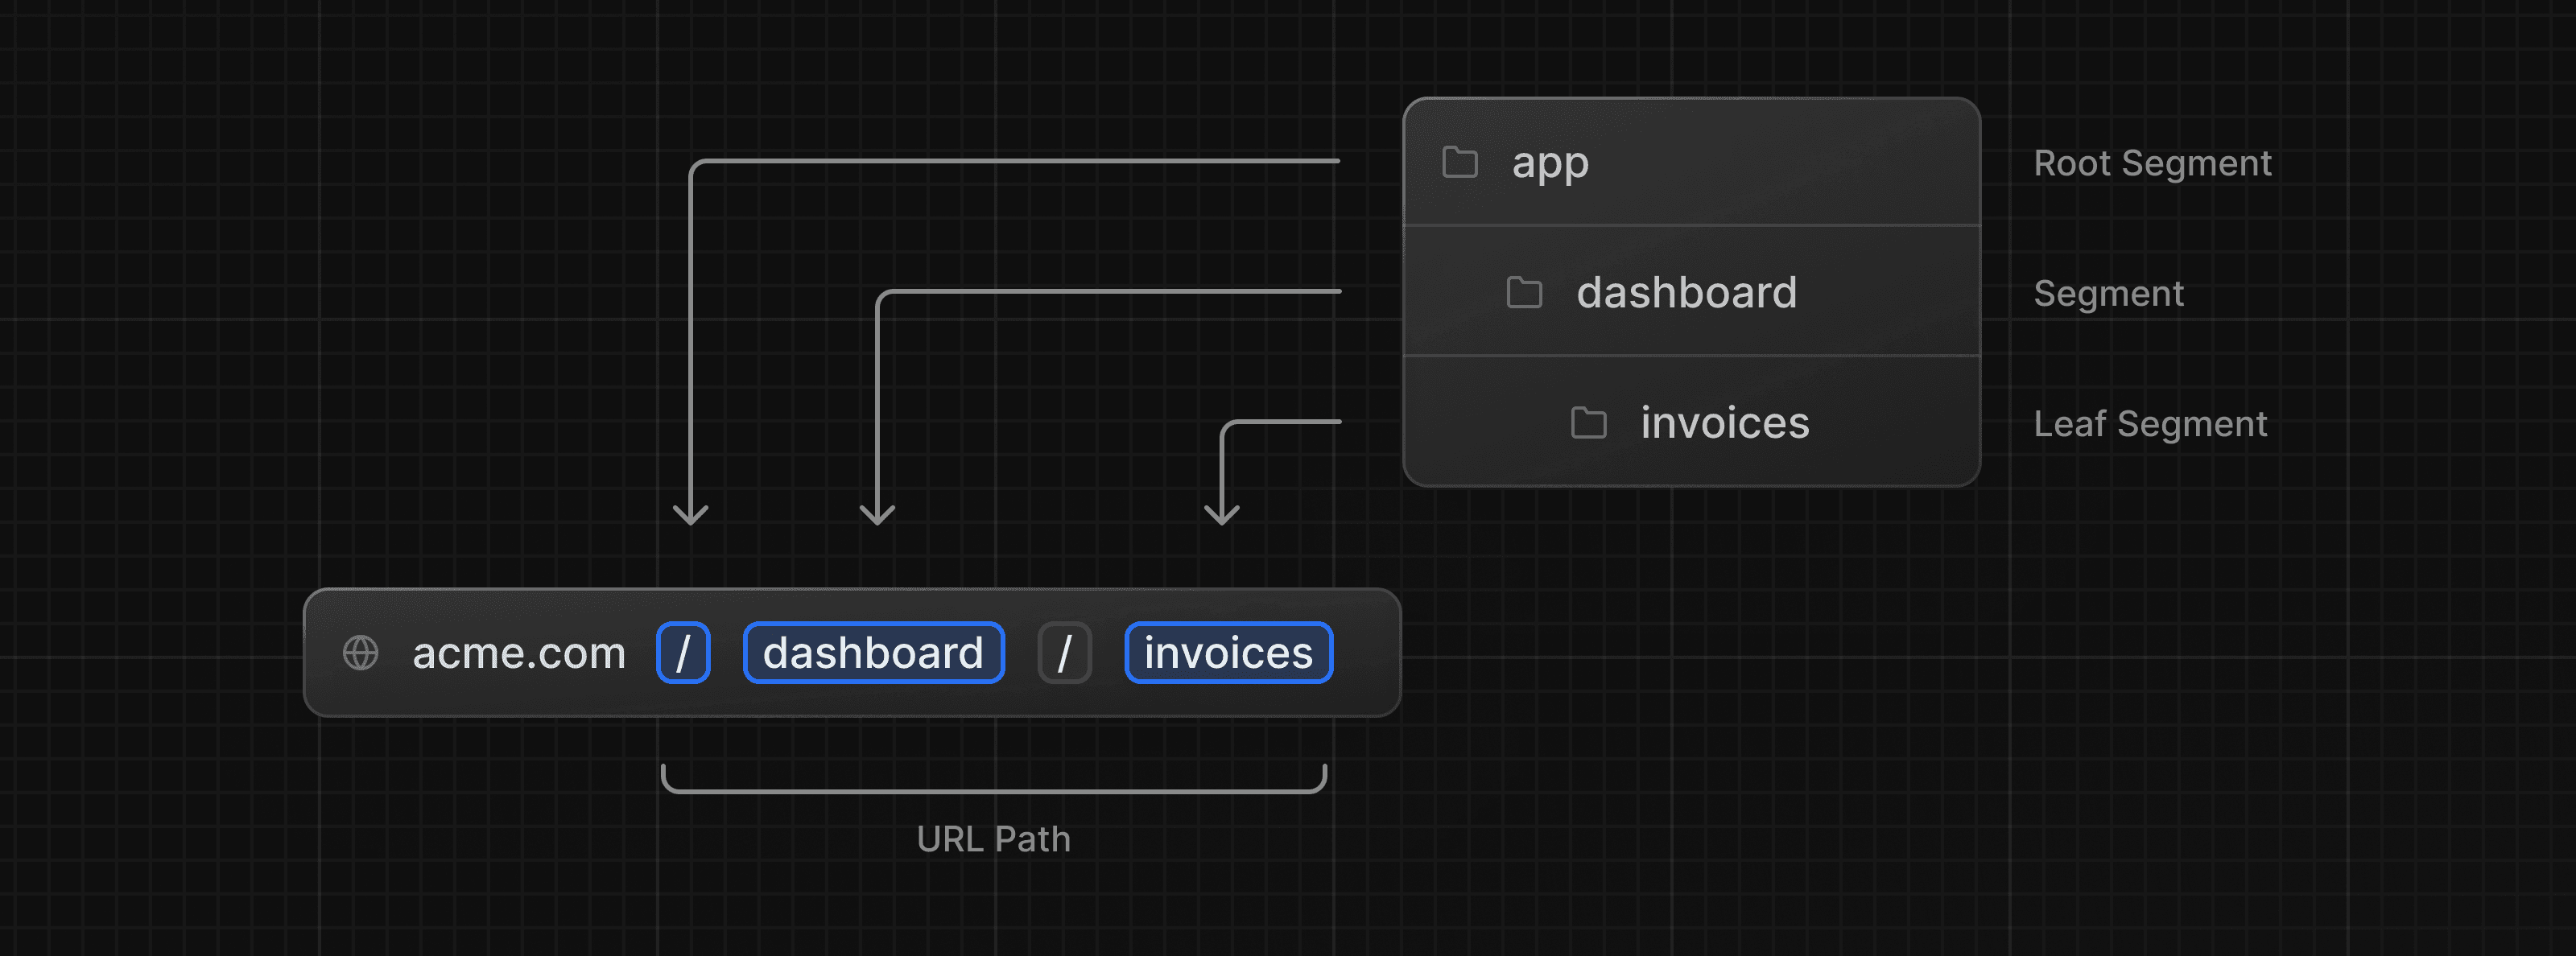
Next.js 使用文件系统路由, app 下的目录层级即为路由层级。
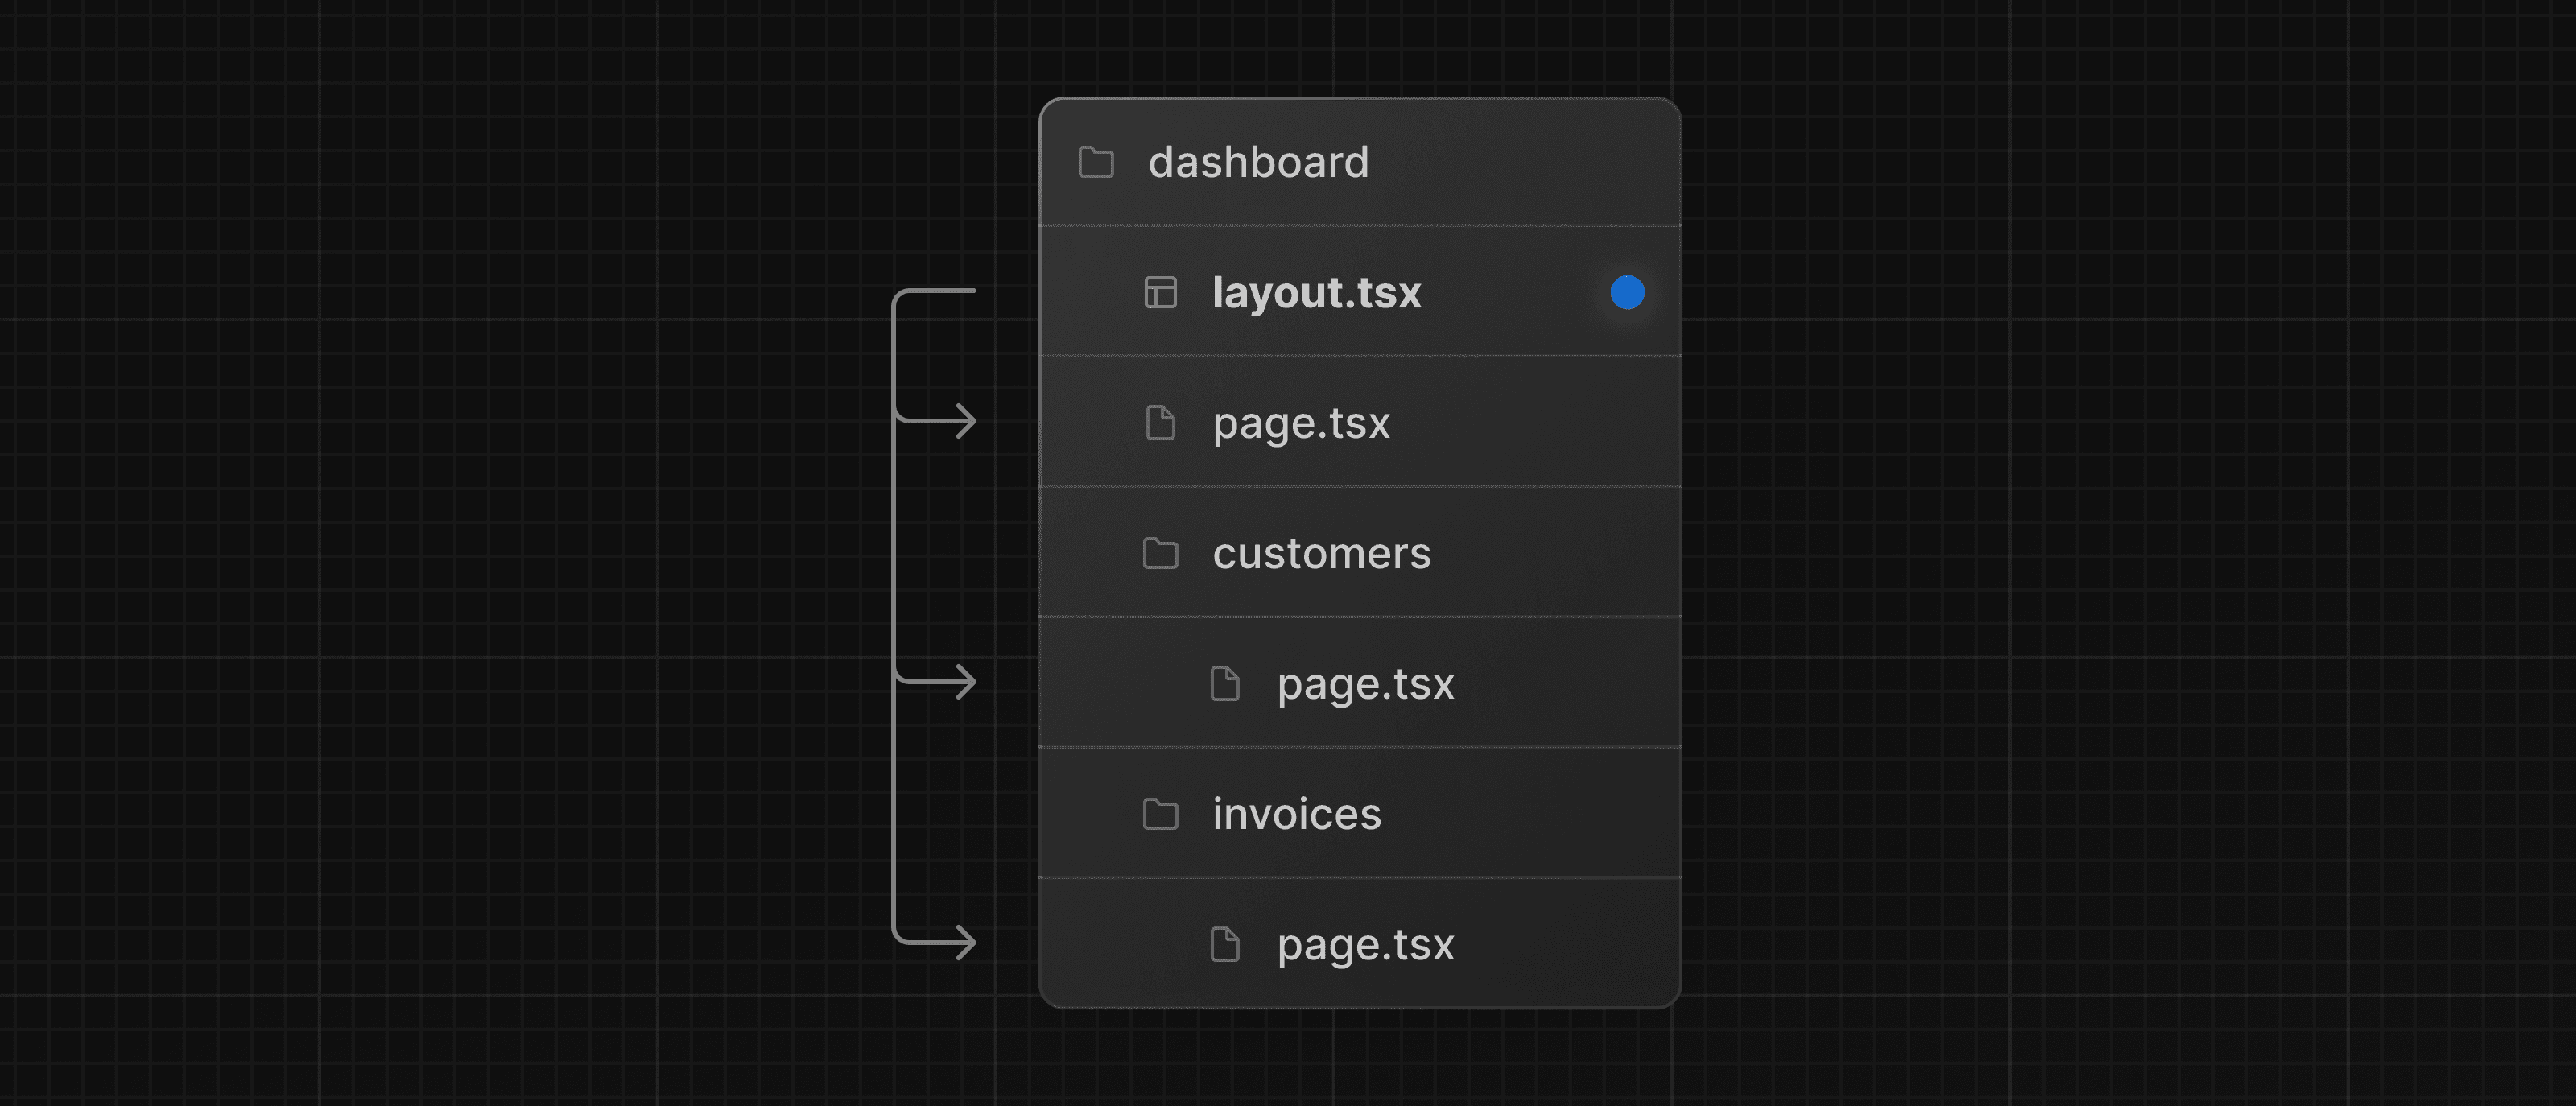
- 每层目录中的
page.tsx(相当于index.html) - 只有
page.tsx可以公开访问,因此在同目录下放置ui组件、测试文件、其他相关代码是安全的
# 创建仪表板 - 页面
- 创建
/app/dashboard/page.tsx(注意路径,不是 ui 下面那个)
export default function Page() {
  return <p>Dashboard Page</p>;
}
- 访问 http://localhost:3000/dashboard (opens new window),可成功访问刚刚创建的页面
# 创建仪表板 - 子页面
需求:
- 客户页面:该页面可通过 http://localhost:3000/dashboard/customers (opens new window) 访问,返回
<p>Customers Page</p>元素。 - 发票页面:该页面可通过 http://localhost:3000/dashboard/invoices (opens new window) 访问,,返回
<p>Invoices Page</p>元素。
操作:
- 创建
/app/dashboard/customers/page.tsx,内容略 - 创建
/app/dashboard/invoices/page.tsx,内容略
# 创建仪表板 - 布局
- 目录下的
layout.tsx文件为约定的布局文件名 - 创建
/app/dashboard/layout.tsx
import SideNav from '@/app/ui/dashboard/sidenav';

export default function Layout({ children }: { children: React.ReactNode }) {
  return (
    <div className="flex h-screen flex-col md:flex-row md:overflow-hidden">
      <div className="w-full flex-none md:w-64">
        <SideNav />
      </div>
      <div className="flex-grow p-6 md:overflow-y-auto md:p-12">{children}</div>
    </div>
  );
}
- 将
<SideNav />组件导入布局中,此组件是官方示例编写好的侧边栏组件。 <Layout />组件接收一个children属性,该子项可以是页面或其他布局。- 当前
/dashboard内的页面将自动嵌套在<Layout />内,如下所示:
- 当前
# 根布局
在上面添加字体时操作过的 /app/layout.tsx 即为根布局,万物起源。
# 页面间导航
为什么要优化导航?
- 要在页面之间跳转,传统上使用
<a>标签。 - 现在,侧边栏链接使用的
<a>标签,点击你会发现跳转时整个页面都会重新刷新
# Link 组件
<Link>允许您使用 JavaScript 进行客户端导航 (opens new window)。编辑
/app/ui/dashboard/nav-links.tsx- 引入
Link - 将原来的
<a>更改为<Link>
- 引入
import Link from 'next/link';

// ....

  <Link
    key={link.name}
    href={link.href}
    className="flex h-[48px] grow items-center justify-center gap-2 rounded-md bg-gray-50 p-3 text-sm font-medium hover:bg-sky-100 hover:text-blue-600 md:flex-none md:justify-start md:p-2 md:px-3"
  >
    <LinkIcon className="w-6" />
    <p className="hidden md:block">{link.name}</p>
  </Link>
此处,点击左侧的侧边栏,切换页面时,不会导致页面刷新
# 自动代码拆分和预取
- Next.js 会自动按路径分段对应用程序进行代码拆分。这与传统的 React SPA 不同,在传统的 React SPA 中,浏览器会在初始加载时加载所有应用程序代码。
- 按路由拆分代码意味着页面独立的。如果某个页面抛错误,应用程序的其余部分仍然可以工作。
- 此外,在生产中,只要
<Link>(opens new window) 组件出现在浏览器窗口中,Next.js 就会自动在后台预取链接路由的代码。当用户单击链接时,目标页面的代码已经加载,因此页面跳转几乎是即时的。
# 完善侧边栏 - 激活当前页面
需求:将当前页面的侧边栏页面按钮变为高亮显示
使用
usePathname()(opens new window) 函数可获取当前路径,这个函数需要在客户端使用编辑
/app/ui/dashboard/nav-links.tsx'use client';标记此组件为客户端组件- 引入
usePathname - 引入
clsx类名控制并配合 tailwind 样式
'use client'; // ... import { usePathname } from 'next/navigation'; import clsx from 'clsx'; export default function NavLinks() { const pathname = usePathname(); // ... className={clsx( 'flex h-[48px] grow items-center justify-center gap-2 rounded-md bg-gray-50 p-3 text-sm font-medium hover:bg-sky-100 hover:text-blue-600 md:flex-none md:justify-start md:p-2 md:px-3', { 'bg-sky-100 text-blue-600': pathname === link.href, }, )} // ... }- 这个过程中如果出现
Error: Unsupported Server Component type: undefined错误提示,需重新启动开发服务器。
# 配置数据库
# 创建数据库
- 注册 https://vercel.com/ (opens new window)
- 点击左上角名字
- 进入
stores页面 Postgres - Create- 名字随意
- 地区推荐
Singapore - (sin1)新加坡
- 创建后,点击页面中的
.env.local,复制备用
# 执行 SQL
回到项目
cp .env.example .env将上面复制
.env.local的内容,覆盖.env对应区域pnpm i @vercel/postgres:安装 postgres打开
/app/seed/route.ts将注释的代码放开,将下面的代码注释掉// return Response.json({ // message: // 'Uncomment this file and remove this line. You can delete this file when you are finished.', // });重新启动开发服务器
pnpm run dev页面提示
Database seeded successfully即为成功至此可删除或回滚
/app/seed/route.ts
# 查看数据库
- 打开 vercel 查看 Data 是否出现对应的表
- 执行 SQL 测试
SELECT invoices.amount, customers.name
FROM invoices
JOIN customers ON invoices.customer_id = customers.id
WHERE invoices.amount = 666;
# 获取数据
如何获取数据?
- 通过第三方 API 接口
- 从服务端 API 层获取,参考 Routing: Route Handlers | Next.js (opens new window)
# 使用服务器组件获取数据
默认情况下,Next.js 应用程序使用 React Server Components 。使用服务器组件获取数据是一种相对较新的方法,有以下好处:
- 服务器组件支持 Promise,为数据获取等异步任务提供更简单的解决方案。可以使用
async/await语法,而无需使用useEffect、useState或数据获取库。 - 服务器组件在服务器上执行,因此您可以将昂贵的数据获取和逻辑保留在服务器上,并且仅将结果发送到客户端。
- 如前所述,由于服务器组件在服务器上执行,因此您可以直接查询数据库,而无需额外的 API 层。
# 完善仪表板页面
/app/dashboard/page.tsx 覆盖:
import { Card } from '@/app/ui/dashboard/cards';
import RevenueChart from '@/app/ui/dashboard/revenue-chart';
import LatestInvoices from '@/app/ui/dashboard/latest-invoices';
import { lusitana } from '@/app/ui/fonts';

export default async function Page() {
  return (
    <main>
      <h1 className={`${lusitana.className} mb-4 text-xl md:text-2xl`}>
        Dashboard
      </h1>
      <div className="grid gap-6 sm:grid-cols-2 lg:grid-cols-4">
        {/* <Card title="Collected" value={totalPaidInvoices} type="collected" /> */}
        {/* <Card title="Pending" value={totalPendingInvoices} type="pending" /> */}
        {/* <Card title="Total Invoices" value={numberOfInvoices} type="invoices" /> */}
        {/* <Card
          title="Total Customers"
          value={numberOfCustomers}
          type="customers"
        /> */}
      </div>
      <div className="mt-6 grid grid-cols-1 gap-6 md:grid-cols-4 lg:grid-cols-8">
        {/* <RevenueChart revenue={revenue}  /> */}
        {/* <LatestInvoices latestInvoices={latestInvoices} /> */}
      </div>
    </main>
  );
}
页面是一个异步组件。这允许使用 await 获取数据。
# 获取 RevenueChart 数据
- 导入
fetchRevenue - 调用
fetchRevenue() - 去掉
<RevenueChart>注释
import { fetchRevenue } from '@/app/lib/data';

export default async function Page() {
  const revenue = await fetchRevenue();
  // ...
    <RevenueChart revenue={revenue}  />
    // ....
}
- 点击
<RevenueChart>进入/app/ui/dashboard/revenue-chart.tsx,去掉里面的注释
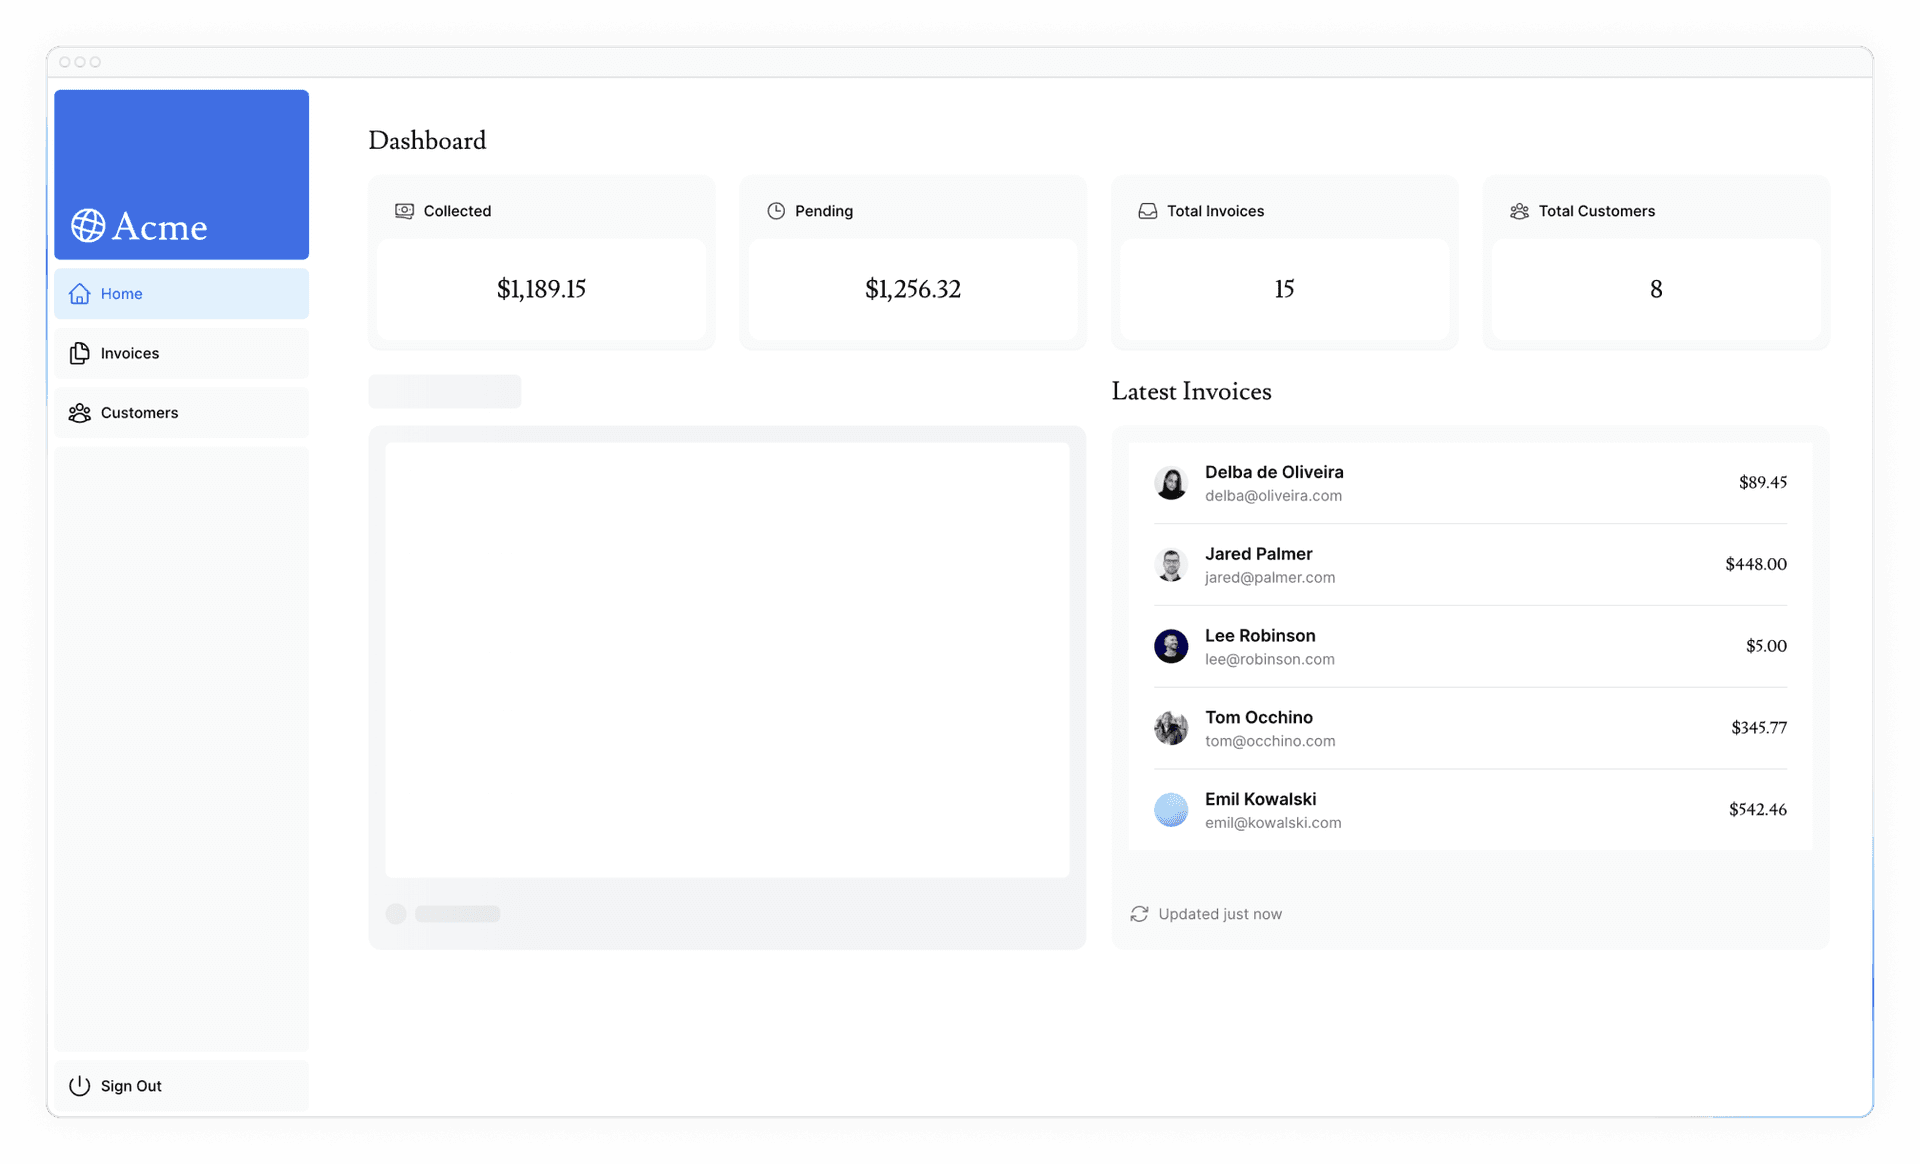
至此,http://localhost:3000/dashboard (opens new window) 出现 Recent Revenue 图标
# 获取 LatestInvoices 的数据
同理
import { fetchRevenue, fetchLatestInvoices } from '@/app/lib/data';


const latestInvoices = await fetchLatestInvoices();

<LatestInvoices latestInvoices={latestInvoices} />
# 获取 Card 组件的数据
- 项目已在
data.ts编写好fetchCardData()方法获取对应的数据,方法中使用了并行查询(同时查询 4 个 SQL)方法。 - 因此只需
const { totalPaidInvoices, totalPendingInvoices, numberOfInvoices, numberOfCustomers } = await fetchCardData();

// 去到card的注解
至此页面中,正常显示 4 个 Card 数据,但存在以下问题:
- 数据请求互相阻塞,形成请求瀑布。
- 默认情况下,Next.js 预渲染路由以提高性能,这称为静态渲染。因此,如果数据发生变化,它不会反映在仪表板中。
# 请求瀑布
“瀑布” 是指依赖于先前请求的完成的网络请求序列。在获取数据时,每个请求只有在前一个请求返回数据后才能开始。
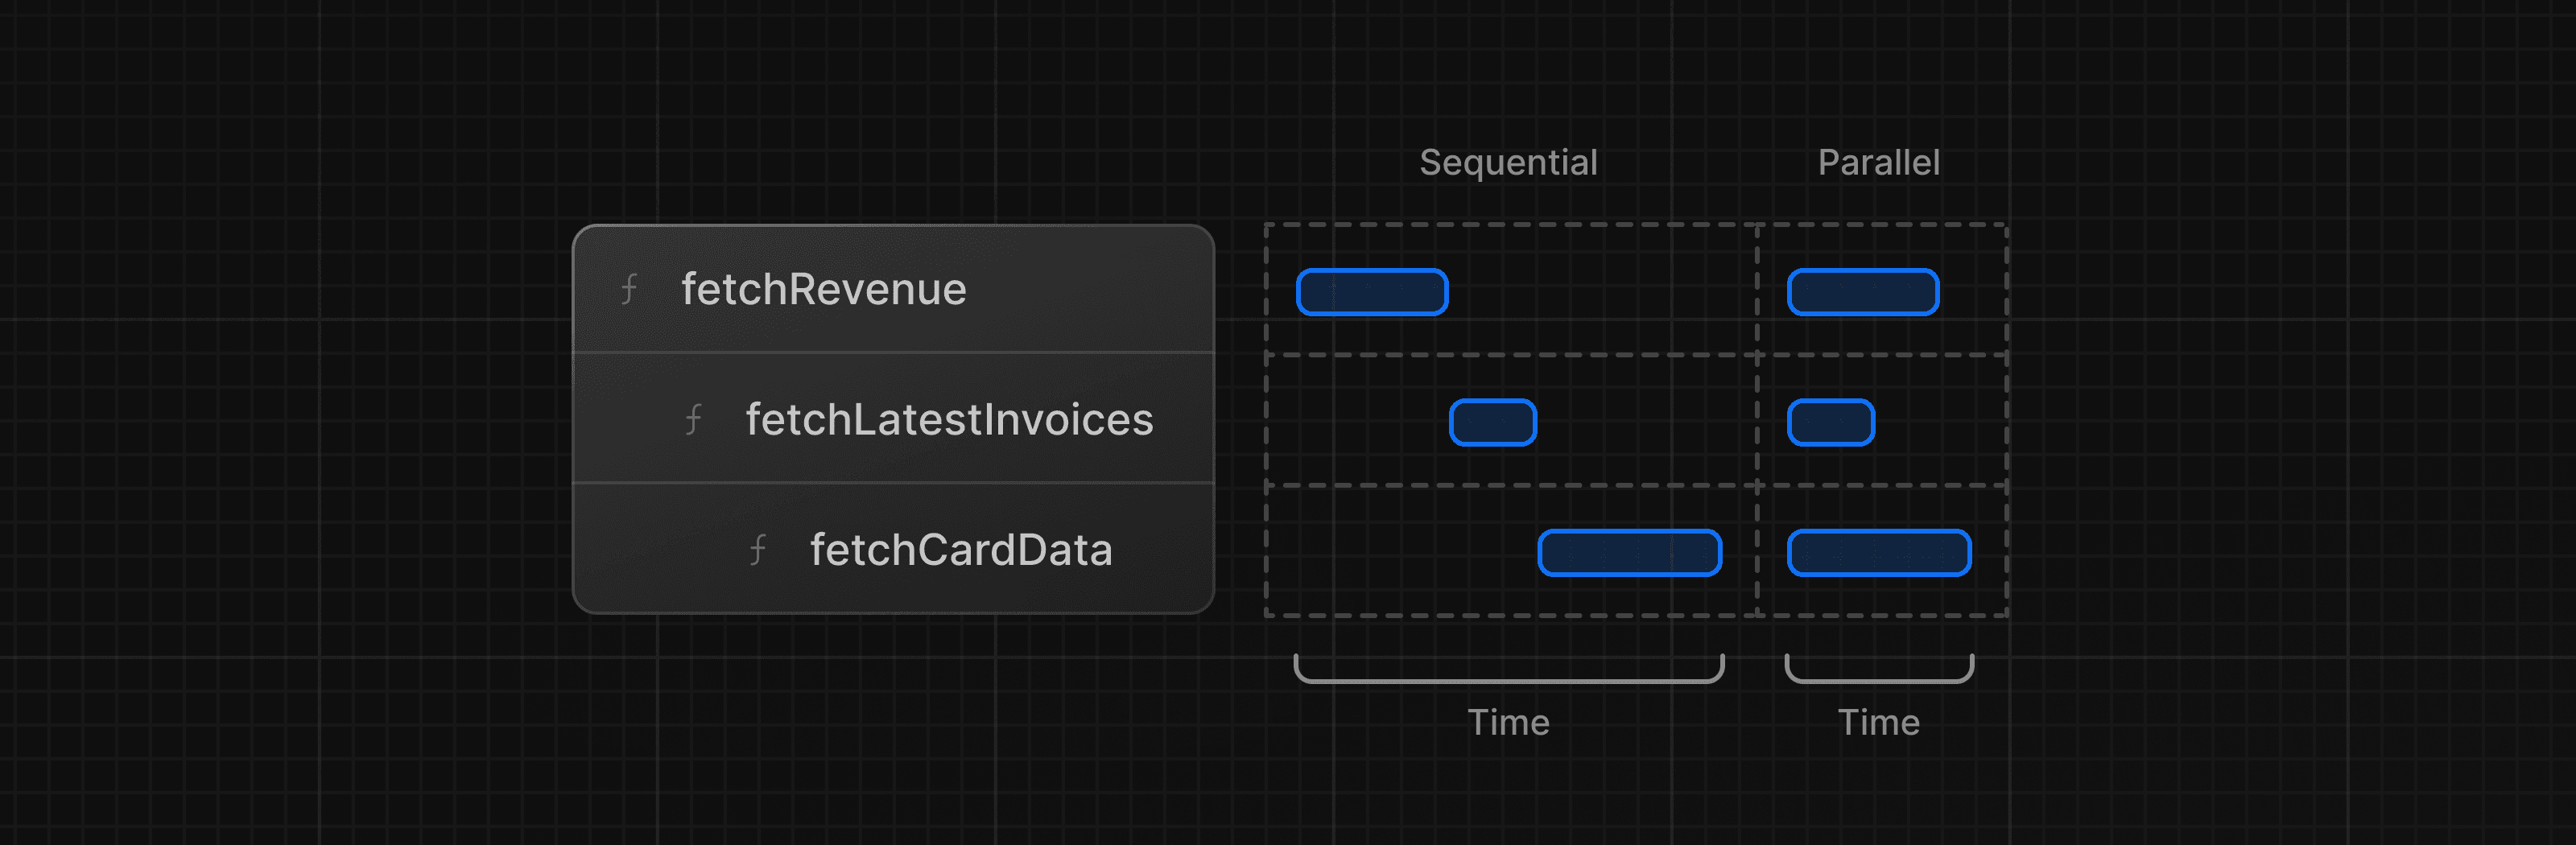
这种模式并不一定是坏的,当后一个请求依赖于前一个请求的返回时,就需要 “瀑布”。除此以外使用瀑布将会影响性能。
# 并行获取数据
在 JavaScript 中,您可以使用Promise.all() (opens new window) 或Promise.allSettled() (opens new window) 同时执行所有 Promise 的功能。
例如,在 data.ts 中,在 fetchCardData() 函数中使用 Promise.all()
缺点是如果其中一个 Promise 长时间无响应,就会导致其他 Promise 也无法返回。
# 静态和动态渲染
# 静态渲染
通过静态渲染,数据获取和渲染发生在构建时(部署时)或重新验证数据 (opens new window)时在服务器上。
每当用户访问您的应用程序时,就会提供缓存的结果。静态渲染有几个好处:
- 更快的网站 - 预渲染的内容可以缓存在 CDN。这可以确保世界各地的用户可以更快、更可靠地访问您网站的内容。
- 减少服务器负载 - 由于内容被缓存,服务器不必为每个用户请求动态生成内容。
- SEO - 预渲染的内容更容易让搜索引擎爬虫索引,因为内容在页面加载时就已经可用。这可以提高搜索引擎排名。
静态渲染对于没有数据或在用户之间共享数据的 UI 非常有用,例如静态博客文章或产品页面。它可能不太适合具有定期更新的个性化数据的仪表板。
# 动态渲染
通过动态渲染,内容会在请求时(当用户访问页面时)在服务器上为每个用户单独渲染。动态渲染有几个好处:
- 实时数据 - 动态渲染允许您的应用程序显示实时或经常更新的数据。这对于数据经常变化的应用程序来说是理想的选择。
- 用户特定的内容 - 更容易提供个性化内容(例如仪表板或用户配置文件),并根据用户交互更新数据。
- 请求时间信息 - 动态呈现允许您访问只能在请求时知道的信息,例如 cookie 或 URL 查询参数。
# 模拟缓慢获取数据
- 编辑
/app/lib/data.ts - 将
fetchRevenue()方法中的注释去掉 - 访问 http://localhost:3000/dashboard (opens new window),受定时器的影响,响应变得缓慢
# 流式传输
流式传输是一种数据传输技术,允许您将路由分解为更小的 “块”,并在准备就绪时将它们逐步从服务器流式传输到客户端。
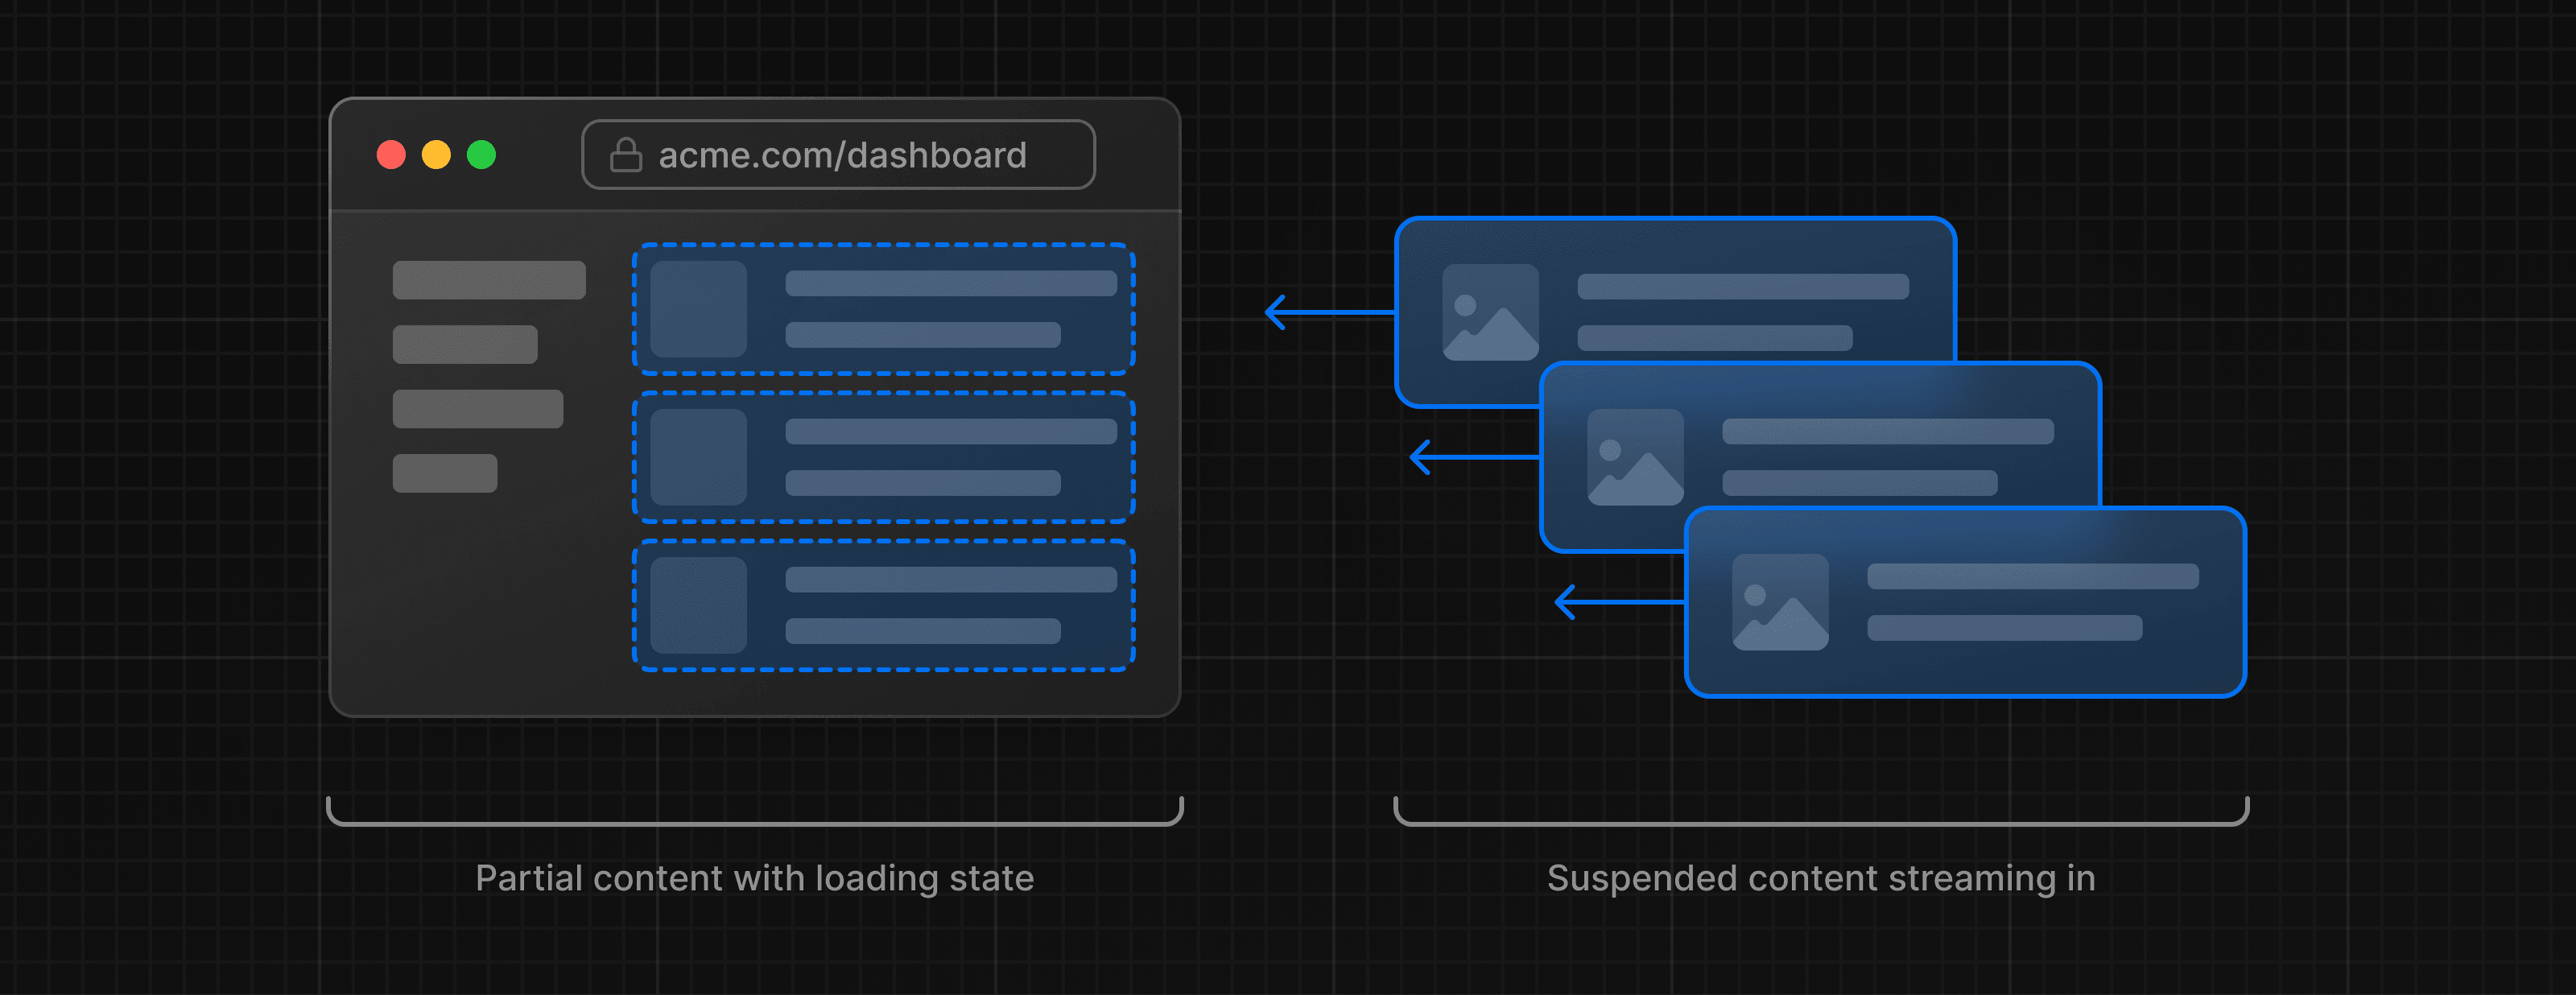
通过流式传输,可以防止缓慢的数据请求阻塞整个页面。这允许用户查看页面的部分内容并与之交互,而无需等待所有数据加载后再向用户显示任何 UI。
流式处理与 React 的组件模型配合得很好,因为每个组件都可以被视为一个块。
在 Next.js 中实现流式传输有两种方法:
- 在页面级别,使用
loading.tsx文件。 - 对于特定组件,使用
<Suspense>。
# 基于 loading.tsx 实现
使用 loading.tsx 流式传输整个页面
- 创建
/app/dashboard/loading.tsx
export default function Loading() {
  return <div>Loading...</div>;
}
访问 http://localhost:3000/dashboard (opens new window):
loading.tsx是一个基于 Suspense 构建的特殊 Next.js 文件,在页面内容加载时显示为loading.tsx的内容。- 由于
<SideNav>是静态的,因此会立即显示。加载动态内容时,用户可以与<SideNav>交互。 - 用户不必等待页面完成加载就可以离开(这称为可中断导航)。
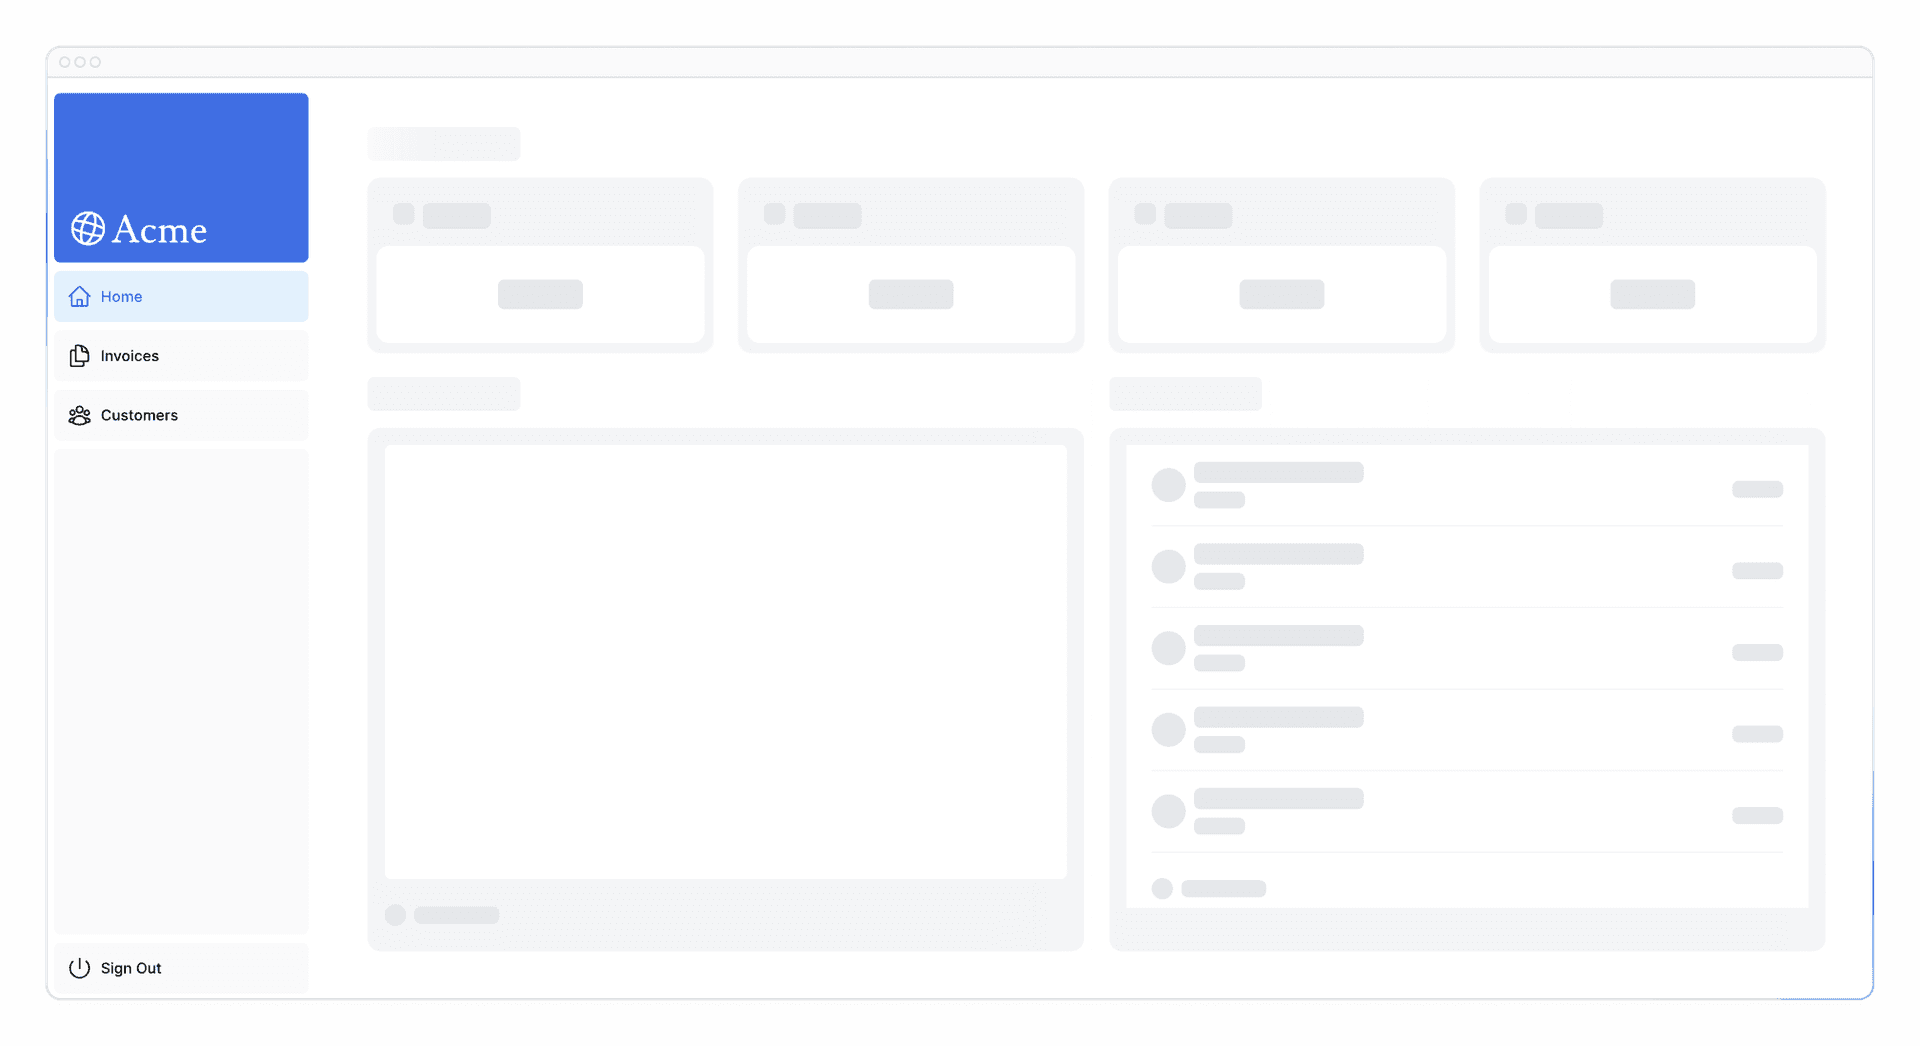
# 完善 loading 页面
- 示例准备了
app/ui/skeletons.tsx加载骨架页面 - 在
loading.tsx中引入使用
import DashboardSkeleton from '@/app/ui/skeletons';

export default function Loading() {
  return <DashboardSkeleton />;
}
# 修复路由组加载骨架错误
在侧边栏点击 Invoices 、 Customers 时也会出现上面的骨架(开发者工具开 3G 速率调试提高复现概率)
这原于: loading.tsx 的级别高于 /invoices/page.tsx 和 /customers/page.tsx ,因此它也适用于这些页面。
- 创建
/app/dashboard/(overview)文件夹 - 将
/app/dashboard文件夹下的loading.tsx、page.tsx放到(overview)文件夹中
笔记
- 通过将文件夹名称括在括号中来创建路由组,如:
(folderName) - 组织路由而不影响 URL 路径
- 即将同一作用域的文件放在同一个路由组中,上文中通过
overview路由组将dashboard overview页面单独出来,从而避免加载骨架作用于其他同路由下的页面
# 基于 Suspense 组件实现
在上面的场景中,之所以页面加载慢,是因为我们在 fetchRevenue() 在函数中添加了延迟代码,因此可以使用 Suspense 仅流式传输此组件并立即显示页面 UI 的其余部分,而不是阻塞整个页面。
# 流式传输 RevenueChart
编辑
/dashboard/(overview)/page.tsx- 删除:
const revenue = await fetchRevenue() // delete this line- 使用
<Suspense>组件包裹<RevenueChart />,并传递一个<RevenueChartSkeleton />作为加载骨架
import { Suspense } from 'react';
import { RevenueChartSkeleton } from '@/app/ui/skeletons';

// ...

<Suspense fallback={<RevenueChartSkeleton />}>
  <RevenueChart />
</Suspense>
点击
<RevenueChart />,进入编辑/app/ui/dashboard/revenue-chart.tsx- 删除 prop
revenue - 并在组件内获取
fetchRevenue()
import { fetchRevenue } from '@/app/lib/data'; // ... export default async function RevenueChart() { // Make component async, remove the props const revenue = await fetchRevenue(); // Fetch data inside the component- 删除 prop
# 流式传输 LatestInvoices
同理,略
<Suspense fallback={<LatestInvoicesSkeleton />}>
  <LatestInvoices />
</Suspense>
# 对组件进行分组
如果对每个 <Card> 组件单独使用 <Suspense> ,这可能会导致卡加载时出现弹出效果,因此将 4 个 Card 作为一组来流式传输或许是更好的办法(毕竟它们的数据也来源于同一个接口)。
编辑
/dashboard/(overview)/page.tsx- 删除所有
<Card>组件及上级<div> - 删除
fetchCardData() - 在原来
<Card>组件位置导入<CardWrapper /> - 并使用 ``<Suspense fallback={
}>` 包裹
<div className="grid gap-6 sm:grid-cols-2 lg:grid-cols-4"> <Suspense fallback={<CardsSkeleton />}> <CardWrapper /> </Suspense> </div>- 删除所有
点击
<CardWrapper />,进入编辑/app/ui/dashboard/cards.tsx- 去掉注释
- 导入
fetchCardData()
export default async function CardWrapper() {
  const {
    numberOfInvoices,
    numberOfCustomers,
    totalPaidInvoices,
    totalPendingInvoices,
  } = await fetchCardData();
    // ...
}
至此,所有卡片同时加载
什么时候使用 Suspense?
- 你希望用户在流式传输页面时如何体验页面。(全局 loading 还是局部 loading?)
- 你想优先处理哪些内容。
- 如果组件依赖于数据获取。
# 部分预渲染
# 静态与动态路由
对于当今构建的大多数 Web 应用程序,您可以为整个应用程序或特定路线选择静态和动态渲染。
在 Next.js 中,如果您在路由中调用动态函数 (opens new window)(例如查询数据库),则整个路由将变为动态。
然而,大多数路由并不是完全静态或动态的。
例如,考虑一个电子商务网站 (opens new window)。您可能希望静态呈现大部分产品信息页面,但您可能希望动态获取用户的购物车和推荐产品,这使您可以向用户显示个性化内容。
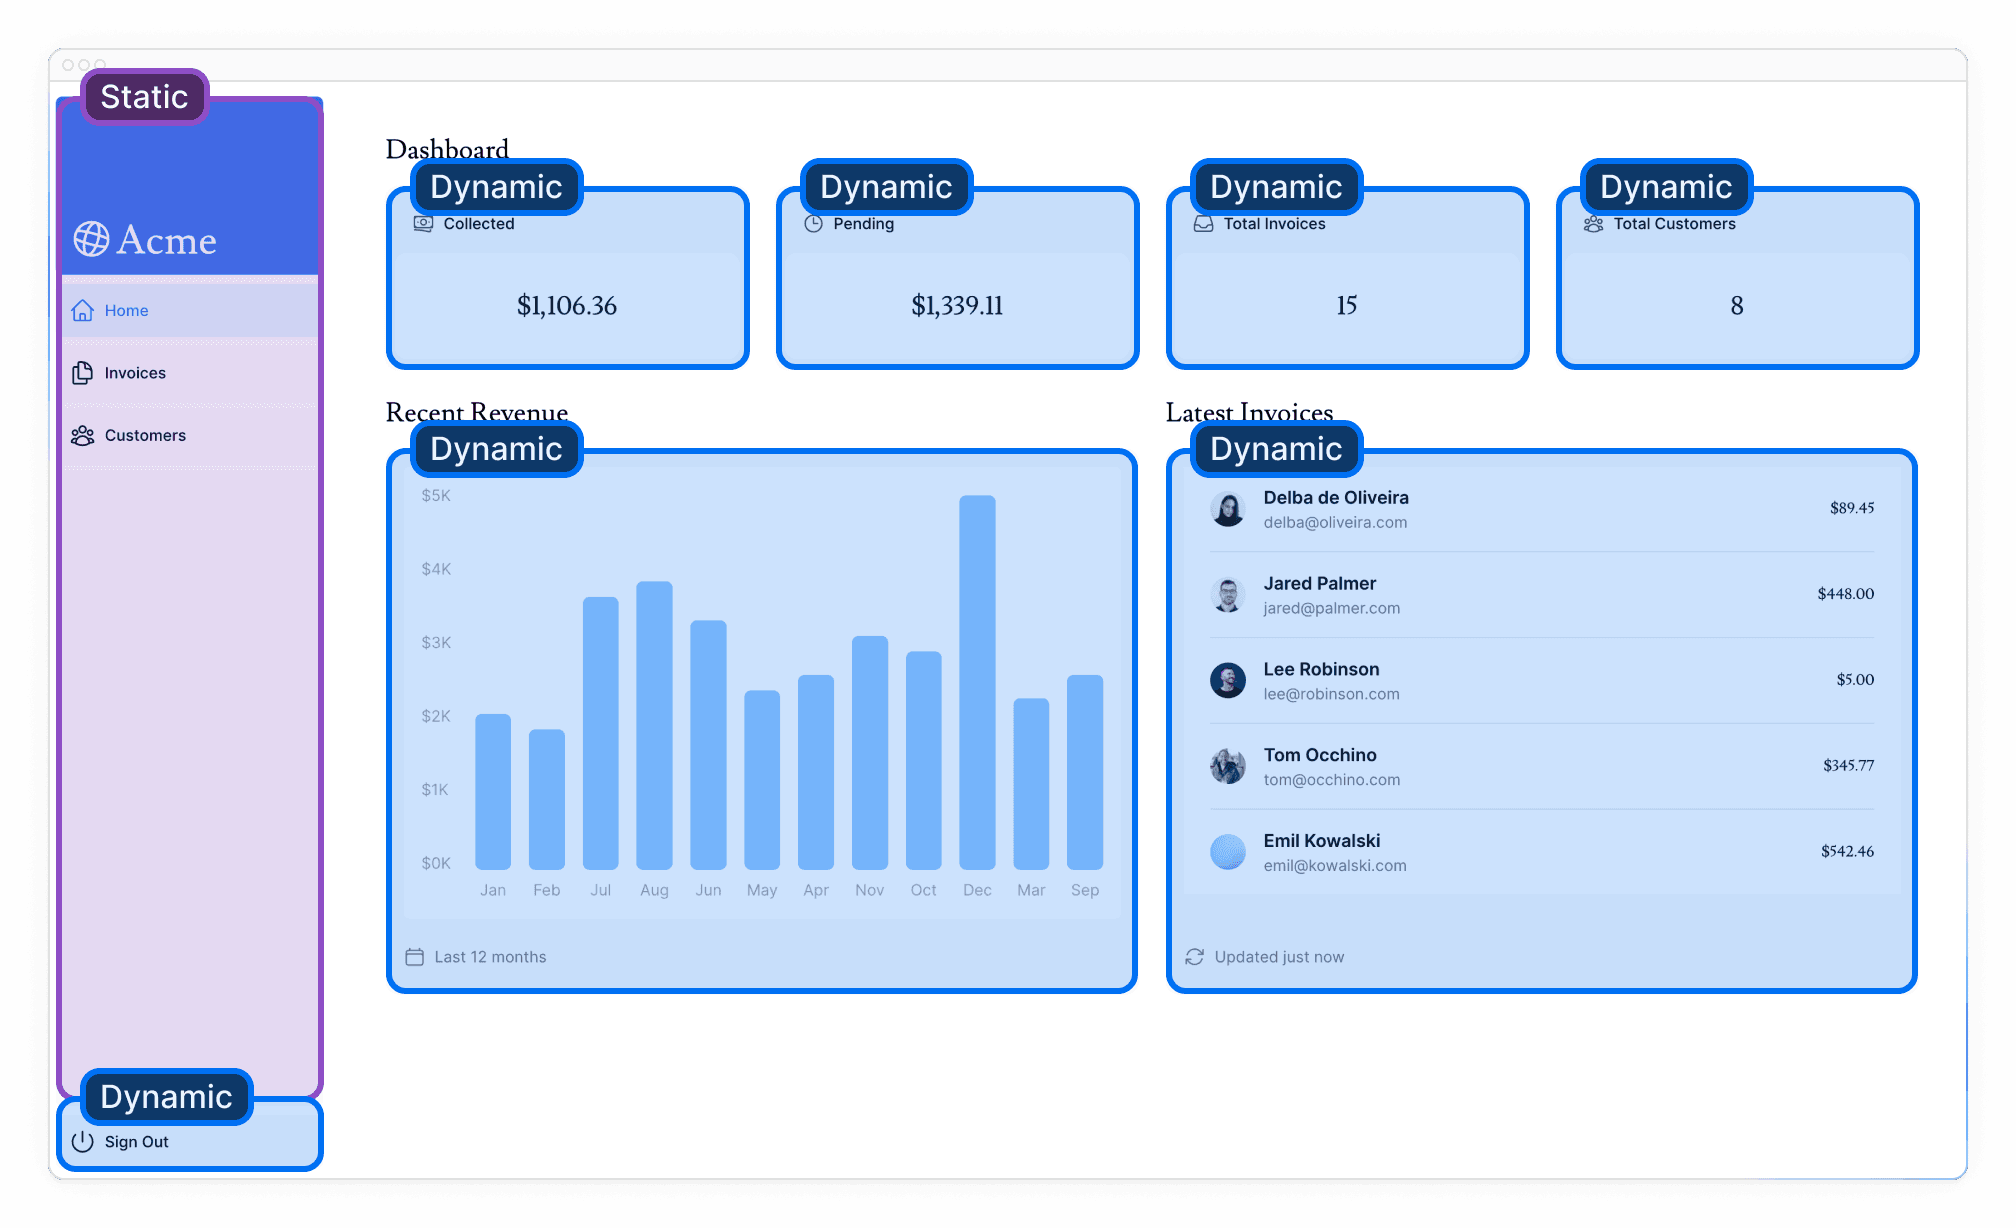
<SideNav>组件不依赖于数据,也不针对用户进行个性化,因此它可以是静态的。<Page>中的组件依赖于经常更改的数据,并将针对用户进行个性化设置,因此它们可以是动态的。
# 什么是部分预渲染?
Next.js 14 引入了部分预渲染(Partial Prerendering,PPR)的实验版本 - 一种新的渲染模型,允许您在同一路径中结合静态和动态渲染的优点。例如:
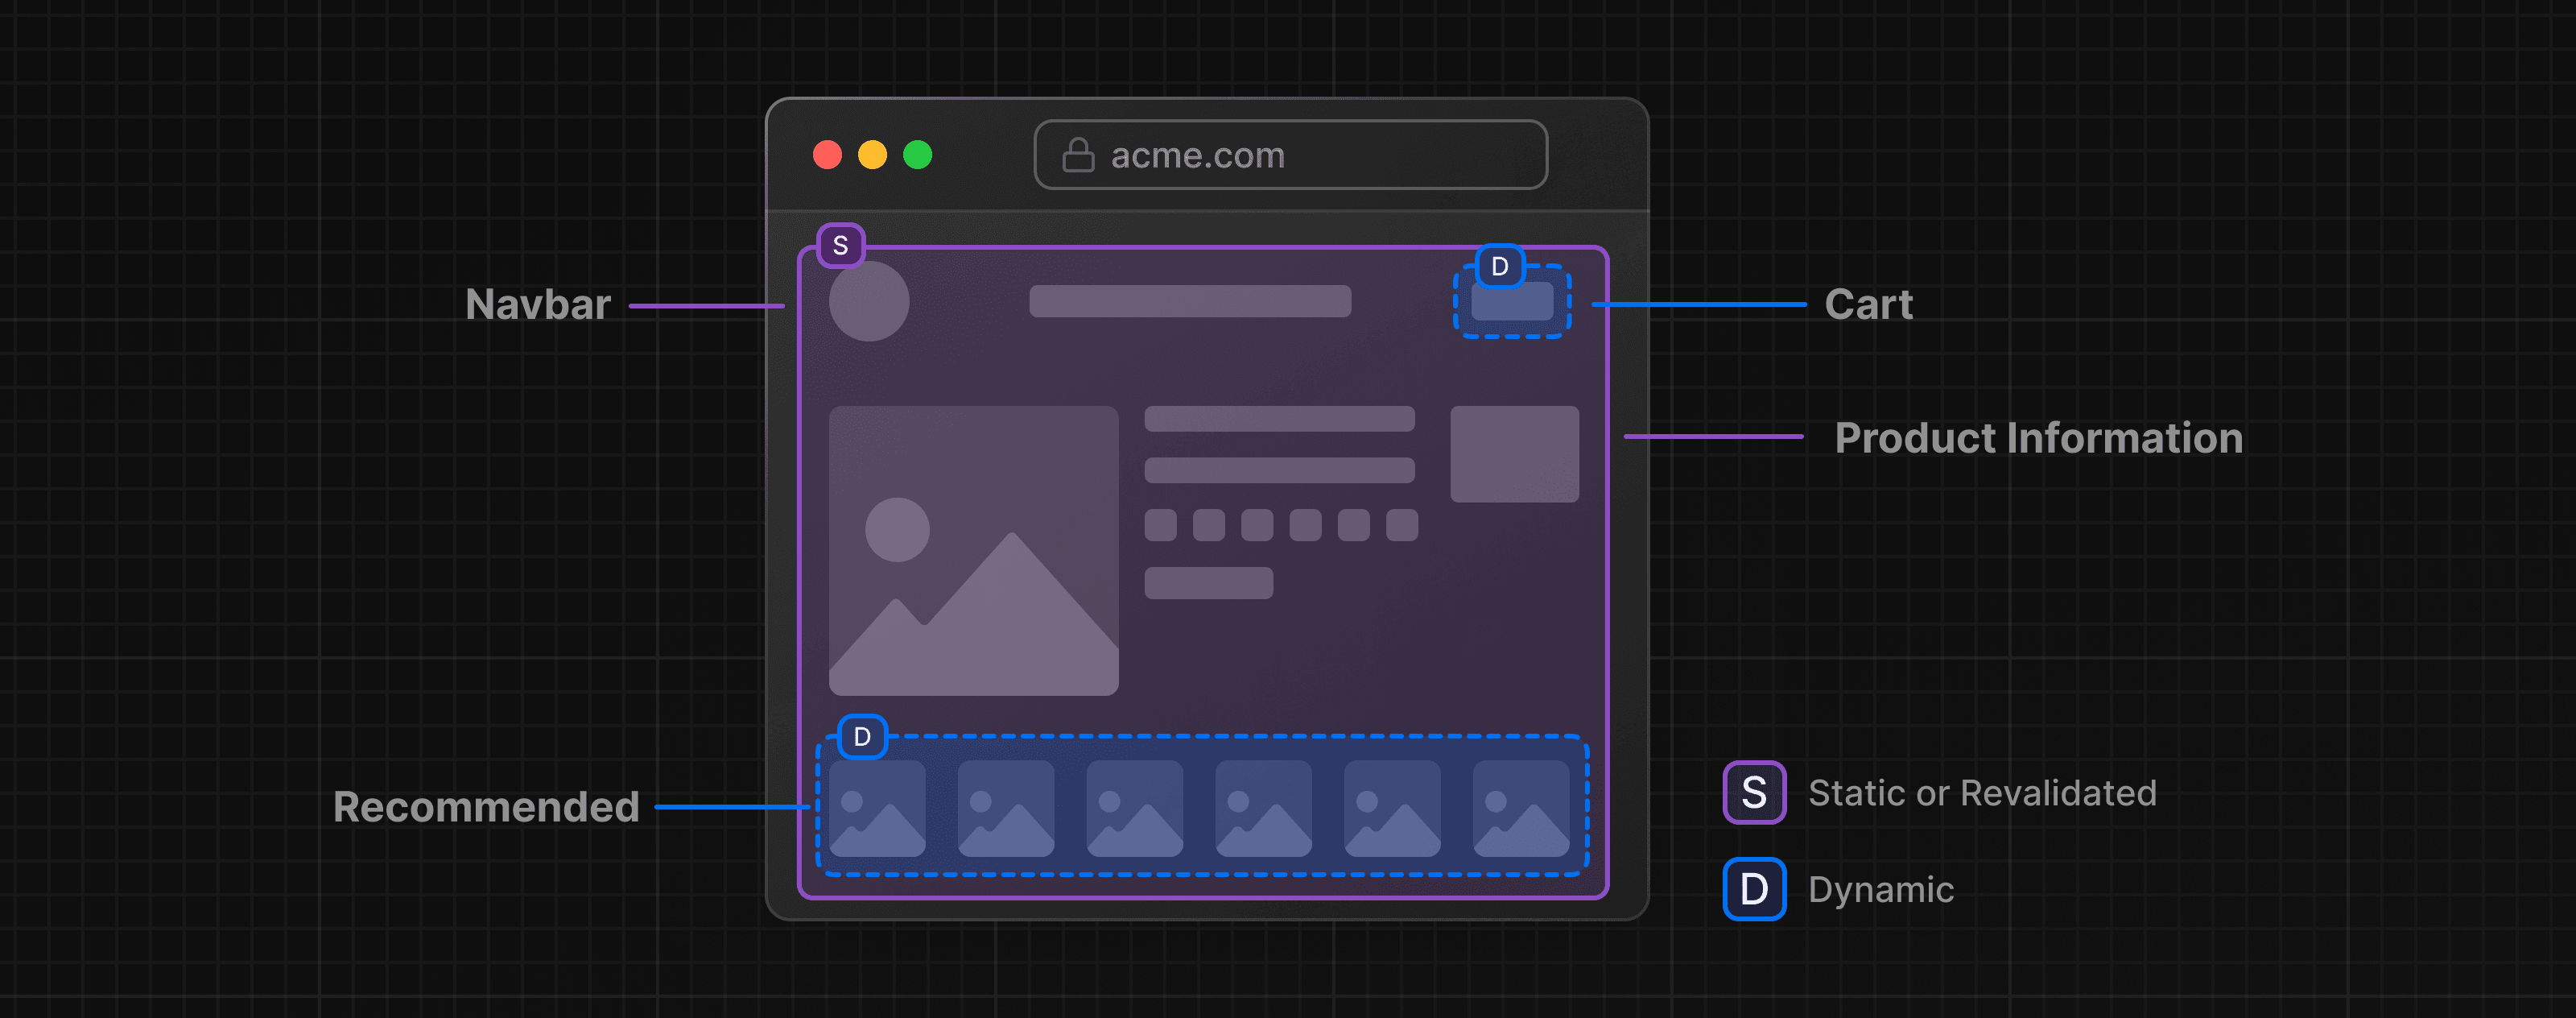
当用户访问一个路由时:
- 静态路由外壳包括导航栏和产品信息,可确保快速初始加载。
- 外壳会留下漏洞,动态内容(如购物车和推荐产品)会异步加载。
- 异步孔是并行流式传输的,从而缩短了页面的整体加载时间。
# 部分预渲染如何工作?
部分预渲染使用 React 的 Suspense 推迟应用程序的渲染部分,直到满足某些条件(例如加载数据)。
Suspense 回退与静态内容一起嵌入到初始 HTML 文件中。在构建时(或重新验证期间),静态内容被预渲染以创建静态 shell。动态内容的呈现被推迟,直到用户请求路线。
将组件包装在 Suspense 中并不会使组件本身变得动态,而是 Suspense 被用作静态和动态代码之间的边界。
# 实施部分预渲染
next.config.js Options: ppr | Next.js (opens new window)
编辑 next.config.mjs ,添加 ppr: 'incremental',
/** @type {import('next').NextConfig} */

const nextConfig = {
  experimental: {
    ppr: 'incremental',
  },
};

export default nextConfig;
编辑 /app/dashboard/layout.tsx ,添加 export const experimental_ppr = true;
import SideNav from '@/app/ui/dashboard/sidenav';

export const experimental_ppr = true;
就是这样。可能在开发中看不到应用程序的差异,但可以改进生产环境性能。 Next.js 将预渲染路由的静态部分,并推迟动态部分,直到用户请求它们。
# 添加搜索和分页
# 发票 (invoices) 页面代码
编辑 /app/dashboard/invoices/page.tsx ,官方已提供好模板:
import Pagination from '@/app/ui/invoices/pagination';
import Search from '@/app/ui/search';
import Table from '@/app/ui/invoices/table';
import { CreateInvoice } from '@/app/ui/invoices/buttons';
import { lusitana } from '@/app/ui/fonts';
import { InvoicesTableSkeleton } from '@/app/ui/skeletons';
import { Suspense } from 'react';

export default async function Page() {
  return (
    <div className="w-full">
      <div className="flex w-full items-center justify-between">
        <h1 className={`${lusitana.className} text-2xl`}>Invoices</h1>
      </div>
      <div className="mt-4 flex items-center justify-between gap-2 md:mt-8">
        <Search placeholder="Search invoices..." />
        <CreateInvoice />
      </div>
      {/*  <Suspense key={query + currentPage} fallback={<InvoicesTableSkeleton />}>
        <Table query={query} currentPage={currentPage} />
      </Suspense> */}
      <div className="mt-5 flex w-full justify-center">
        {/* <Pagination totalPages={totalPages} /> */}
      </div>
    </div>
  );
}
<Search/>:发票列表搜索栏<Pagination/>:发票列表分页<Table/>:发票列表
# 添加搜索功能
需要用到的 hook 函数:
useSearchParams:获取当前 URL 的查询参数。- 如:
/dashboard/invoices?page=1&query=pending返回:{page: '1', query: 'pending'}
- 如:
usePathname:获取当前 URL 的路径。- 如:对于路由
/dashboard/invoices, 返回'/dashboard/invoices'
- 如:对于路由
useRouter:路由跳转,参考:Functions: useRouter | Next.js (opens new window)router.replace(href: string, { scroll: boolean }):类似a标签,根据href跳转(浏览器跳转,而非 history)
# 获取用户输入的值
- 点击
<Search>,进入编辑 (/app/ui/search.tsx'use client';:说明是客户端组件,可以使用事件侦听器和 hook 函数
- 创建一个
handleSearch函数,在 inputonChange时调用
'use client';

import { MagnifyingGlassIcon } from '@heroicons/react/24/outline';

export default function Search({ placeholder }: { placeholder: string }) {
  function handleSearch(term: string) {
    console.log(term);
  }

  return (
    <div className="relative flex flex-1 flex-shrink-0">
      <label htmlFor="search" className="sr-only">
        Search
      </label>
      <input
        className="peer block w-full rounded-md border border-gray-200 py-[9px] pl-10 text-sm outline-2 placeholder:text-gray-500"
        placeholder={placeholder}
        onChange={(e) => {
          handleSearch(e.target.value);
        }}
      />
      <MagnifyingGlassIcon className="absolute left-3 top-1/2 h-[18px] w-[18px] -translate-y-1/2 text-gray-500 peer-focus:text-gray-900" />
    </div>
  );
}
- 打开浏览器控制台检查是否正常打印
# 使用查询参数更新 URL
URLSearchParams - Web APIs | MDN (opens new window)
需求:即在 URL 中追加查询参数,如:
http://.../dashboard/invoices
http://.../dashboard/invoices?query=lee
'use client';

import { usePathname, useRouter, useSearchParams } from 'next/navigation';

export default function Search() {
    // 1. 使用useSearchParams获取当前浏览器查询参数字符串
    const searchParams = useSearchParams();

    // 4. 获取当前浏览器路径
    const pathname = usePathname();
    // 5. 获取replace方法用于浏览器跳转
    const { replace } = useRouter();

    function handleSearch(term: string) {
        // 2. searchParams转换为URLSearchParams
        const params = new URLSearchParams(searchParams);

        // 3. 根据搜索词设置query参数
        if (term) {
            params.set('query', term);
        } else {
            params.delete('query');
        }

        // 6. 使用replace方法跳转到(追加查询参数)的新路径
        replace(`${pathname}?${params.toString()}`);
    }
    // ...
}
至此,当用户在搜索框输入关键字,就会触发跳转。但这里有个问题,用户每按一个字符都会触发一次跳转
# 保持 URL 与关键字同步
需求:即刷新浏览器后 URL 中的查询参数回显到搜索框中。
- 在 input 组件属性添加:
defaultValue={searchParams.get('query')?.toString()}
为什么是defaultValue而不是value?
defaultValue 是受控的,而 value 是非受控的,如果有使用状态管理,那么可以将 searchParams.get('query') 初始化到 value 对应的变量,来实现,但目前还没有使用状态管理,因此只能用 defaultValue
# 更新列表
需求:根据查询参数显示对应的列表结果
编辑
/app/dashboard/invoices/page.tsx- 组件 prop 接受一个
searchParams参数 - 将其传递到
Table(去掉注释)
import Pagination from '@/app/ui/invoices/pagination'; import Search from '@/app/ui/search'; import Table from '@/app/ui/invoices/table'; import { CreateInvoice } from '@/app/ui/invoices/buttons'; import { lusitana } from '@/app/ui/fonts'; import { Suspense } from 'react'; import { InvoicesTableSkeleton } from '@/app/ui/skeletons'; export default async function Page({ searchParams, }: { searchParams?: { query?: string; page?: string; }; }) { const query = searchParams?.query || ''; const currentPage = Number(searchParams?.page) || 1; return ( <div className="w-full"> <div className="flex w-full items-center justify-between"> <h1 className={`${lusitana.className} text-2xl`}>Invoices</h1> </div> <div className="mt-4 flex items-center justify-between gap-2 md:mt-8"> <Search placeholder="Search invoices..." /> <CreateInvoice /> </div> <Suspense key={query + currentPage} fallback={<InvoicesTableSkeleton />}> <Table query={query} currentPage={currentPage} /> </Suspense> <div className="mt-5 flex w-full justify-center"> {/* <Pagination totalPages={totalPages} /> */} </div> </div> ); }- 组件 prop 接受一个
笔记
如果导航到 <Table> 组件,将看到 query 和 currentPage 这两个属性被传递到 fetchFilteredInvoices() 函数,该函数返回与查询匹配的发票。
至此,页面出现了列表,并可以根据搜索参数显示不同的收税结果
# 防抖
需求:正如上面提及的,用户每按一个字符都会触发一次跳转(搜索),显然这不是所期望的,而应该是在他最后一次输入时,才跳转。
防抖原理:
- 触发事件:当发生应该防抖的事件(例如搜索框中的按键)时,计时器就会启动。
- 等待:如果在计时器到期之前发生新事件,则重置计时器。
- 执行:如果计时器到达倒计时结束,则执行防抖功能。
实现的方法有很多,也可以手动实现,这里使用 use-debounce 库的处理:
pnpm i use-debounce
编辑 /app/ui/search.tsx
// ...
import { useDebouncedCallback } from 'use-debounce';

// Inside the Search Component...
const handleSearch = useDebouncedCallback((term) => {
  console.log(`Searching... ${term}`);

  const params = new URLSearchParams(searchParams);
  if (term) {
    params.set('query', term);
  } else {
    params.delete('query');
  }
  replace(`${pathname}?${params.toString()}`);
}, 300);
使用 useDebouncedCallback 函数包裹原来的 handleSearch 函数,并在第二个参数 传递用户停止输入x毫秒 后执行
至此,检查浏览器 network,不再是每次输入都发送请求
# 添加分页
需求:URL 查询参数添加 page 用作表示第几页
- 官方已准备
fetchInvoicesPages函数,可根据查询参数返回总页数 - 编辑
/app/dashboard/invoices/page.tsx - 引入
fetchInvoicesPages函数 - 去掉
Pagination组件注释
// ...
import { fetchInvoicesPages } from '@/app/lib/data';

export default async function Page({
  searchParams,
}: {
  searchParams?: {
    query?: string,
    page?: string,
  },
}) {
  const query = searchParams?.query || '';
  const currentPage = Number(searchParams?.page) || 1;

  const totalPages = await fetchInvoicesPages(query);

  return (
    // ...
    <Pagination totalPages={totalPages} />
  );
}
- Pagination 组件,内部代码是被注释掉的
- 点击
<Pagination>,进入编辑/app/ui/invoices/pagination.tsx,去掉注释代码 - 根据标红提示可知,目前还缺少
createPageURL、currentPage
'use client';

import { usePathname, useSearchParams } from 'next/navigation';

export default function Pagination({ totalPages }: { totalPages: number }) {
    // 1. 获取当前浏览器路径
    const pathname = usePathname();
    // 2. 获取当前浏览器地址栏查询参数
    const searchParams = useSearchParams();
    // 3. 从查询参数中获取当前页码,如果没有则默认为 1
    const currentPage = Number(searchParams.get('page')) || 1;

    // 4. 生成追加page参数的URL
    const createPageURL = (pageNumber: number | string) => {
        const params = new URLSearchParams(searchParams);
        params.set('page', pageNumber.toString());
        return `${pathname}?${params.toString()}`;
      };
    // ...
}
至此,页面中的分页组件可正常使用;但存在一个问题,在非第 1 页时进行关键字搜索,搜索结果显示的时搜索前的分页,而非第 1 页
完善搜索功能
编辑 /app/ui/search.tsx ,添加 params.set('page', '1'); 确保每次搜索都回到第一页
  const handleSearch = useDebouncedCallback((term) => {
    const params = new URLSearchParams(searchParams);
    params.set('page', '1');
  }
# 修改数据
# 服务器操作
React Server Actions 允许直接在服务器上运行异步代码。它们消除了创建 API 端点来改变数据的需要。相反,您可以编写在服务器上执行的异步函数,并且可以从客户端或服务器组件调用。
服务器操作提供有效的安全解决方案,防止不同类型的攻击,保护数据并确保授权访问。
服务器操作通过 POST 请求、加密闭包、严格输入检查、错误消息散列和主机限制等技术来实现,可以显着增强应用程序的安全性。
# 表单
在 React 中,您可以使用 <form> 元素中的 action 属性来调用操作。该操作将自动接收本机 FormData (opens new window) 对象,包含捕获的数据。
// Server Component
export default function Page() {
  // Action
  async function create(formData: FormData) {
    'use server';

    // Logic to mutate data...
  }

  // Invoke the action using the "action" attribute
  return <form action={create}>...</form>;
}
在服务器组件中调用服务器操作的一个优点是即使客户端上禁用 JavaScript,表单也可以工作。(原生表单提交)
# Next.js
服务器操作还与 Next.js 缓存 (opens new window)深度集成。通过服务器操作提交表单时,您不仅可以使用该操作来更改数据,还可以使用 revalidatePath 和 revalidateTag 等 API 重新验证关联的缓存。
# 创建发票
# 前端 - 创建路由和页面
创建 /dashboard/invoices/create/page.tsx
import Form from '@/app/ui/invoices/create-form';
import Breadcrumbs from '@/app/ui/invoices/breadcrumbs';
import { fetchCustomers } from '@/app/lib/data';

export default async function Page() {
  const customers = await fetchCustomers();

  return (
    <main>
      <Breadcrumbs
        breadcrumbs={[
          { label: 'Invoices', href: '/dashboard/invoices' },
          {
            label: 'Create Invoice',
            href: '/dashboard/invoices/create',
            active: true,
          },
        ]}
      />
      <Form customers={customers} />
    </main>
  );
}
- 官方已提前准备了
<Form> - 访问 http://localhost:3000/dashboard/invoices/create (opens new window)
# 后端 - 创建控制器 (actions) 方法
创建
/app/lib/actions.ts:这类似于 MVC 模型中的 controller 控制器'use server';:文件中的所有导出函数标记为服务器操作,可以在客户端和服务器组件中导入和使用这些服务器功能
'use server';

export async function createInvoice(formData: FormData) {}
编辑
/app/ui/invoices/create-form.tsx:引入createInvoiceimport { customerField } from '@/app/lib/definitions'; import Link from 'next/link'; import { CheckIcon, ClockIcon, CurrencyDollarIcon, UserCircleIcon, } from '@heroicons/react/24/outline'; import { Button } from '@/app/ui/button'; import { createInvoice } from '@/app/lib/actions'; export default function Form({ customers, }: { customers: customerField[]; }) { return ( <form action={createInvoice}> // ... ) }
笔记
本质是还是 post 请求后端接口 /invoices/create (当前路径),只是现在更像是一个前后端不分离的项目,有别于以前纯服务器渲染的前后端不分离,现在变得更灵活,能静态就静态,不能静态得再动态。
# 后端 - 获取表单数据
当用户在浏览器提交表单时,就会请求到服务端 actions.ts 的 createInvoice
'use server';

export async function createInvoice(formData: FormData) {
  const rawFormData = {
    customerId: formData.get('customerId'),
    amount: formData.get('amount'),
    status: formData.get('status'),
  };
  // Test it out:
  console.log(rawFormData);
}
# 后端 - 验证表单
Zod | Documentation (opens new window)
这里使用 Zod 库来校验数据
'use server';

import { z } from 'zod';

const FormSchema = z.object({
  id: z.string(),
  customerId: z.string(),
  amount: z.coerce.number(), // amount强转number类型
  status: z.enum(['pending', 'paid']),  // 只接受两种字符串
  date: z.string(),
});

const CreateInvoice = FormSchema.omit({ id: true, date: true }); // 删除id,date

export async function createInvoice(formData: FormData) {
  const { customerId, amount, status } = CreateInvoice.parse({
    customerId: formData.get('customerId'),
    amount: formData.get('amount'),
    status: formData.get('status'),
  });

  // 金额转换为美分
  const amountInCents = amount * 100;
  // 创建一个格式为“YYYY-MM-DD”的当期日期
  const date = new Date().toISOString().split('T')[0];
}
至此,完成了基本的表单验证功能,但抛出的异常并没有友好处理,在下一节时讲到。
# 后端 - 数据插入数据库
import { sql } from '@vercel/postgres';

// ...

export async function createInvoice(formData: FormData) {
 // ....

  await sql`
    INSERT INTO invoices (customer_id, amount, status, date)
    VALUES (${customerId}, ${amountInCents}, ${status}, ${date})
  `;
}
# 后端 - 清除路径缓存
Next.js 有一个客户端路由器缓存 (opens new window)机制,可将路由段存储在用户浏览器中一段时间。与预取 (opens new window)一起,此缓存可确保用户可以在路由之间快速导航,同时减少向服务器发出的请求数量。
由于您要更新发票路由中显示的数据,因此您希望清除此缓存并向服务器触发新请求。您可以使用 Next.js 中的revalidatePath (opens new window) 函数来执行此操作:
/app/lib/actions.ts
// ...
import { revalidatePath } from 'next/cache';

// ...

export async function createInvoice(formData: FormData) {
	// ...
  await sql`
    INSERT INTO invoices (customer_id, amount, status, date)
    VALUES (${customerId}, ${amountInCents}, ${status}, ${date})
  `;

  revalidatePath('/dashboard/invoices');
}
# 后端 - 重定向
操作完成后,重定向回列表页: redirect('/dashboard/invoices');
'use server';

import { z } from 'zod';
import { sql } from '@vercel/postgres';
import { revalidatePath } from 'next/cache';
import { redirect } from 'next/navigation';

// ...

export async function createInvoice(formData: FormData) {
  // ...

  revalidatePath('/dashboard/invoices');
  redirect('/dashboard/invoices');
}
# 更新发票
Routing: Dynamic Routes | Next.js (opens new window)
编辑页面的路径一般为 /dashboard/invoices/{id}/edit
在 Next.js 种约定:通过将文件夹名称括在方括号 [] 中来创建动态分段,如 [id]
# 前端 - 创建路由和页面
因此编辑页面的路径为 /app/dashboard/invoices/[id]/edit/page.tsx
import Form from '@/app/ui/invoices/edit-form';
import Breadcrumbs from '@/app/ui/invoices/breadcrumbs';
import { fetchCustomers } from '@/app/lib/data';

export default async function Page({ params }: { params: { id: string } }) {
  const id = params.id;
    <main>
      <Breadcrumbs
        breadcrumbs={[
          { label: 'Invoices', href: '/dashboard/invoices' },
          {
            label: 'Edit Invoice',
            href: `/dashboard/invoices/${id}/edit`,
            active: true,
          },
        ]}
      />
      <Form invoice={invoice} customers={customers} />
    </main>
  );
}
页面组件接受 params 属性,使用它来读取 id 传参
# 前端 - 完善编辑按钮
官方在列表页准备的编辑按钮 <UpdateInvoice> 里的 Link 的 href 需要调整路径,传递 id:
/app/ui/invoices/buttons.tsx
export function UpdateInvoice({ id }: { id: string }) {
  return (
    <Link
      href={`/dashboard/invoices/${id}/edit`}
      className="rounded-md border p-2 hover:bg-gray-100"
    >
      <PencilIcon className="w-5" />
    </Link>
  );
}
# 前端 - 编辑页面获取数据
官方已经准备好 fetchInvoiceById 、 fetchCustomers 后端方法来分别获取发票详情、顾客列表,因此只需有在页面中引入即可:
/app/dashboard/invoices/[id]/edit/page.tsx
import Form from '@/app/ui/invoices/edit-form';
import Breadcrumbs from '@/app/ui/invoices/breadcrumbs';
import { fetchInvoiceById, fetchCustomers } from '@/app/lib/data';

export default async function Page({ params }: { params: { id: string } }) {
  const id = params.id;
  const [invoice, customers] = await Promise.all([
    fetchInvoiceById(id),
    fetchCustomers(),
  ]);
  // ...
}
至此,可以正常跳转到编辑页面,并能正常显示对应的信息
# 后端 - 创建控制器 (actions) 方法
创建一个 updateInvoice 控制器方法,用于接受处理,稍后前端提交的更新请求:
/app/lib/actions.ts
// Use Zod to update the expected types
const UpdateInvoice = FormSchema.omit({ id: true, date: true });

export async function updateInvoice(id: string, formData: FormData) {
  const { customerId, amount, status } = UpdateInvoice.parse({
    customerId: formData.get('customerId'),
    amount: formData.get('amount'),
    status: formData.get('status'),
  });

  const amountInCents = amount * 100;

  await sql`
    UPDATE invoices
    SET customer_id = ${customerId}, amount = ${amountInCents}, status = ${status}
    WHERE id = ${id}
  `;

  revalidatePath('/dashboard/invoices');
  redirect('/dashboard/invoices');
}
笔记
话说这段代码里的 FormSchema.omit({ id: true, date: true }) 中的 {id: true, date: true } 有意义吗?又没有把整个 FormData 丢进去,都是每个字段单独 get 的。
# 前端 - 提交更新请求
/app/ui/invoices/edit-form.tsx
// ...
import { updateInvoice } from '@/app/lib/actions';

export default function EditInvoiceForm({
  invoice,
  customers,
}: {
  invoice: InvoiceForm;
  customers: CustomerField[];
}) {
  const updateInvoiceWithId = updateInvoice.bind(null, invoice.id);

  return (
    <form action={updateInvoiceWithId}>
      <input type="hidden" name="id" value={invoice.id} />
    </form>
  );
}
传递 id 的方法有两种:
const updateInvoiceWithId = updateInvoice.bind(null, invoice.id);<input type="hidden" name="id" value={invoice.id} />(这段可以注释掉)
第二种做过前后端不分离的都懂,略。
这里着重讲一下第一种,js 的 bind 方法可以实现函数柯里化,不严谨的讲就是重载
// 原方法
function updateInvoice(id: string, formData: FormData)

const updateInvoiceWithId = updateInvoice.bind(null, invoice.id);
// 这操作,相当于把原方法的this改为null(本来也不是实例对象),第一个参数写死invoice.id
function updateInvoiceWithId(formData: FormData){
    return updateInvoice(invoice.id,formData)
}
# 删除发票
# 后端 - 创建控制器 (actions) 方法
/app/lib/actions.ts
export async function deleteInvoice(id: string) {
  await sql`DELETE FROM invoices WHERE id = ${id}`;
  revalidatePath('/dashboard/invoices');
}
由于操作是在 /dashboard/invoices 路径中调用的,因此不需要调用 redirect 。只需调用 revalidatePath 重新渲染列表即可。
# 前端 - 完善删除按钮
/app/ui/invoices/buttons.tsx
import { deleteInvoice } from '@/app/lib/actions';

// ...

export function DeleteInvoice({ id }: { id: string }) {
  const deleteInvoiceWithId = deleteInvoice.bind(null, id);

  return (
    <form action={deleteInvoiceWithId}>
      <button type="submit" className="rounded-md border p-2 hover:bg-gray-100">
        <span className="sr-only">Delete</span>
        <TrashIcon className="w-4" />
      </button>
    </form>
  );
}
笔记
看起来 next.js 的后端交互都是使用 form 表单来进行的
# 异常处理
# 使用 try/catch
将可能发生错误的代码用 try 包裹,如
export async function createInvoice(formData: FormData) {
  const { customerId, amount, status } = CreateInvoice.parse({
    customerId: formData.get('customerId'),
    amount: formData.get('amount'),
    status: formData.get('status'),
  });

  const amountInCents = amount * 100;
  const date = new Date().toISOString().split('T')[0];

  try {
    await sql`
      INSERT INTO invoices (customer_id, amount, status, date)
      VALUES (${customerId}, ${amountInCents}, ${status}, ${date})
    `;
  } catch (error) {
    return {
      message: 'Database Error: Failed to Create Invoice.',
    };
  }

  revalidatePath('/dashboard/invoices');
  redirect('/dashboard/invoices');
}
应在 try 块之外调用 redirect ,因为 redirect 是通过抛出错误来工作的
# 使用 error.tsx 处理所有错误
# 创建错误页面
创建 /dashboard/invoices/error.tsx
'use client';

import { useEffect } from 'react';

export default function Error({
  error,
  reset,
}: {
  error: Error & { digest?: string };
  reset: () => void;
}) {
  useEffect(() => {
    // Optionally log the error to an error reporting service
    console.error(error);
  }, [error]);

  return (
    <main className="flex h-full flex-col items-center justify-center">
      <h2 className="text-center">Something went wrong!</h2>
      <button
        className="mt-4 rounded-md bg-blue-500 px-4 py-2 text-sm text-white transition-colors hover:bg-blue-400"
        onClick={
          // Attempt to recover by trying to re-render the invoices route
          () => reset()
        }
      >
        Try again
      </button>
    </main>
  );
}
"use client":客户端组件- props
error:JavaScript 原生 Error 实例reset:重置错误边界的函数。执行时,该函数将尝试重新渲染路线段。
# 测试
在 deleteInvoice(id: string) 抛出一个异常
/app/lib/actions.ts
export async function deleteInvoice(id: string) {
  throw new Error('Failed to Delete Invoice');

  // .......
}
- 尝试在前端删除一条记录
# 使用 notFound 函数处理 404 错误
使用 notFound 函数细化错误类型,当用户访问一个不存在的资源时,使用 notFound(); 抛出,在使用 not-found.tsx 页面展示。
# 创建未找到页面
创建 /dashboard/invoices/[id]/edit/not-found.tsx
import Link from 'next/link';
import { FaceFrownIcon } from '@heroicons/react/24/outline';

export default function NotFound() {
  return (
    <main className="flex h-full flex-col items-center justify-center gap-2">
      <FaceFrownIcon className="w-10 text-gray-400" />
      <h2 className="text-xl font-semibold">404 Not Found</h2>
      <p>Could not find the requested invoice.</p>
      <Link
        href="/dashboard/invoices"
        className="mt-4 rounded-md bg-blue-500 px-4 py-2 text-sm text-white transition-colors hover:bg-blue-400"
      >
        Go Back
      </Link>
    </main>
  );
}
# 完善编辑页面
- 编辑
/dashboard/invoices/[id]/edit/page.tsx:当invoice不存在时,抛notFound
import { fetchInvoiceById, fetchCustomers } from '@/app/lib/data';
import { updateInvoice } from '@/app/lib/actions';
import { notFound } from 'next/navigation';

export default async function Page({ params }: { params: { id: string } }) {
  const id = params.id;
  const [invoice, customers] = await Promise.all([
    fetchInvoiceById(id),
    fetchCustomers(),
  ]);

  if (!invoice) {
    notFound();
  }

  // ...
}
# 测试
# 改善无障碍环境
# 使用 ESLint 辅助功能插件
这不是必须的,但它有助于捕获开发过程中的可访问性问题
# 代码检查
Next.js 包含eslint-plugin-jsx-a11y (opens new window) 在其 ESLint 配置中添加插件,以帮助及早发现可访问性问题。例如,如果您的图像没有 alt 文本、错误地使用 aria-* 和 role 属性等,此插件会发出警告。
/package.json :添加 "lint": "next lint"
"scripts": {
    "build": "next build",
    "dev": "next dev",
    "start": "next start",
    "lint": "next lint"
},
npm run lint
// 按指引安装ESlint
意外:
如果出现 Failed to load config "next/typescript" to extend from. 错误,需:
pnpm update [email protected]

// 再次执行
npm run lint
# 测试
/app/ui/invoices/table.tsx :删除 alt
<Image
  src={invoice.image_url}
  className="rounded-full"
  width={28}
  height={28}
  alt={`${invoice.name}'s profile picture`} // Delete this line
/>
再次扫描就会提示:
./app/ui/invoices/table.tsx
88:23  Warning: Image elements must have an alt prop, either with meaningful text, or an empty string for decorative images.  jsx-a11y/alt-text
# 表单校验
# 前端校验 - required 属性
将 required 属性添加到表单中的 <input> 和 <select> 元素来依赖浏览器提供(原生支持)的表单验证。例如:
/app/ui/invoices/create-form.tsx
<input
  id="amount"
  name="amount"
  type="number"
  placeholder="Enter USD amount"
  className="peer block w-full rounded-md border border-gray-200 py-2 pl-10 text-sm outline-2 placeholder:text-gray-500"
  required
/>
测试:http://localhost:3000/dashboard/invoices/create (opens new window) 提交一个空表单。
# 后端校验
完善基于 Zod 的表单校验功能,返回友好提示
/app/lib/actions.ts
- 校验规则
const FormSchema = z.object({
  id: z.string(),
  // customerId必须是string,不能为空
  customerId: z.string({
    // 如果customerId不是string,返回错误消息
    invalid_type_error: 'Please select a customer.',
  }),
  // amount强转(coerce)为(number),必须(大于)(0),否则返回(错误消息)
  amount: z.coerce
    .number()
    .gt(0, { message: 'Please enter an amount greater than $0.' }),
  // status必须是枚举('pending', 'paid')
  status: z.enum(['pending', 'paid'], {
    // 如果status不是枚举值,返回错误消息
    invalid_type_error: 'Please select an invoice status.',
  }),
  // dueDate必须是string
  date: z.string(),
});
- 定义一个
State类型 - 在
createInvoice入参中添加prevState: State,在后端代码中并不用到,但之后在前端中使用,只能理解是一种约定。
export type State = {
  errors?: {
    customerId?: string[];
    amount?: string[];
    status?: string[];
  };
  message?: string | null;
};

export async function createInvoice(prevState: State, formData: FormData) {
  // ...
}
- 将 Zod
parse()函数更改为safeParse()
export async function createInvoice(prevState: State, formData: FormData) {
  // Validate form fields using Zod
  const validatedFields = CreateInvoice.safeParse({
    customerId: formData.get('customerId'),
    amount: formData.get('amount'),
    status: formData.get('status'),
  });

  // 校验不通过,返回错误信息
  if (!validatedFields.success) {
    return {
      errors: validatedFields.error.flatten().fieldErrors,
      message: 'Missing Fields. Failed to Create Invoice.',
    };
  }

  // 校验通过,提取数据
  const { customerId, amount, status } = validatedFields.data;

  // ...
}
parse() 在校验过程中出现校验错误时,会抛出异常,因此需要用 try/catch 来捕获,而 safeParse() 则不会抛异常,而是通过返回值来得知校验结果。
数据库操作错误友好提示
- 将数据库操作的代码 try/catch 包裹,当出现错误时返回友好提示
  // ....
  try {
    await sql`
      INSERT INTO invoices (customer_id, amount, status, date)
      VALUES (${customerId}, ${amountInCents}, ${status}, ${date})
    `;
  } catch (error) {
    // If a database error occurs, return a more specific error.
    return {
      message: 'Database Error: Failed to Create Invoice.',
    };
  }

// ...
回到前端页面
useActionState – React 中文文档 (opens new window)
useActionState是一个可以根据某个表单动作的结果更新 state 的 Hook。
前端导入 useActionState 钩子函数:钩子函数只能在前端使用因此需要 "use client"
/app/ui/invoices/create-form.tsx
'use client';
// ...
import { createInvoice, State } from '@/app/lib/actions';
// 1. 导入 useActionState
import { useActionState } from 'react';

export default function Form({ customers }: { customers: CustomerField[] }) {
  // 2 定义一个错误信息的初始状态
  const initialState: State = { message: null, errors: {} };
  // 3. 使用 useActionState 传入 控制器方法createInvoice 和 initialState
  const [state, formAction] = useActionState(createInvoice, initialState);

  // 4. 在表单中使用 formAction 而不是 createInvoice
  return <form action={formAction}>...</form>;
}
useActionState :
- 入参:
(action, initialState),分别为控制器方法、 - 出参:
[state, formAction],分别为表单状态、提交表单调用的函数
<form action={formAction}>
  <div className="rounded-md bg-gray-50 p-4 md:p-6">
    {/* Customer Name */}
    <div className="mb-4">
      <label htmlFor="customer" className="mb-2 block text-sm font-medium">
        Choose customer
      </label>
      <div className="relative">
        <select
          id="customer"
          name="customerId"
          className="peer block w-full rounded-md border border-gray-200 py-2 pl-10 text-sm outline-2 placeholder:text-gray-500"
          defaultValue=""
          aria-describedby="customer-error"
        >
          <option value="" disabled>
            Select a customer
          </option>
          {customers.map((name) => (
            <option key={name.id} value={name.id}>
              {name.name}
            </option>
          ))}
        </select>
        <UserCircleIcon className="pointer-events-none absolute left-3 top-1/2 h-[18px] w-[18px] -translate-y-1/2 text-gray-500" />
      </div>
      <div id="customer-error" aria-live="polite" aria-atomic="true">
        {state.errors?.customerId &&
          state.errors.customerId.map((error: string) => (
            <p className="mt-2 text-sm text-red-500" key={error}>
              {error}
            </p>
          ))}
      </div>
    </div>
    // ...
  </div>
</form>
aria-describedby="customer-error":这会在select元素和错误消息容器之间建立关系。它表明id="customer-error"的容器描述了select元素。当用户与select框交互时,屏幕阅读器将阅读此描述以通知他们错误。aria-live="polite":当div内的错误更新时,屏幕阅读器应礼貌地通知用户。当内容更改时(例如,当用户更正错误时),屏幕阅读器将宣布这些更改,但仅在用户空闲时才进行,以免打断它们。
# 身份验证与授权
- 身份验证是为了确保用户是他们所说的人。您正在使用您拥有的用户名和密码等信息来证明您的身份。
- 授权是下一步。一旦用户的身份得到确认,授权就会决定他们可以使用应用程序的哪些部分。
# 创建登录页面
/app/login/page.tsx
import AcmeLogo from '@/app/ui/acme-logo';
import LoginForm from '@/app/ui/login-form';

export default function LoginPage() {
  return (
    <main className="flex items-center justify-center md:h-screen">
      <div className="relative mx-auto flex w-full max-w-[400px] flex-col space-y-2.5 p-4 md:-mt-32">
        <div className="flex h-20 w-full items-end rounded-lg bg-blue-500 p-3 md:h-36">
          <div className="w-32 text-white md:w-36">
            <AcmeLogo />
          </div>
        </div>
        <LoginForm />
      </div>
    </main>
  );
}
# 安装 NextAuth.js
Auth.js | Nextjs (opens new window)
pnpm i next-auth@beta
生成一个随机字符串
# your-secret-key
openssl rand -base64 32
存储到 /.env
AUTH_SECRET=your-secret-key
# 添加页面选项
创建 /auth.config.ts
import type { NextAuthConfig } from 'next-auth';

export const authConfig = {
  pages: {
    signIn: '/login',
  },
} satisfies NextAuthConfig;
可在 pages 配置自定义登录、注销和错误页面的路由,如这里配置了登录页的路由。
# 使用中间件保护路由
阻止非登录用户访问 dashboard 页面
- 编辑
/auth.config.ts
import type { NextAuthConfig } from 'next-auth';

export const authConfig = {
  pages: {
    signIn: '/login',
  },
  callbacks: {
    authorized({ auth, request: { nextUrl } }) {
      const isLoggedIn = !!auth?.user;
      const isOnDashboard = nextUrl.pathname.startsWith('/dashboard');
      if (isOnDashboard) {
        if (isLoggedIn) return true;
        return false; // Redirect unauthenticated users to login page
      } else if (isLoggedIn) {
        return Response.redirect(new URL('/dashboard', nextUrl));
      }
      return true;
    },
  },
  providers: [], // Add providers with an empty array for now
} satisfies NextAuthConfig;
authorized 回调用于验证请求是否有权通过 Next.js Middleware (opens new window) 访问页面。它在请求完成之前调用,并接收具有 auth 和 request 属性的对象。 auth 属性包含用户的会话, request 属性包含传入的请求。
providers 选项是一个数组,您可以在其中列出不同的登录选项。目前,它是一个空数组以满足 NextAuth 配置。您将在添加凭据提供程序 (opens new window)部分了解更多相关信息。
- 创建
/middleware.ts
import NextAuth from 'next-auth';
import { authConfig } from './auth.config';

export default NextAuth(authConfig).auth;

export const config = {
  // https://nextjs.org/docs/app/building-your-application/routing/middleware#matcher
  matcher: ['/((?!api|_next/static|_next/image|.*\\.png$).*)'],
};
在这里,您使用 authConfig 对象初始化 NextAuth.js 并导出 auth 属性。您还使用中间件中的 matcher 选项来指定它应该在特定路径上运行。
使用中间件执行此任务的优点是,在中间件验证身份验证之前,受保护的路由甚至不会开始渲染,从而增强应用程序的安全性和性能。
# 密码散列
存储在数据库的密码不应使用明文存储,而是加密存储,这样即便数据库被脱库,也无法直接读取到用户的明文密码。
- 创建
/auth.ts
import NextAuth from 'next-auth';
import { authConfig } from './auth.config';

export const { auth, signIn, signOut } = NextAuth({
  ...authConfig,
});
# 添加凭证提供者
在 NextAuth.js 添加 providers 选项。 providers 是一个数组,您可以在其中列出不同的登录选项,例如 Google 或 GitHub。在本课程中,我们将重点关注使用凭证提供程序 (opens new window)仅有的。
/auth.ts
import NextAuth from 'next-auth';
import { authConfig } from './auth.config';
import Credentials from 'next-auth/providers/credentials';

export const { auth, signIn, signOut } = NextAuth({
  ...authConfig,
  providers: [Credentials({})],
});
# 添加登录功能
/auth.ts
import NextAuth from 'next-auth';
import Credentials from 'next-auth/providers/credentials';
import { authConfig } from './auth.config';
import { z } from 'zod';
import { sql } from '@vercel/postgres';
import type { User } from '@/app/lib/definitions';
import bcrypt from 'bcrypt';

// 从数据库中获取用户
async function getUser(email: string): Promise<User | undefined> {
  try {
    const user = await sql < User > `SELECT * FROM users WHERE email=${email}`;
    return user.rows[0];
  } catch (error) {
    console.error('Failed to fetch user:', error);
    throw new Error('Failed to fetch user.');
  }
}

export const { auth, signIn, signOut } = NextAuth({
  ...authConfig,
  providers: [
    Credentials({
      // 1. authorize函数处理身份验证逻辑
      async authorize(credentials) {
        // 2. 表单校验器
        const parsedCredentials = z
          .object({ email: z.string().email(), password: z.string().min(6) })
          .safeParse(credentials);


        if (parsedCredentials.success) {
          // 表单校验成功,从数据库中获取用户
          const { email, password } = parsedCredentials.data;
          const user = await getUser(email);
          if (!user) return null;
          // 检查密码是否匹配
          const passwordsMatch = await bcrypt.compare(password, user.password);
          // 匹配成功,返回用户
          if (passwordsMatch) return user;
        }

        // 表单校验失败 || 用户不存在 || 密码不匹配
        console.log('Invalid credentials');
        return null;
      },
    }),
  ],
});
# 更新登录表单
定义一个控制器方法 authenticate
/app/lib/actions.ts
'use server';

import { signIn } from '@/auth';
import { AuthError } from 'next-auth';

// ...

export async function authenticate(
  prevState: string | undefined,
  formData: FormData,
) {
  try {
    await signIn('credentials', formData);
  } catch (error) {
    if (error instanceof AuthError) {
      switch (error.type) {
        case 'CredentialsSignin':
          return 'Invalid credentials.';
        default:
          return 'Something went wrong.';
      }
    }
    throw error;
  }
}
/app/ui/login-form.tsx
'use client';

import { lusitana } from '@/app/ui/fonts';
import {
  AtSymbolIcon,
  KeyIcon,
  ExclamationCircleIcon,
} from '@heroicons/react/24/outline';
import { ArrowRightIcon } from '@heroicons/react/20/solid';
import { Button } from '@/app/ui/button';
import { useActionState } from 'react';
import { authenticate } from '@/app/lib/actions';

export default function LoginForm() {
  const [errorMessage, formAction, isPending] = useActionState(
    authenticate,
    undefined,
  );

  return (
    <form action={formAction} className="space-y-3">
      <div className="flex-1 rounded-lg bg-gray-50 px-6 pb-4 pt-8">
        <h1 className={`${lusitana.className} mb-3 text-2xl`}>
          Please log in to continue.
        </h1>
        <div className="w-full">
          <div>
            <label
              className="mb-3 mt-5 block text-xs font-medium text-gray-900"
              htmlFor="email"
            >
              Email
            </label>
            <div className="relative">
              <input
                className="peer block w-full rounded-md border border-gray-200 py-[9px] pl-10 text-sm outline-2 placeholder:text-gray-500"
                id="email"
                type="email"
                name="email"
                placeholder="Enter your email address"
                required
              />
              <AtSymbolIcon className="pointer-events-none absolute left-3 top-1/2 h-[18px] w-[18px] -translate-y-1/2 text-gray-500 peer-focus:text-gray-900" />
            </div>
          </div>
          <div className="mt-4">
            <label
              className="mb-3 mt-5 block text-xs font-medium text-gray-900"
              htmlFor="password"
            >
              Password
            </label>
            <div className="relative">
              <input
                className="peer block w-full rounded-md border border-gray-200 py-[9px] pl-10 text-sm outline-2 placeholder:text-gray-500"
                id="password"
                type="password"
                name="password"
                placeholder="Enter password"
                required
                minLength={6}
              />
              <KeyIcon className="pointer-events-none absolute left-3 top-1/2 h-[18px] w-[18px] -translate-y-1/2 text-gray-500 peer-focus:text-gray-900" />
            </div>
          </div>
        </div>
        <Button className="mt-4 w-full" aria-disabled={isPending}>
          Log in <ArrowRightIcon className="ml-auto h-5 w-5 text-gray-50" />
        </Button>
        <div
          className="flex h-8 items-end space-x-1"
          aria-live="polite"
          aria-atomic="true"
        >
          {errorMessage && (
            <>
              <ExclamationCircleIcon className="h-5 w-5 text-red-500" />
              <p className="text-sm text-red-500">{errorMessage}</p>
            </>
          )}
        </div>
      </div>
    </form>
  );
}
# 添加注销功能
/ui/dashboard/sidenav.tsx
import Link from 'next/link';
import NavLinks from '@/app/ui/dashboard/nav-links';
import AcmeLogo from '@/app/ui/acme-logo';
import { PowerIcon } from '@heroicons/react/24/outline';
import { signOut } from '@/auth';

export default function SideNav() {
  return (
    <div className="flex h-full flex-col px-3 py-4 md:px-2">
      // ...
      <div className="flex grow flex-row justify-between space-x-2 md:flex-col md:space-x-0 md:space-y-2">
        <NavLinks />
        <div className="hidden h-auto w-full grow rounded-md bg-gray-50 md:block"></div>
        <form
          action={async () => {
            'use server';
            await signOut();
          }}
        >
          <button className="flex h-[48px] grow items-center justify-center gap-2 rounded-md bg-gray-50 p-3 text-sm font-medium hover:bg-sky-100 hover:text-blue-600 md:flex-none md:justify-start md:p-2 md:px-3">
            <PowerIcon className="w-6" />
            <div className="hidden md:block">Sign Out</div>
          </button>
        </form>
      </div>
    </div>
  );
}
# 测试
[email protected]
123456
# 元数据
在 Web 开发中,元数据提供有关网页的其他详细信息。访问该页面的用户看不到元数据。相反,它在幕后工作,嵌入到页面的 HTML 中,通常在 <head> 元素中。这些隐藏信息对于搜索引擎和其他需要更好地了解网页内容的系统至关重要。
元数据在增强网页的搜索引擎优化方面发挥着重要作用,使搜索引擎和社交媒体平台更容易访问和理解网页。适当的元数据可以帮助搜索引擎有效地对网页进行索引,从而提高其在搜索结果中的排名。
# 元数据的类型
标题元数据:负责显示在浏览器选项卡上的网页标题。这对于搜索引擎优化至关重要,因为它可以帮助搜索引擎了解网页的内容。
<title>Page Title</title>
描述元数据:此元数据提供网页内容的简要概述,通常显示在搜索引擎结果中。
<meta name="description" content="A brief description of the page content." />
关键字元数据:此元数据包括与网页内容相关的关键字,帮助搜索引擎索引页面。
<meta name="keywords" content="keyword1, keyword2, keyword3" />
开放图谱元数据:此元数据增强了网页在社交媒体平台上共享时的表示方式,提供标题、描述和预览图像等信息。
<meta property="og:title" content="Title Here" />
<meta property="og:description" content="Description Here" />
<meta property="og:image" content="image_url_here" />
网站图标元数据:此元数据将网站图标(小图标)链接到网页,显示在浏览器的地址栏或选项卡中。
<link rel="icon" href="path/to/favicon.ico" />
# 添加元数据
Next.js 有一个元数据 API,可用于定义应用程序元数据。您可以通过两种方式将元数据添加到应用程序中:
基于配置:在
layout.js或page.js文件中导出静态元metadata对象 (opens new window)或动态generateMetadata函数 (opens new window)。基于文件:Next.js 有一系列专门用于元数据目的的特殊文件:
favicon.ico、apple-icon.jpg和icon.jpg:用于 favicon 和图标opengraph-image.jpg和twitter-image.jpg:用于社交媒体图像robots.txt:提供搜索引擎抓取的说明sitemap.xml:提供有关网站结构的信息
通过这两个选项,Next.js 将自动为您的页面生成相关的 <head> 元素。
# 网站图标和开放图谱图像
在 /public 文件夹中,您会注意到有两个图像: favicon.ico 和 opengraph-image.jpg 。
将这些图像移至 /app 文件夹的根目录。
完成此操作后,Next.js 将自动识别并使用这些文件作为您的网站图标和 OG 图像。您可以通过在开发工具中检查应用程序的 <head> 元素来验证这一点。
# 页面标题和描述
您还可以包含任何 layout.js 或 page.js 文件中的metadata 对象 (opens new window),以添加其他页面信息,例如标题和描述。 layout.js 中的任何元数据都将被使用它的所有页面继承。
在根布局中,创建一个包含以下字段的新元 metadata 对象:
编辑 /app/layout.tsx
import { Metadata } from 'next';

export const metadata: Metadata = {
  title: 'Acme Dashboard',
  description: 'The official Next.js Course Dashboard, built with App Router.',
  metadataBase: new URL('https://next-learn-dashboard.vercel.sh'),
};

export default function RootLayout() {
  // ...
}
Next.js 会自动将标题和元数据添加到您的应用程序中。
但是,如果您想为特定页面添加自定义标题怎么办?您可以通过向页面本身添加 metadata 对象来完成此操作。嵌套页面中的元数据将覆盖父级中的元数据。
例如,在 /dashboard/invoices 页面中,您可以更新页面标题:
编辑 /app/dashboard/invoices/page.tsx
import { Metadata } from 'next';

export const metadata: Metadata = {
  title: 'Invoices | Acme Dashboard',
};
# 元数据模板
/app/layout.tsx
import { Metadata } from 'next';

export const metadata: Metadata = {
  title: {
    template: '%s | Acme Dashboard',
    default: 'Acme Dashboard',
  },
  description: 'The official Next.js Learn Dashboard built with App Router.',
  metadataBase: new URL('https://next-learn-dashboard.vercel.sh'),
};
/app/dashboard/invoices/page.tsx
export const metadata: Metadata = {
  title: 'Invoices',
};
导航到 /dashboard/invoices 页面并检查 <head> 元素。您应该看到页面标题现在是 Invoices | Acme Dashboard 。