 基于Tailscale实现的云组网
# 前言
在使用 WireGuard 一段时间后,存在痛点是配置麻烦、对动态公网 IP 不友好。如下图中地区 1 拥有动态公网 IP,但公网 IP 切换后,其他客户端需要重启客户端才可以连接上,体验不佳,因此使用有固定公网 IP 的中转服务器中转,但这带来的问题就是,地区 2 的设备在读取地区 1 的数据时,将受限于中转服务器的带宽,最多只能是 min(中转服务器上行,中转服务器下行) ,使得地区 1 的带宽不能发挥最大效益。
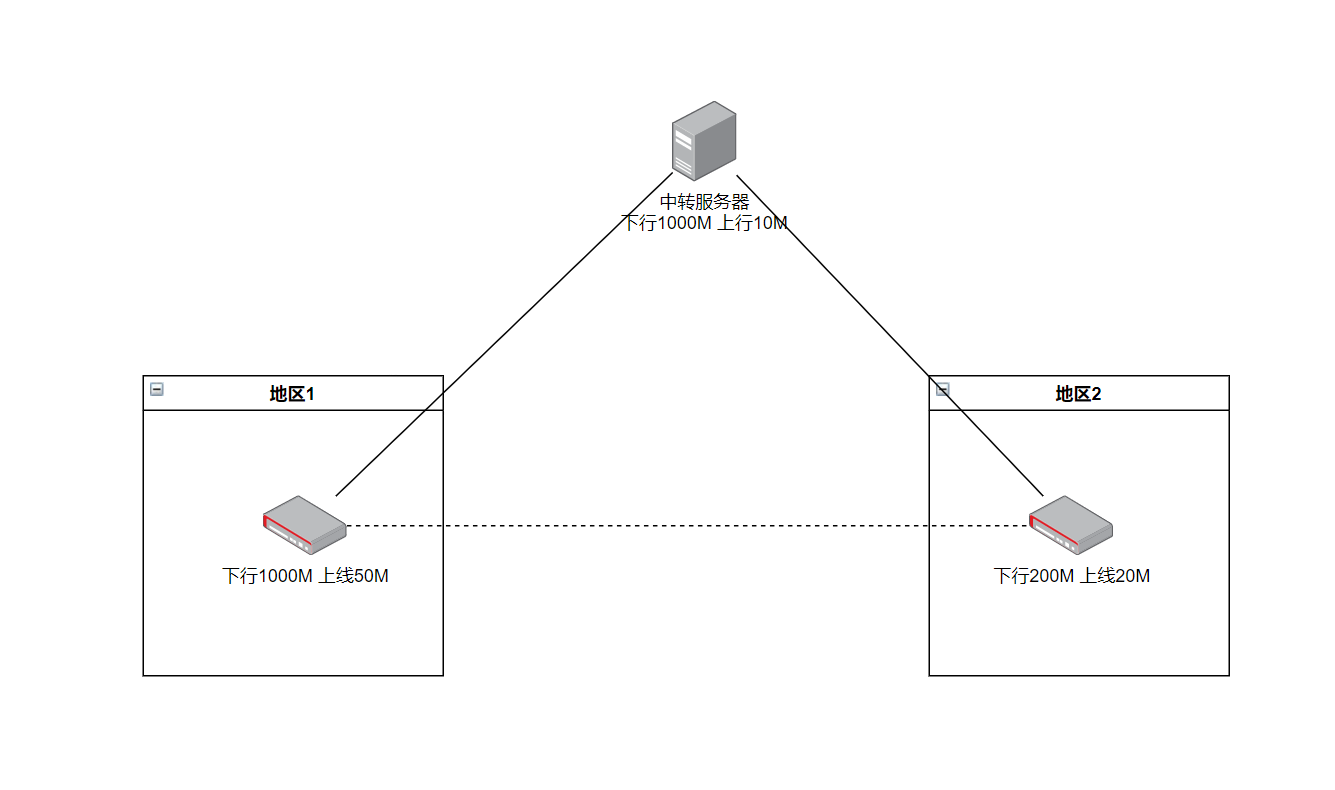
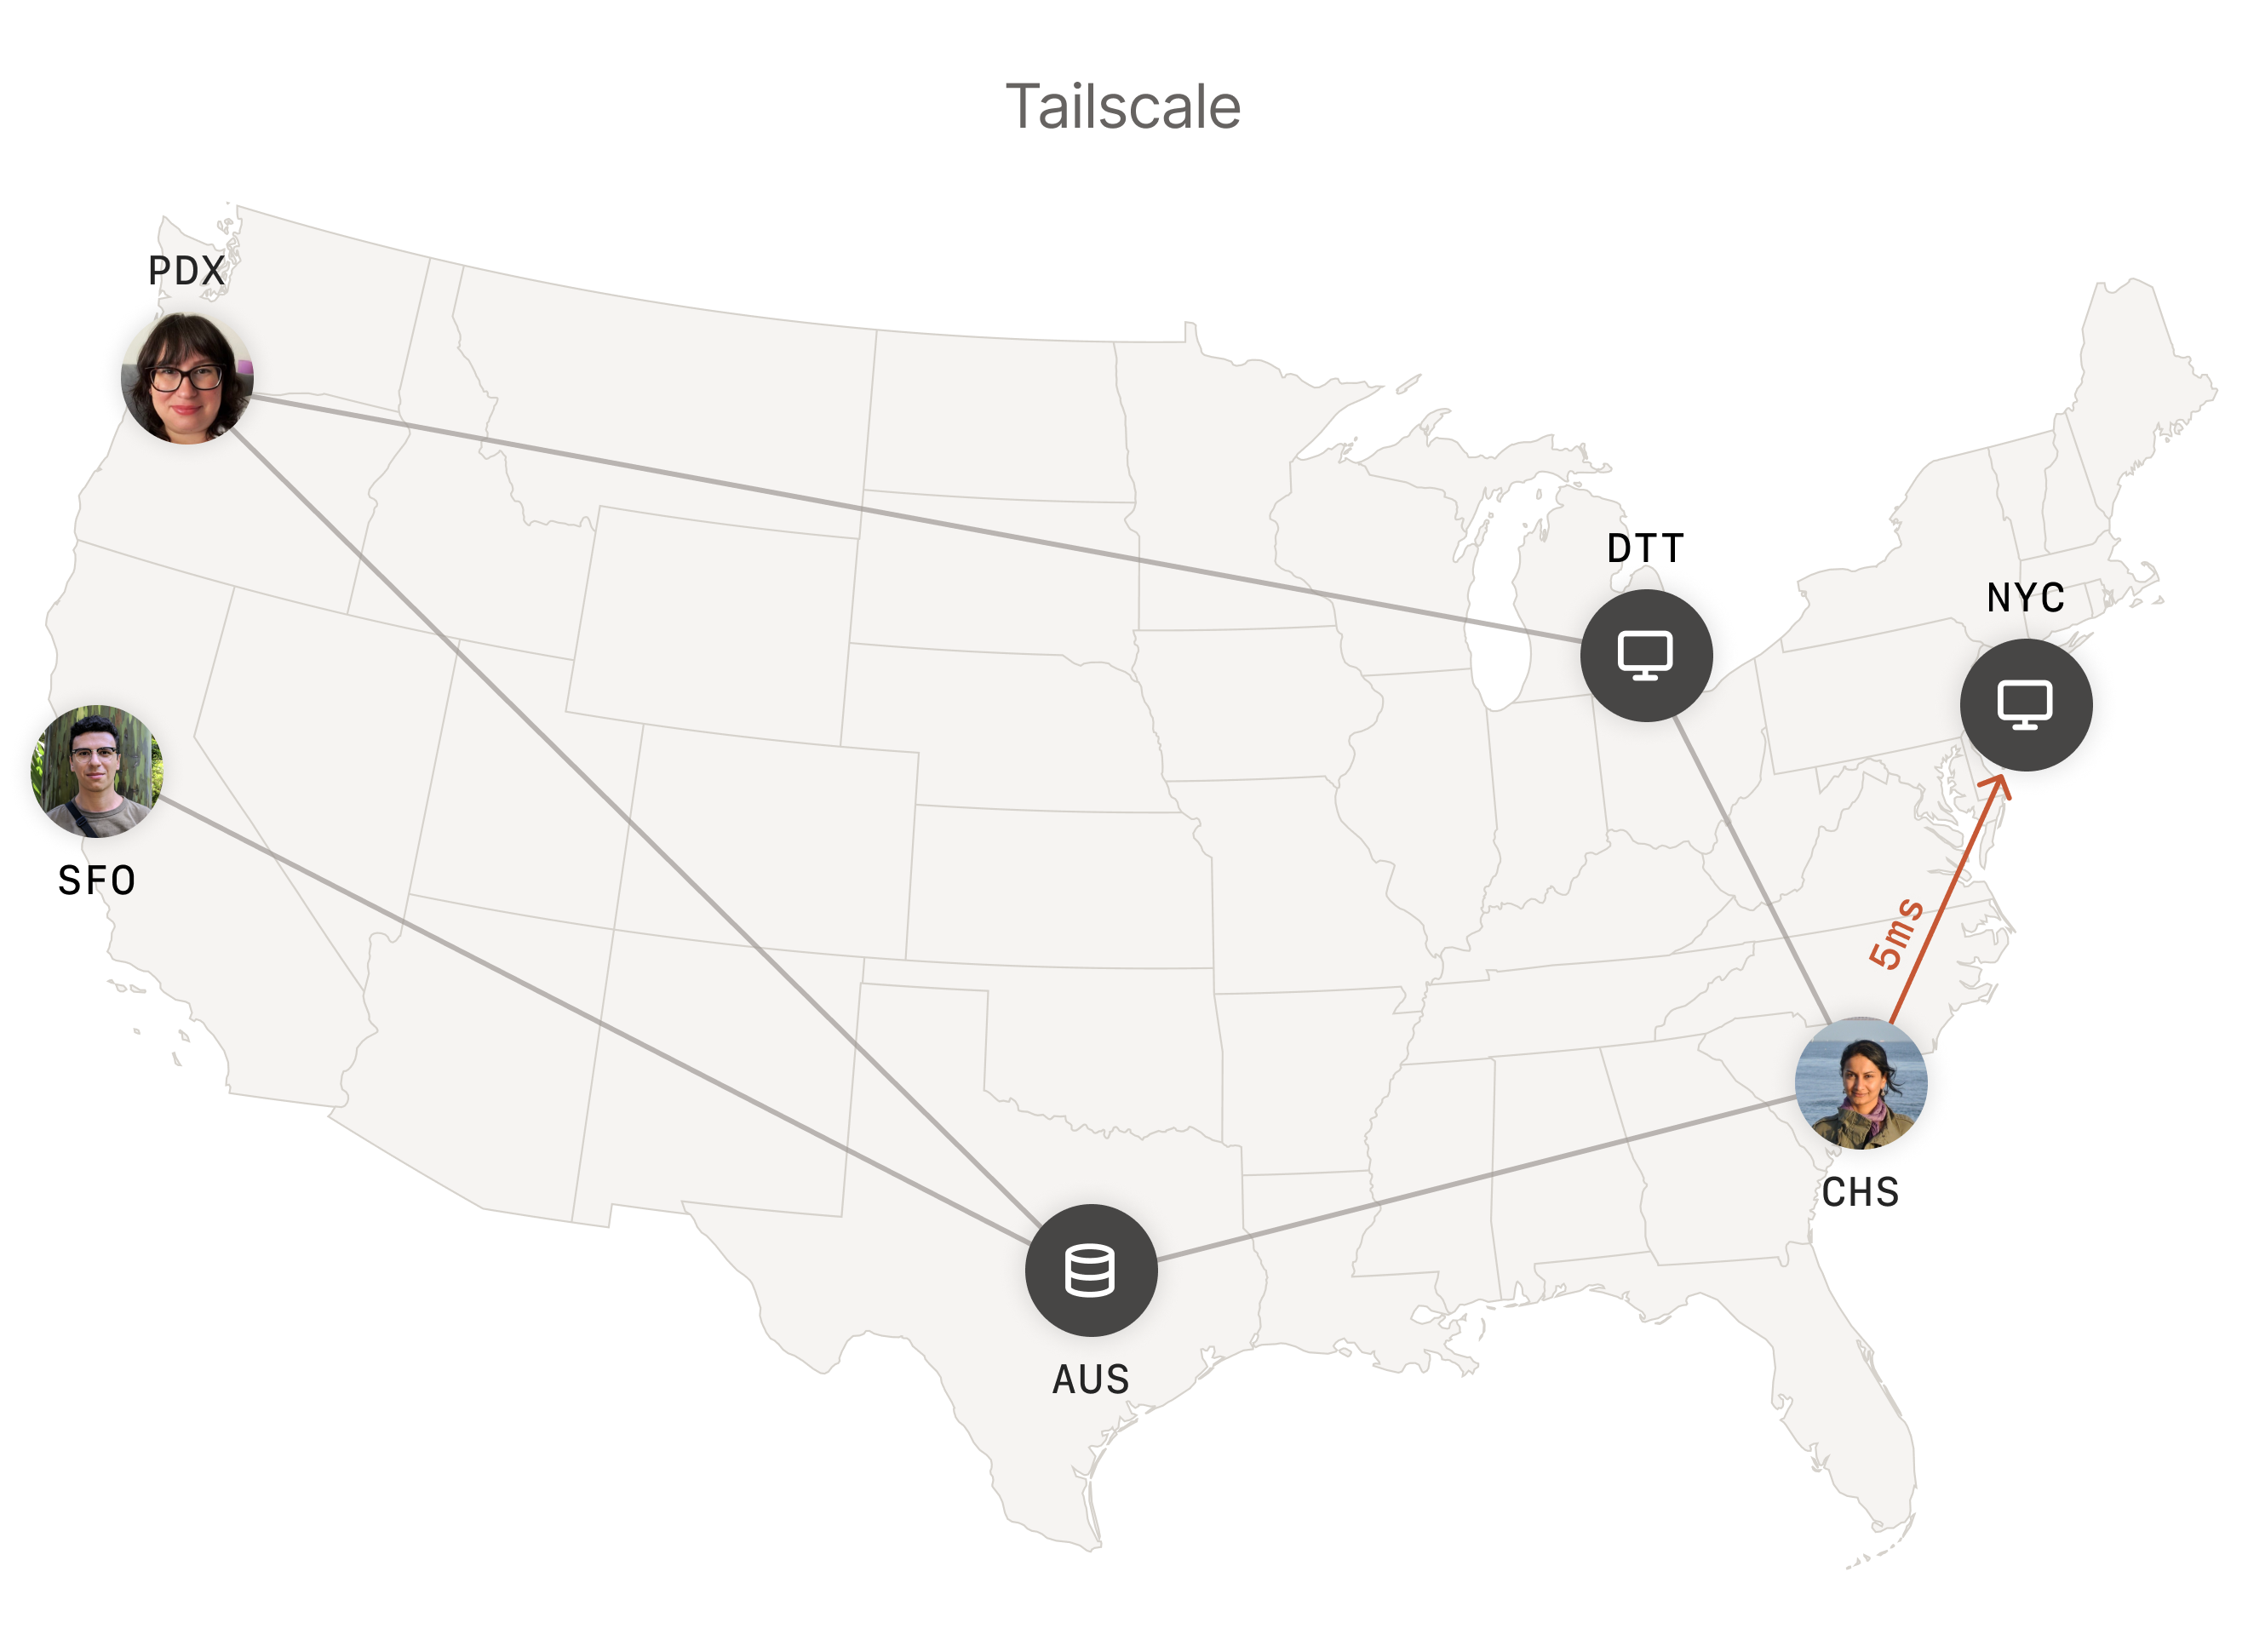
Tailscale 是一个基于 WireGuard 开发的商用产品,相较于 WireGuard 他最大的特点是支持 UDP 打洞,可使得上图中的网络拓扑由星型拓扑变为网状拓扑。

# 开始
由于 Tailscale 是商业产品,因此需要在官网注册 https://tailscale.com/ (opens new window),其免费可提供最多 3 个用户 100 个设备(可使用自建服务器,解决限制问题)
- 在官网注册账号后,在每个设备安装 Tailscale 客户端,登录账号即可完成组网。
- Tailscale 客户端完成登录后,默认的 key 是会过期的,可按需进入 Tailscale 后台 (opens new window)将设备秘钥过期禁用。
# 安装 - 普通客户端
如手机、电脑等一个设备就是一个 ip 的设备,则直接安装客户端、登录即可。
# 安装 - 子网路由器
如果安装的设备需要充当一个网关,则需要以下操作。
# Linux
参考:Subnet routers and traffic relay nodes · Tailscale Docs (opens new window)
# 安装 客户端
# 一键安装脚本
curl -fsSL https://tailscale.com/install.sh | sh
# 配置 IP 转发
如果 Linux 系统有 /etc/sysctl.d 目录,执行
echo 'net.ipv4.ip_forward = 1' | sudo tee -a /etc/sysctl.d/99-tailscale.conf
echo 'net.ipv6.conf.all.forwarding = 1' | sudo tee -a /etc/sysctl.d/99-tailscale.conf
sudo sysctl -p /etc/sysctl.d/99-tailscale.conf
如果 Linux 系统没有 /etc/sysctl.d 目录,执行
echo 'net.ipv4.ip_forward = 1' | sudo tee -a /etc/sysctl.conf
echo 'net.ipv6.conf.all.forwarding = 1' | sudo tee -a /etc/sysctl.conf
sudo sysctl -p /etc/sysctl.conf
如果防火墙使用的 firewalld ,执行
firewall-cmd --permanent --add-masquerade
# 启动
sudo tailscale up \
--advertise-routes=192.168.0.0/24,192.168.1.0/24 \ # 路由到此设备的网段
--accept-routes \ # 接收其他设备的子网,不添加只能访问其他设备的100.x.x.x
--advertise-exit-node \ # 出口节点
--accept-dns=false \ # 禁用Tailscale的DNS
--reset \ # 重置设置
按需将上例中的子网替换为实际网络的子网。支持 IPv4 和 IPv6 子网
笔记
Windows、macOS、iOS 和 Android 上的客户端将自动选择您的新子网路由。
对于 Linux 客户端,只有使用
--accept-routes标志的客户端才会发现新路由,因为默认情况下仅使用 Tailscale 100.x 地址。
TL;DR
纯粹的 Linux 客户端 (如 armbian 的玩客云),只要能访问其他组网设备,其他设备能通过 100.x.x.x 访问到此客户端
tailscale up --accept-dns=false #--reset
# --accept-routes 会导致无法外部无法ssh到设备,不使用的代价无法请求其他设备的子网
# Padavan
本质上跟 Linux 是一样的,在 扩展功能 - ShadowSocks - tailscale , Tailscale开关,选择 自定义参数 ,
启动参数参考 Linux 的即可。
tailscale up --advertise-routes=192.168.0.0/24,192.168.1.0/24 --accept-routes
笔记
实践发现,成功执行上述命令后,在路由器终端下可以 ping 通其他组网设备,但路由器下的设备则无法访问。
可能跟对方节点没有重启获取最新配置有关,重启并添加 --accept-routes 参数后正常。
笔记
主路由为 Padavan,Tailscale 搭在 openwrt 旁路由上,发现无法打洞成功,实践可通过在 Padavan 主路由,高级设置 - 外部网络(WAN)- 端口转发(UPnP),选择 端口转发协议:UPnp & NAT-PMP & PCP 、 限制转发规则只针对设置 IP:否
# OpenWrt
参考:[OpenWrt Wiki] Tailscale (opens new window)
# 安装 - 使用 opkg
opkg update

# 安装iptables-nft【openwrt 20.3+需要】
opkg install iptables-nft kmod-ipt-conntrack kmod-ipt-conntrack-extra kmod-ipt-conntrack-label kmod-nft-nat

# 安装tailscale
opkg install tailscale

# 查看openwrt版本;
cat /etc/openwrt_release | grep DISTRIB_RELEASE
# DISTRIB_RELEASE='24.10-SNAPSHOT'
注意
使用 istoreos 固件不要安装 iptables-nft ,istoreos 20.3 使用的仍然是 iptables,亲测安装这个插件会导致 openclash 的防火墙规则无法加入 PREROUTING 链。
# 安装 - 手动
参考:Setting up Tailscale with static binaries · Tailscale Docs (opens new window)
在使用 kwrt-11.11.2024-ramips-mt7621-d-team_newifi-d2-squashfs-sysupgrade.bin 固件尝试安装 tailscale 时提示:
> opkg install tailscale
Installing tailscale (1.76.3-r3) to root...
Segmentation fault
# 设置 openwrt
# 登录
tailscale up --advertise-routes=10.0.0.0/24,10.0.1.0/24 --accept-routes --accept-dns=false --reset
笔记
- 使用
--accept-dns=false禁用 Tailscale 的 DNS,用于解决与clash的冲突 netfilter-mode:自动防火墙开关- OpenWrt 22.03.x 版本必须用这个参数,21.02.x 版本不需要
- 注意:tailscale
1.48以后版本不再需要此参数 --netfilter-mode=off
- 网络 - 接口 - 新增
- 常规设置
- 名称:tailscale
- 协议:不配置协议
- 设备:tailscale0
- 保存
- 防火墙设置
- 自定义:tailscale
- 保存
- 常规设置
- 网络 - 防火墙,找到刚刚创建的防火墙
tailscale,编辑- 常规设置
- 转发:接收
- 动态 IP 伪装:勾选
- MSS 钳制:勾选
- 允许转发到目标区域:lan、wan
- 允许来自源区的转发:lan
- 常规设置
笔记
- 在和 OpenClash 同时使用时,还需要在 OpenClash - 插件设置 - 流量控制 - 本地 IPv4 绕过地址 追加
100.64.0.0/10 - 如果 Openwrt 作为拨号的主路由,还需要将
服务 - UPnP - 常规设置 - 启用 IGDv1 模式(√),否则无法打洞(此外还尝试过把 Tailscale 防火墙的入站 / 出站 / 转发设为接收,不确定是否也是影响因素)
笔记
参考:packages/net/tailscale at master · openwrt/packages (opens new window)
在一次更新将 tailscale 更新到 1.58.2-30 后,发现启动项找不到 tailscale,在终端执行 tailscale 提示:
failed to connect to local tailscaled; it doesn't appear to be running
目前的解决版本时在终端执行:
- 找到 openwrt 对应版本的分支:packages/net/tailscale/files/tailscale.init at openwrt-23.05 · openwrt/packages (opens new window)
- 如我现在用的
23.x的将仓库中的net/tailscale/files/tailscale.init下载到路由器的/etc/init.d/tailscale:
cd /etc/init.d/
wget https://raw.githubusercontent.com/openwrt/packages/openwrt-23.05/net/tailscale/files/tailscale.init
mv tailscale.init tailscale
chmod 755 tailscale

# 开机启动
/etc/init.d/tailscale enable
# 启动应用
/etc/init.d/tailscale start
启动后可能会打印一下日志:
deleting [-j ts-input] in filter/INPUT: running [/usr/sbin/iptables -t filter -D INPUT -j ts-input --wait]: exit status 2: iptables v1.8.7 (legacy): Couldn't load target `ts-input':No such file or directory

Try `iptables -h' or 'iptables --help' for more information.
deleting [-j ts-forward] in filter/FORWARD: running [/usr/sbin/iptables -t filter -D FORWARD -j ts-forward --wait]: exit status 2: iptables v1.8.7 (legacy): Couldn't load target `ts-forward':No such file or directory

Try `iptables -h' or 'iptables --help' for more information.
deleting [-j ts-postrouting] in nat/POSTROUTING: running [/usr/sbin/iptables -t nat -D POSTROUTING -j ts-postrouting --wait]: exit status 2: iptables v1.8.7 (legacy): Couldn't load target `ts-postrouting':No such file or directory

Try `iptables -h' or 'iptables --help' for more information.
deleting [-j ts-input] in filter/INPUT: running [/usr/sbin/ip6tables -t filter -D INPUT -j ts-input --wait]: exit status 2: ip6tables v1.8.7 (legacy): Couldn't load target `ts-input':No such file or directory

Try `ip6tables -h' or 'ip6tables --help' for more information.
deleting [-j ts-forward] in filter/FORWARD: running [/usr/sbin/ip6tables -t filter -D FORWARD -j ts-forward --wait]: exit status 2: ip6tables v1.8.7 (legacy): Couldn't load target `ts-forward':No such file or directory

Try `ip6tables -h' or 'ip6tables --help' for more information.
不用管,现在可以正常执行 tailscale xxxxx 命令
# Kubernetes
参考:Tailscale on Kubernetes · Tailscale Docs (opens new window)
失败的操作
在
Tailscale Admin - settings - keys创建一个
Auth key将创建的 Auth key 存储到 k8s 的 Secret 中
apiVersion: v1
kind: Secret
metadata:
  name: tailscale-auth
stringData:
  TS_AUTHKEY: tskey-0123456789abcde
拉去 tailscale 仓库代码:
git clone https://github.com/tailscale/tailscale.git

cd tailscale/docs/k8s

# 【注:这段作用咱不明确】配置基于角色的访问控制(RBAC),允许 Tailscale pod 读取/写入 tailscale Secret。
export SA_NAME=tailscale
export TS_KUBE_SECRET=tailscale-auth
make rbac | kubectl apply -f-
修改 subnet-router.yaml
# Copyright (c) Tailscale Inc & AUTHORS
# SPDX-License-Identifier: BSD-3-Clause
apiVersion: v1
kind: Pod
metadata:
  name: subnet-router
  labels:
    app: tailscale
spec:
  serviceAccountName: "{{SA_NAME}}"
  initContainers:
    - name: sysctler
      image: busybox:latest
      securityContext:
        privileged: true
      command: ["/bin/sh"]
      args:
        - -c
        - sysctl -w net.ipv4.ip_forward=1 net.ipv6.conf.all.forwarding=1
  containers:
  - name: tailscale
    imagePullPolicy: Always
    image: "ghcr.io/tailscale/tailscale:latest"
    env:
    # Store the state in a k8s secret
    - name: TS_KUBE_SECRET
      value: "{{TS_KUBE_SECRET}}"
    - name: TS_USERSPACE
      value: "false"
    - name: TS_DEBUG_FIREWALL_MODE
      value: auto
    - name: TS_AUTHKEY
      valueFrom:
        secretKeyRef:
          name: tailscale-auth
          key: TS_AUTHKEY
          optional: true
    - name: TS_ROUTES
      value: "{{TS_ROUTES}}"
    securityContext:
      privileged: true
      #runAsUser: 1000
      #runAsGroup: 1000
按照官方文档操作,会导致集群中的 pod 无法访问其他节点下的设备,相信与路由表有关,因此使用官方的方案在我的场景是行不通的。
# 找到k8s集群的Pod、Service网段,我是通过安装的配置文件找的

# 修改成k8s集群Pod、Service的实际网段
SERVICE_CIDR=10.20.0.0/16
POD_CIDR=10.42.0.0/15
export TS_ROUTES=$SERVICE_CIDR,$POD_CIDR

# 启动
make subnet-router | kubectl apply -f-
# 如果没有配置上面的Auth key,在这里获取登录URL进行身份验证:
kubectl logs subnet-router
# 通用
# 操作:启动子网路由
在 tailscale 后台 - 设备 - 启用子网路由。
# 命令
# 查看当前配置
tailscale debug prefs
# 优化
# 访问权限
Tailscale 使用网络访问控制列表 (access control lists,ACLs) 来精确定义允许特定用户或设备访问 tailnet 上的内容。 ACL 存储在 Tailscale 后台
Access Controls页面 (opens new window) 。
配置以 HuJSON 格式(类似于 JSON)存储,配置属性说明如下:
HuJSON与JSON的区别
- 可以添加注释:C 语言风格的行注释和块注释与空格混合在一起
- 数组结尾可以是逗号:允许在对象 / 数组中的最后一个成员 / 元素后面使用逗号
acls:参考 https://tailscale.com/kb/1018/acls/#acl-rules (opens new window)- action:字符串,只有
accept接受这一属性,默认不配置就是拒绝 - src:数组
- proto:可选,3、4 层协议,默认
tcp+udp
- action:字符串,只有
[
  // [email protected]可以访问设备vega(hosts中定义的ip别名)上的所有资源
  {
    "action": "accept",
    "src": [
      "[email protected]"
    ],
    "dst": [
      "vega:*"
    ],
  },
  // security组可以访问所有443端口(HTTPS服务),以及corp-network(hosts中定义的ip网段)上的所有资源。
  {
    "action": "accept",
    "src": [
      "group:security"
    ],
    "dst": [
      "*:443",
      "corp-network:*"
    ],
  },
  // employees组可以访问带有webapps标签的设备的80端口(HTTP服务)
  {
    "action": "accept",
    "src": [
      "group:employees"
    ],
    "proto": "tcp",
    "dst": [
      "tag:webapps:80"
    ],
  },
  // 允许group:employees访问group:security所有16(CHAOS)协议
  {
    "action": "accept",
    "src": [
      "group:employees"
    ],
    "proto": "16",
    "dst": [
      "group:security:*"
    ],
  },
  // [email protected]和security组都可以访问带有lab标签的设备
  {
    "action": "accept",
    "src": [
      "[email protected]",
      "group:security"
    ],
    "dst": [
      "tag:lab:*"
    ],
  },
  // 所有的带lab标签设备都可以相互通信
  {
    "action": "accept",
    "src": [
      "tag:lab"
    ],
    "dst": [
      "tag:lab:*"
    ],
  },
  // 同一用户认证的设备可以在端口22上进行通信。
  {
    "action": "accept",
    "src": [
      "*"
    ],
    "dst": [
      "autogroup:self:22"
    ],
  },
]
groups:用户组(角色),以避免配置重复的访问规则
{
  "group:security": [
    "[email protected]",
    "[email protected]",
  ],
  "group:employees": [
    "[email protected]",
    "[email protected]",
    "[email protected]",
    "[email protected]",
    "[email protected]",
  ],
}
hosts:类似于操作系统的 hosts,但它还可以定义网段的别名{ "vega": "100.3.4.5", "corp-network": "10.0.0.0/8", "critical-corp-server": "10.0.0.1", }tests:检查 ACL 的行为并避免意外破坏重要权限
[
  // group:security可以访问vega的443端口,但不能访问80端口
  {
    "src": "group:security",
    "accept": ["vega:443"],
    "deny": ["vega:80"],
  },
  // [email protected](用户)可以访问vega、tag:lab的22端口
  {
    "src": "[email protected]",
    "accept": ["vega:22", "tag:lab:22"],
  },
  // tag:lab不能访问critical-corp-server的80端口
  {
    "src": "tag:lab",
    "deny": ["critical-corp-server:80"],
  },
]
tagOwners:向特定设备分配标签
{
  "tag:lab": ["[email protected]"],
  "tag:security": ["group:security"],
  "tag:webapps": ["[email protected]"]
}
autoApprovers:定义哪些用户可以发布子网路由或出口节点而无需审核。
{
  // [email protected]可以创建10.0.0.0/24子网路由器,而无需审核。
  "routes": {
    "10.0.0.0/24": ["[email protected]"],
  },
  // 带有security标签的设备无需审核即可成为出口节点
  "exitNode": ["tag:security"],
}
ssh:定义哪些用户可以在哪些设备上建立 Tailscale SSH 连接,以及哪些 SSH 用户。
[
  {
    // 所有用户都可以以非root用户身份SSH到自己的设备
    "action": "accept",
    "src": ["autogroup:member"],
    "dst": ["autogroup:self"],
    "users": ["autogroup:nonroot"]
  }
]
"randomizeClientPort": true:随机客户端端口,提高打洞成功率
# 出口节点
即使用此节点访问互联网
出口节点
- Android/iOS:略
- Linux:添加
--advertise-exit-node标签
笔记
如果没有配置 ACL,则需要再后台开启才可以作为出口节点
调用方
- Linux:
--exit-node=<exit-node-name-or-ip> --exit-node-allow-lan-access=true
参考
# DERP Servers(中转服务器)
当 UDP 打洞失败时,,默认使用 Tailscale 官方 DERP Servers(中转服务器)转发流量,但 Tailscale 并未在中国大陆地区部署 DERP Servers,虽然在香港有一个,但似乎连不上,实测会使用 Tokyo 、 San Francisco 的 DERP Servers 进行中转,延迟约 200ms。
如果使用域名访问(境内需要备案)则不需要修改源码重新演绎,install 后即得到可执行文件,一些教程提到的重新编译主要是没有备案域名的场景。
安装 Go
- All releases - The Go Programming Language (opens new window)
- Download and install - The Go Programming Language (opens new window)
wget https://go.dev/dl/go1.23.4.linux-amd64.tar.gz
wget https://golang.google.cn/dl/go1.23.4.linux-amd64.tar.gz # 国内可用

rm -rf /usr/local/go && tar -C /usr/local -xzf go1.23.4.linux-amd64.tar.gz

export PATH=$PATH:/usr/local/go/bin

# 国内镜像
go env -w GO111MODULE=on
go env -w GOPROXY=https://goproxy.cn,direct

go version
下载 DERP Servers
go install tailscale.com/cmd/derper@latest
# go install tailscale.com/cmd/derper@main # 据说会导致`-verify-clients` 鉴权失败

cd ~/go/bin

# 此目录下的derper即为DERP Servers的可执行文件

# 复制到/etc/derp/目录
mkdir -p /etc/derp && cp derper /etc/derp/
笔记
这里没有魔改 derper 源码来对 IP 地址支持,主要是因为我有备案域名。
自签证书
openssl req -x509 -newkey rsa:4096 -sha256 -days 3650 -nodes -keyout /etc/derp/derp.myself.com.key -out /etc/derp/derp.myself.com.crt -subj "/CN=derp.myself.com" -addext "subjectAltName=DNS:derp.myself.com"
启动 DERP Servers
# 创建服务
cat > /etc/systemd/system/derp.service <<EOF
[Unit]
Description=TS Derper
After=network.target
Wants=network.target
[Service]
User=root
Restart=always
ExecStart=/etc/derp/derper -hostname derp.myself.com -a :33445 -http-port 33446 -certmode manual -certdir /etc/derp --verify-clients
RestartPreventExitStatus=1
[Install]
WantedBy=multi-user.target
EOF
-a:http (s) 服务的端口号,格式为:port、ip:port。如果不指定 IP,则默认为所有接口。如果端口是 443 且 / 或-certmode为manual,则提供 HTTPS 服务,否则提供 HTTP 服务。-http-port 33446:实际上是用不上的,只是防止占用了 80 端口-stun-port:UDP 打洞端口,默认 3478
# 设置开机启动
systemctl enable derp

# 启动derp
systemctl start derp
配置服务器防火墙
- 放行
33445(https)、3478(udp 打洞) - 访问
https://derp.myself.com:33445,返回This is a Tailscale DERP server.即为成功。
配置 ACL
"derpMap": {
  "OmitDefaultRegions": true,
  "Regions": {
    "900": {
      "RegionID": 900,
      "RegionCode": "myderp",
      "Nodes": [
        {
          "Name": "1",
          "RegionID": 900,
          "DERPPort": 33445,
          "HostName": "derp.myself.com",
          // InsecureForTests用于单元测试禁用TLS验证。使用自签证书时设置
          "InsecureForTests": true
        }
      ]
    }
  }
}
检查
tailscale netcheck

tailscale status

tailscale ping 另一个设备虚拟ip

tailscale down

tailscale up
开启访问限制
防止别人白嫖中转服务器
# 安装tailscale客户端
curl -fsSL https://tailscale.com/install.sh | sh

# 启动,加入tailscale网络
tailscale up
添加 --verify-clients 参数,已在上文配置中添加,无需再次配置
vim /etc/systemd/system/derp.service

# 在ExecStart最后添加 --verify-clients

# 重新加载配置
systemctl daemon-reload

# 重启derp服务
systemctl restart derp.service
2024 年 12 月 28 日补充: 阿里云服务器部署遇到的坑
使用阿里云轻量部署 DERP 时遇到 tailscale up DNS 失效问题,排除发现,阿里云使用的 DNS 服务为:
nameserver 100.100.2.136
nameserver 100.100.2.138
与 tailscale 的内网 IP 冲突,这里我采用修改 DNS 地址来解决,代价就是会影响阿里云内网资源的访问。 其他解决方法参考:Troubleshooting Tailscale Exit Node no Internet Issue - Frank's Weblog (opens new window)
参考:
- DERP Servers · Tailscale Docs (opens new window)
- Custom DERP Servers · Tailscale Docs (opens new window)
# 修改 MTU
正如我在基于 WireGuard 实现的云组网 | NipGeihou's blog 提及的,我的服务器最大 MTU 比 1280 低,而 Tailscale 默认 MTU 是 1280。
vim /etc/default/tailscale

# 添加
TS_DEBUG_MT="1252"

# 强制写入
:wq!

# 重新加载配置
systemctl restart tailscaled
笔记
待验证
参考:
# IP 冲突
我的服务器网段与公司的服务器网段冲突,导致开启 Tailscale 的时候,无法访问公司的服务。
route add -p <服务ip> mask 255.255.255.0 <公司网关>
# route add -p 192.168.10.0 mask 255.255.255.0 192.168.10.1
# IP Ping 得通却无法访问端口
检查是否是和 mihomo tun 全局模式冲突,尝试停用 mihomo,排查。如果是,则在 mihomo 的 tun 配置中添加:
route-exclude-address:
- 192.168.0.0/16
- fc00::/7
# 扩展:tailscale 与 k8s 冲突
在 k8s 集群的 master 、 node1 中安装了 tailscale 客户端后发现无法访问控制面板。
# 查询node状态
kubectl get nodes
NAME           STATUS     ROLES                         AGE    VERSION
master   Ready      control-plane,master,worker   391d   v1.23.8
node1    NotReady   worker                        391d   v1.23.8
node2    Ready      worker                        391d   v1.23.8
发现 node1 状态为 NotReady
# 登入node1服务器,查看日志
journalctl -f -u kubelet

"Objects listed" error:Get "https://lb.kubesphere.local:6443/apis/node.k8s.io/v1/runtimeclasses?resourceVersion=105092441": dial tcp 10.0.x.12:6443: i/o timeout 30001ms
发现是与 master 节点通信超时,经过 master 、 node1 、 node2 三台服务器互 ping 可确认,master 与 node1 互 ping 不通,除此以外都正常。
tcpdump -i eth0 icmp and src 10.0.x.9

tcpdump: verbose output suppressed, use -v or -vv for full protocol decode
listening on eth0, link-type EN10MB (Ethernet), capture size 262144 bytes
10:51:13.075317 IP gz-lh-node1.cluster.local > gz-lh-master.cluster.local: ICMP echo request, id 6, seq 1, length 64
10:51:14.089492 IP gz-lh-node1.cluster.local > gz-lh-master.cluster.local: ICMP echo request, id 6, seq 2, length 64
通过在 master 节点抓包可知,master 能成功接收来自 node1 的请求包数据,但没有响应包。
# 在master节点尝试通过指定端口
ping -I eth0 10.0.12.9

# 可正常ping通,猜测是路由规则出了问题
参考:
- Kubernetes 集群状态异常排错 - 知乎 (opens new window)
- kubernetes nodes notready 解决思路_nodes not ready-CSDN 博客 (opens new window)
这个问题跟之前基于 WireGuard 实现的云组网 中的 与 k8s 隧道路由表冲突 是类似的,由于 tailscale 默认使用的路由表是 52,这个路由表的优先级高于 main 表,从而导致本应该直连的数据反而走了 tailscale 隧道,但 tailscale 并没有像 wireguard 一样提供修改路由表的功能,因此需要一些操作:
# 定义路由规则,让下面的网段走main表

# 节点网段,eth0网段
ip rule add to 192.168.1.0/24 priority 5000 table main

# k8s网段
ip rule add to 10.233.0.0/17 priority 5000 table main

# 查看规则
ip rule show
- 含义:
192.168.1.0/24、10.233.0.0/17使用 main 表路由
NAT 转换
场景:在云厂商 A 的一台服务器 S1 上设置了整个云上的网段,即通过 S1 来转发访问云数据库等资源,经过抓包发现默认情况下,在与云数据库建立连接时,源 IP 为 tailscale 的 100.x.x.x IP,导致回复时网关不知道这个 IP 是谁,进而导致无法建立连接,因此需要在 S1 上 NAT,使得出口 IP 为 S1 的 IP,而不是 100.x.x.x 。
iptables -t nat -A POSTROUTING -s 100.64.0.0/10 -o eth0 -j MASQUERADE
参考: