 基于WireGuard实现的云组网
提示
前提知识:计算机网络
# 需求
- 实现家庭网络、出租屋网络、手机网络、云服务互联互通
- 家庭网络拥有公网 ip,在访问家庭网络直连,而不经过云服务器中转【参考:基于 Tailscale 实现的云组网】
- 内网 DNS,由于很多服务都带有端口号,并不好记【参考:基于 Nginx 的内网域名管理】
# 拓扑图
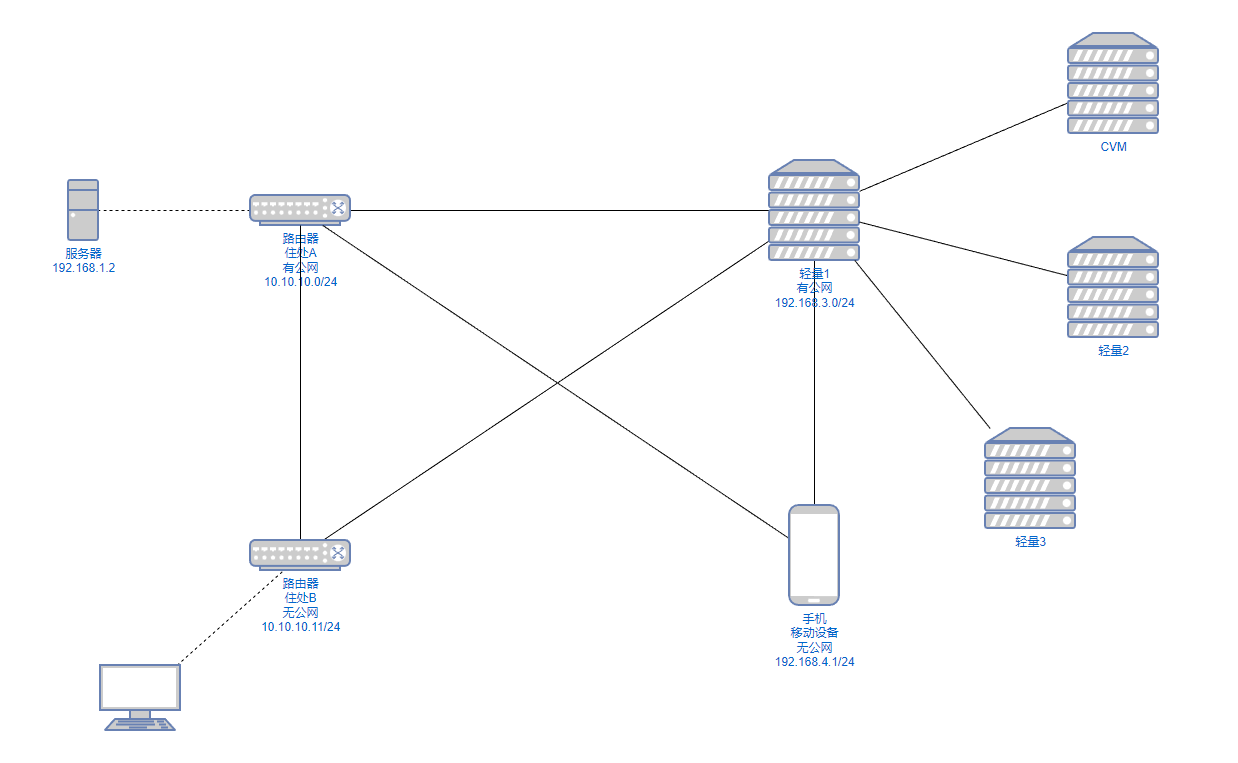
- 访问有公网设备时直连
- 访问无公网设备时经云服务器转发
# 安装
# Linux
Ubuntu
apt install wireguard

# 作为中转服务器:配置流量转发
echo "net.ipv4.ip_forward = 1" >> /etc/sysctl.conf
echo "net.ipv4.conf.all.proxy_arp = 1" >> /etc/sysctl.conf
sysctl -p /etc/sysctl.conf
笔记
net.ipv4.ip_forward = 1 :是否允许将网络数据包从一个网络接口转发到另一个网络接口。
net.ipv4.conf.all.proxy_arp = 1 :是否允许使用代理 ARP(地址解析协议)来响应 ARP 请求。
代理 ARP 是一种网络技术,它允许一个网关或路由器代表其他计算机响应 ARP 请求,以便将数据包正确地转发到目标计算机。这种技术通常用于网络地址转换(NAT)等场景中,以使得内部网络中的计算机能够访问外部网络。
笔记
如安装官方文档的 Quick Start 的步骤,还需要添加虚拟网卡、IP 地址、转发 IP......,而有更方便的 wg-quick 命令,会根据下面提到的配置文件,自动完成上述操作,因此,至此只需要安装 wireguard 接口,如果是中继服务器则另外开启 IP 转发即可。
# 常见命令
# 启动
systemctl start wg-quick@wg0

# 重启
systemctl restart wg-quick@wg0

# 查看连接状态
wg

# 伪装 NAT
iptables -t nat -A POSTROUTING -o enp1s0(网卡) -j MASQUERADE

# 接受来自wg0网卡的转发
iptables -A FORWARD -i wg0 -j ACCEPT
iptables -A FORWARD -i wg0 -o enp1s0 -j ACCEPT

# wg-quick
wg-quick up wg0
wg-quick down wg0
# Padavan
文件下载:https://nip.lanzoul.com/iZ8Wv0ykwyne (opens new window) 密码:h7rj
- 将
tunsafe_mipsel文件移动并重命名:/etc/storage/tunsafe - 添加可执行权限:
chmod a+x tunsafe - 创建 wg0.conf 文件到
/etc/storage/wg0.conf
# 启动
/etc/storage/tunsafe start -n wg0 /etc/storage/wg0.conf &

# 停止
/etc/storage/tunsafe stop

# 状态查看
/etc/storage/tunsafe show
自行编译
上面的文件,原文中是 k2p 的,我在同时 7621 的 newifi3 上可用,但在 k2p 却提示:
...
Sending handshake...
inotify_init1() failed: Function not implemented
...
因此打算自己编译看看
源仓库:https://github.com/TunSafe/TunSafe (opens new window)
由于路由器上没有 git 命令,这里我先下载到电脑,再将文件夹上传到路由器
chmod a+x ./build_linux.sh
失败!!
笔记
实践发现,成功连接后,路由器下的设备可以 ping 通其他节点的设备,但反之则不行,tcpdump wg0 发现数据包到到达 wg0,已知解决办法为从路由器管理页面关闭防火墙,但这并不是一个好方法。
也许是更好的方法:
# 允许192.169.0.0/16的数据包进入
iptables -A INPUT -p all -s 192.169.0.0/16 -j ACCEPT

# 允许从wg0接口上的192.169.0.0/16源地址的数据包转发到br0接口
iptables -A FORWARD -i wg0 -o br0 -s 192.169.0.0/16 -j ACCEPT
添加了上述规则仅能实现 ping 通路由器 ip,但仍无法 ping 通路由器下的设备 ip。
# OpenWrt
以 iStoreOS 为例
- 软件包管理,安装
luci-i18n-wireguard-zh-cn安装,会自动将所需依赖一并安装 - 网络 - 接口 - 添加新接口,名称:
cloud_network,协议:WireGuard VPN- 常规设置,填写
- 秘钥(点击
生成新的密钥对) - 公钥(感觉可以不填,可能是用来复制生成的密钥对里的公钥)
- IP 地址,如
192.168.1.0/24
- 秘钥(点击
- 防火墙
- 选择:
lan
- 选择:
- 对端,添加对端
- 公钥
- 允许的 IP
- 路由允许的 IP:勾选
- 端点主机
- 端点端口
- 持续 Keep-Alive:25
- 常规设置,填写
保存并应用,重启
总结
- 感觉都对了,还是不行就试试重启
- 检查 OpenClash 的
插件设置-流量控制-本地 IPv4 绕过地址是否包含 wg 的AllowedIPs
不可用,需重启解决问题
留意到在使用过程中,会出现 WireGurad 不可用,需重启解决的问题,这种情况或是一种通病,曾试过公司使用 OpenWrt 的 WireGurad 与腾讯云内网组网,而我也使用 Windows 的 WireGurad 与自己的腾讯云组网,同时出现组网不可用的情况,都需要重启客户端才可使用。在参考中获悉一种 OpenWrt 的解决办法,待验证:
# 在定时任务
* * * * * /usr/bin/wireguard_watchdog
参考:OpenWrt 路由器上的 WireGuard VPN 客户端设置 (opens new window)
# 配置
# 生成密钥对
在配置之前,需要先生成用于连接的密钥对,密钥对可以在任意用 wg 客户端的生成,也可以统一生成。
#生成私钥
wg genkey > example.key

# 生成公钥
wg pubkey < example.key > example.key.pub

# 同时输出 私钥+公钥
wg genkey | tee >(wg pubkey)

# 通过私钥字符串得到公钥
echo "公钥字符串" | wg pubkey
# wg0.conf
/etc/wireguard/wg0.conf
[Interface]
# Name = node1.example.tld
Address = 192.0.2.3/32
ListenPort = 51820
MTU = 1280
PrivateKey = localPrivateKeyAbcAbcAbc=

[Peer]
# Name = node2-node.example.tld
AllowedIPs = 192.0.2.1/24
Endpoint = node1.example.tld:51820
PublicKey = remotePublicKeyAbcAbcAbc=
PersistentKeepalive = 25
[Interface]:当前节点配置- Address:虚拟网卡网卡地址
- ListenPort:当前节点会监听这个端口,供其他节点连接
- PrivateKey:当前节点的私钥
- MTU:
1280 - Table:默认
auto,会根据 Peer 的 AllowedIPs 配置到主路由表,当存在冲突时,需要自定义路由表,参考坑 2.
[Peer]:对等节点- AllowedIPs:允许从此节点发来的数据报,源 IP 地址范围,同时也是当前节点发送时的路由表规则。
- Endpoint:与此节点连接的 IP 地址和端口
- PublicKey:此节点的公钥
- PersistentKeepalive:心跳包间隔时长,通常为
25
配置 1:NAT 背后节点
[Interface]
PrivateKey = xxxx
MTU = 1280

[Peer]
# 中转节点
PublicKey = xxx
AllowedIPs = 192.168.0.0/16 # 路由到此节点的目标地址段,同时也是允许他发来的源地址段
Endpoint = x.x.x.x:51820 # 此节点的端点
PersistentKeepalive = 25
- 将 IP 报文中目的地址为
192.168.0.0/16的数据包转发到中转节点 - 允许由中转节点接收到的源地址为
192.168.0.0/16
配置 2:中转节点
[Interface]
PrivateKey = xxxx
MTU = 1280
ListenPort = 51820 # 与其他节点建立连接的端口

[Peer]
# 节点1
PublicKey = xxx
AllowedIPs = 192.168.1.0/24 # 路由到此节点的目标地址段,同时也是允许他发来的源地址段
PersistentKeepalive = 25

[Peer]
# 节点2
PublicKey = xxx
AllowedIPs = 192.168.2.0/24 # 路由到此节点的目标地址段,同时也是允许他发来的源地址段
PersistentKeepalive = 25
对于中转节点而言,更注重转发
配置 3:无外网节点
[Interface]
PrivateKey = xxxx
MTU = 1280
Table = 1234 # 避免与k8s隧道冲突

[Peer]
# 节点1
PublicKey = xxx
AllowedIPs = 0.0.0.0/0 # 把所有流量转发到此节点
PersistentKeepalive = 25
# 192.168.0.0/16 使用 1234 表
ip rule add to 192.168.0.0/16 table 1234
ip rule add ipproto tcp dport 80 table 1234
ip rule add ipproto tcp dport 443 table 1234
提示
如果出现只 ping 得通,但 curl 无返回,看看是不是云上的防火墙入口规则没有全部放行。
# ⚠️wg-quick 重启脚本
wg-quick-restart.sh
#!/bin/bash

# Set the path to your WireGuard configuration file
CONF_FILE="/etc/wireguard/wg0.conf"

# Bring the interface down
sudo wg-quick down "$CONF_FILE"

# Bring the interface up with the new configuration
sudo wg-quick up "$CONF_FILE"

# Print a message to indicate that the configuration has been reloaded
echo "WireGuard configuration reloaded!"
chmod +x wg-quick-restart.sh
笔记
在 wg-quick down wg0 状态下,可使用
# 启动
systemctl start wg-quick@wg0

# 重启
systemctl restart wg-quick@wg0
# 限制目的 IP
在实践中发现,一个节点配置,把路由到中转节点的 AllowedIPs 改为 0.0.0.0/0 就可以通过中转节点访问互联网,而这并不是我期望的,我只希望它处理内网 IP 的路由。
需要通过防火墙 iptables 来限制
todo
# wireguard over TCP(基于 Phantun 实现)
参考:WireGuard 基础教程:使用 Phantun 将 WireGuard 的 UDP 流量伪装成 TCP・云原生实验室 (opens new window)
# 安装
Releases · dndx/phantun (opens new window)
wget https://github.com/dndx/phantun/releases/download/v0.7.0/phantun_x86_64-unknown-linux-musl.zip
unzip phantun_x86_64-unknown-linux-musl.zip
mv phantun_client phantun_server /usr/local/bin/
# 服务端


#
在client端运行:
./udp2raw_amd64 -c -l0.0.0.0:3333  -r44.55.66.77:4096 -k "passwd" --raw-mode faketcp   --cipher-mode xor  -a
# 服务端 wg0.conf
MTU = 1200
ListenPort = 51820
PreUp = sudo udp2raw -s -l 0.0.0.0:4096 -r 127.0.0.1:51820 -k "your-password" --raw-mode faketcp -a --log-level 0 --cipher-mode xor &
Postdown = pkill -f "udp2raw.*:4097"
# 客户端 wg0.conf
MTU = 1200
PreUp = udp2raw -c -l 127.0.0.1:51820 -r YOUR-SERVER-IP:4096 -k "your-password" --raw-mode faketcp -a --log-level 0 --cipher-mode xor &
Postdown = pkill -f "udp2raw.*:51820"

# peer的ip写 127.0.0.1:51820
# 踩过的坑
# 腾讯云轻量服务器不能通过静态路由到其他内网服务器
在腾讯云有多台轻量服务器,本打算统一用其中的服务器 A 作为 WireGuard 的服务端,而其他内网服务器则通过静态路由下一跳到服务器 A,应该多次尝试后路由规则仍然无效,最后询问腾讯云客服答复:
- 中间还有其他设备的,其他设备感知不到您的内部路由的
- 也就没有办法传递您的数据流量
- 没有的,机器内部路由,其他设备是不学习的
- 否则会影响云内架构和路由转发
最终选择在每一台服务器上部署 WireGuard 互联
# 与 k8s 隧道路由表冲突
服务器上的 k8s 集群虽然每台机器都有公网 ip,但配置太过麻烦,打算使用 master 节点来中转数据。在中继服务器的 Peer.AllowedIPs 除了要配 node 节点的 ip 地址外,还需要配容器 ip 段,否则源地址是容器 ip 段的数据包无法通过中继服务器转发。
那么问题就出现了,如果在中转节点配置了容器 ip 段,那么 wg-quick 在启动的时候就会添加路由规则将 容器ip段 -> wg0 ,而中转节点原本就有一条 容器ip段 -> tunl0 k8s 创建的路由规则,导致冲突。
解决:使用 Table 指定 wg0 的路由表,再通过 ip rule 来配置哪些流量经过此路由表转发。
# wg0的数据都使用1234表,主要是处理中转数据
ip rule add dev wg0 table 1234

# 将目的地址为192.168.0.0/16,使用1234表,主要是处理中转节点自身发送的数据
ip rule add to 192.168.0.0/16 table 1234
# MTU1280 不是真理
如果直接使用 1500、1420,就会丢包,在上网查阅资料时,有个最佳实践说是 1280 ,设置后确实没有出现丢包的情况。直到有一天,我在腾讯云上买了个云数据库,无法使用数据库连接工具连接,直接卡死无响应。开始以为是腾讯云魔改的数据库不兼容问题,后来使用公网连接正常排除了这个问题。通过抓包发现腾讯云中转服务器无法将 MySQL 一个 1420 大的数据包发到客户端,在 eth0 接收后丢包。因此再一次把目光投到了 MTU 身上,经过测试发现此台服务器最佳 MTU 为 1252 。
# 一直ping,直到最大可ping通MTU
ping -M do -s 1500 <客户端ip>
ping -M do -s 1400 <客户端ip>
...
ping -M do -s 1252 <客户端ip>
# 客户端无法重连问题排除
# 分别在客户端和服务端抓包

# 客户端
tcpdump -i eth1 host <服务端ip> and udp


# 服务端
tcpdump -i eth0 port <wg服务端口>
抓包发现,客户端一直在向服务端发送报文,而服务端始终未收到报文。
- 通过
ping确认客户端和服务端可正常通信。 - 通过之前的经历可知,重启后恢复正常
因此怀疑跟 NAT 有关,但没上级设备的权限,打算使用重启脚本解决:
wg-monitor.sh
#!/bin/bash

ip="10.0.0.1"    # 将ip地址替换为你要ping的目标IP
count=0          # 初始化计数器

while true; do
    if ping -c 1 -W 1 "$ip" >/dev/null 2>&1; then
        logger -t "wg-monitor" "ping success: $ip"
        count=0
        break
    else
        logger -t "wg-monitor" "ping fail: $ip"
        count=$((count+1))
    fi

    if [ "$count" -eq 5 ]; then
        logger -t "wg-monitor" "reboot WireGuard"
        ifup cloud_network  # 重启 WireGuard
        break
    fi

    sleep 5  # 等待5秒后再次ping
done
OpenWrt
重启命令: ifup cloud_network
脚本保存路径:
cd /usr/bin

vim wg-monitor.sh

...

chmod +x wg-monitor.sh

echo '* * * * * /usr/bin/wg-monitor.sh' >> /etc/crontabs/root
根据 Improvement to wireguard_watchdog script? - Installing and Using OpenWrt / Network and Wireless Configuration - OpenWrt Forum (opens new window) 的描述,笔者认为修改
/usr/bin/wireguard_watchdog比起自己写一个脚本,通用性更好,但能力局限,当前仍采用另写脚本处理。
Ubuntu
重启命令: systemctl restart wg-quick@wg0
# 与 mihomo 不兼容问题
由于需要和境外服务器组网,而 udp 数据包出境丢包严重,因此加了一层 TLS 隧道来优化稳定,在连接两个 Peer 时发现两个
# 总结
wireguard 确实十分轻量,也因为轻量所以似乎不那么聪明。他适用于云组网,IP 地址很少改变的场景。
# Reference
- WireGuard 教程:WireGuard 的搭建使用与配置详解 – 云原生实验室 (opens new window)
- WireGuard 教程:使用 Netmaker 配置 WireGuard 全互联 (full mesh) 模式 – 云原生实验室 (opens new window)
- WireGuard 基础教程:wg-quick 路由策略解读 – 云原生实验室 - Kubernetes|Docker|Istio|Envoy|Hugo|Golang | 云原生 (opens new window)
- Wireguard 全互联模式(full mesh)配置指南 – 云原生实验室 - Kubernetes|Docker|Istio|Envoy|Hugo|Golang | 云原生 (opens new window)
- Quick Start - WireGuard (opens new window)
- wireguard-tools - Required tools for WireGuard, such as wg(8) and wg-quick(8) (opens new window)
- Route
- MTU
- Access Control