 EEWORLD Follow me 第3期
# 前言
经过 2 期的活动,感觉 EE 还是挺好玩的,而且说得上是有手就行,因此在第 3 期 (opens new window)活动开始时,我也在第一时间申请了。第 3 期的难度,看起来比第 2 期要难,起码从器件的数量来看是这样的。
本期的板子为:Seeed Studio XIAO ESP32C3

# 任务
# 任务 1:使用 MicroPython 系统(必做任务)
任务要求:熟悉 Seeed Studio XIAO ESP32C3 开发板基本操作,安装 esptool,并给开发板刷写 MicroPython 系统,完成入门程序的运行
搭配器件:Seeed Studio XIAO ESP32C3
准备
下载 MicroPython 固件:MicroPython - Python for microcontrollers (opens new window)
下载 esptool 工具:Releases · espressif/esptool (opens new window)
笔记
esptool 的安装方法有很多种,如直接从 git 仓库从下载源码执行的,也有 pip install esptool 的,我这里使用 git 仓库 Release 预编译的。
烧录
根据固件下载页面的 MicroPython - Python for microcontrollers (opens new window) 安装说明,修改:
# 擦除闪存
#esptool.py --chip esp32c3 --port /dev/ttyUSB0 erase_flash
.\esptool.exe --chip esp32c3 --port COM10 erase_flash

# 从地址 0x0 开始烧录
#esptool.py --chip esp32c3 --port /dev/ttyUSB0 --baud 460800 write_flash -z 0x0 esp32c3-20220117-v1.18.bin
.\esptool.exe --chip esp32c3 --port COM10 --baud 460800 write_flash -z 0x0 ESP32_GENERIC_C3-20231005-v1.21.0.bin

# 成功烧录的日志结尾
...
Hash of data verified.

Leaving...
Hard resetting via RTS pin...
- 将
COM10修改为实际串口
连接
使用 Thonny 连接

# 任务 2:驱动扩展板上的 OLED 屏幕(必做任务)
任务要求:使用扩展板上的 OLED 屏幕显示文字和图形
搭配器件:Seeed Studio XIAO ESP32C3、Seeed Studio Expansion Board Base for XIAO
官方示例
编辑 MicroPython 设备的
boot.py文件粘贴下面的官方示例代码
import time
from machine import Pin, SoftI2C
import ssd1306
import math

# ESP8266 Pin assignment
i2c = SoftI2C(scl=Pin(7), sda=Pin(6))  # Adjust the Pin numbers based on your connections
oled_width = 128
oled_height = 64
oled = ssd1306.SSD1306_I2C(oled_width, oled_height, i2c)

oled.fill(0)  # Clear the screen
oled.text("Hello, Seeder!", 10, 15)
oled.text("/////", 30, 40)
oled.text("(`3`)y", 30, 55)
oled.show()  # Show the text
保存
终端
Ctrl + D重新加载报错:找不到
ssd1306模块
MPY: soft reboot
Traceback (most recent call last):
  File "boot.py", line 3, in <module>
ImportError: no module named 'ssd1306'
MicroPython v1.21.0 on 2023-10-06; ESP32C3 module with ESP32C3
Type "help()" for more information.
- Thonny - 工具 - 包管理 - 搜索
ssd1306,安装 - 终端
Ctrl + D重新加载
- 安装
ssd1306驱动 - 显示文字
from machine import Pin, SoftI2C
import ssd1306
# i2c引脚
i2c = SoftI2C(scl=Pin(7), sda=Pin(6))
oled_width = 128
oled_height = 64
oled = ssd1306.SSD1306_I2C(oled_width, oled_height, i2c)
# 清除屏幕
oled.fill(0)
# 显示内容
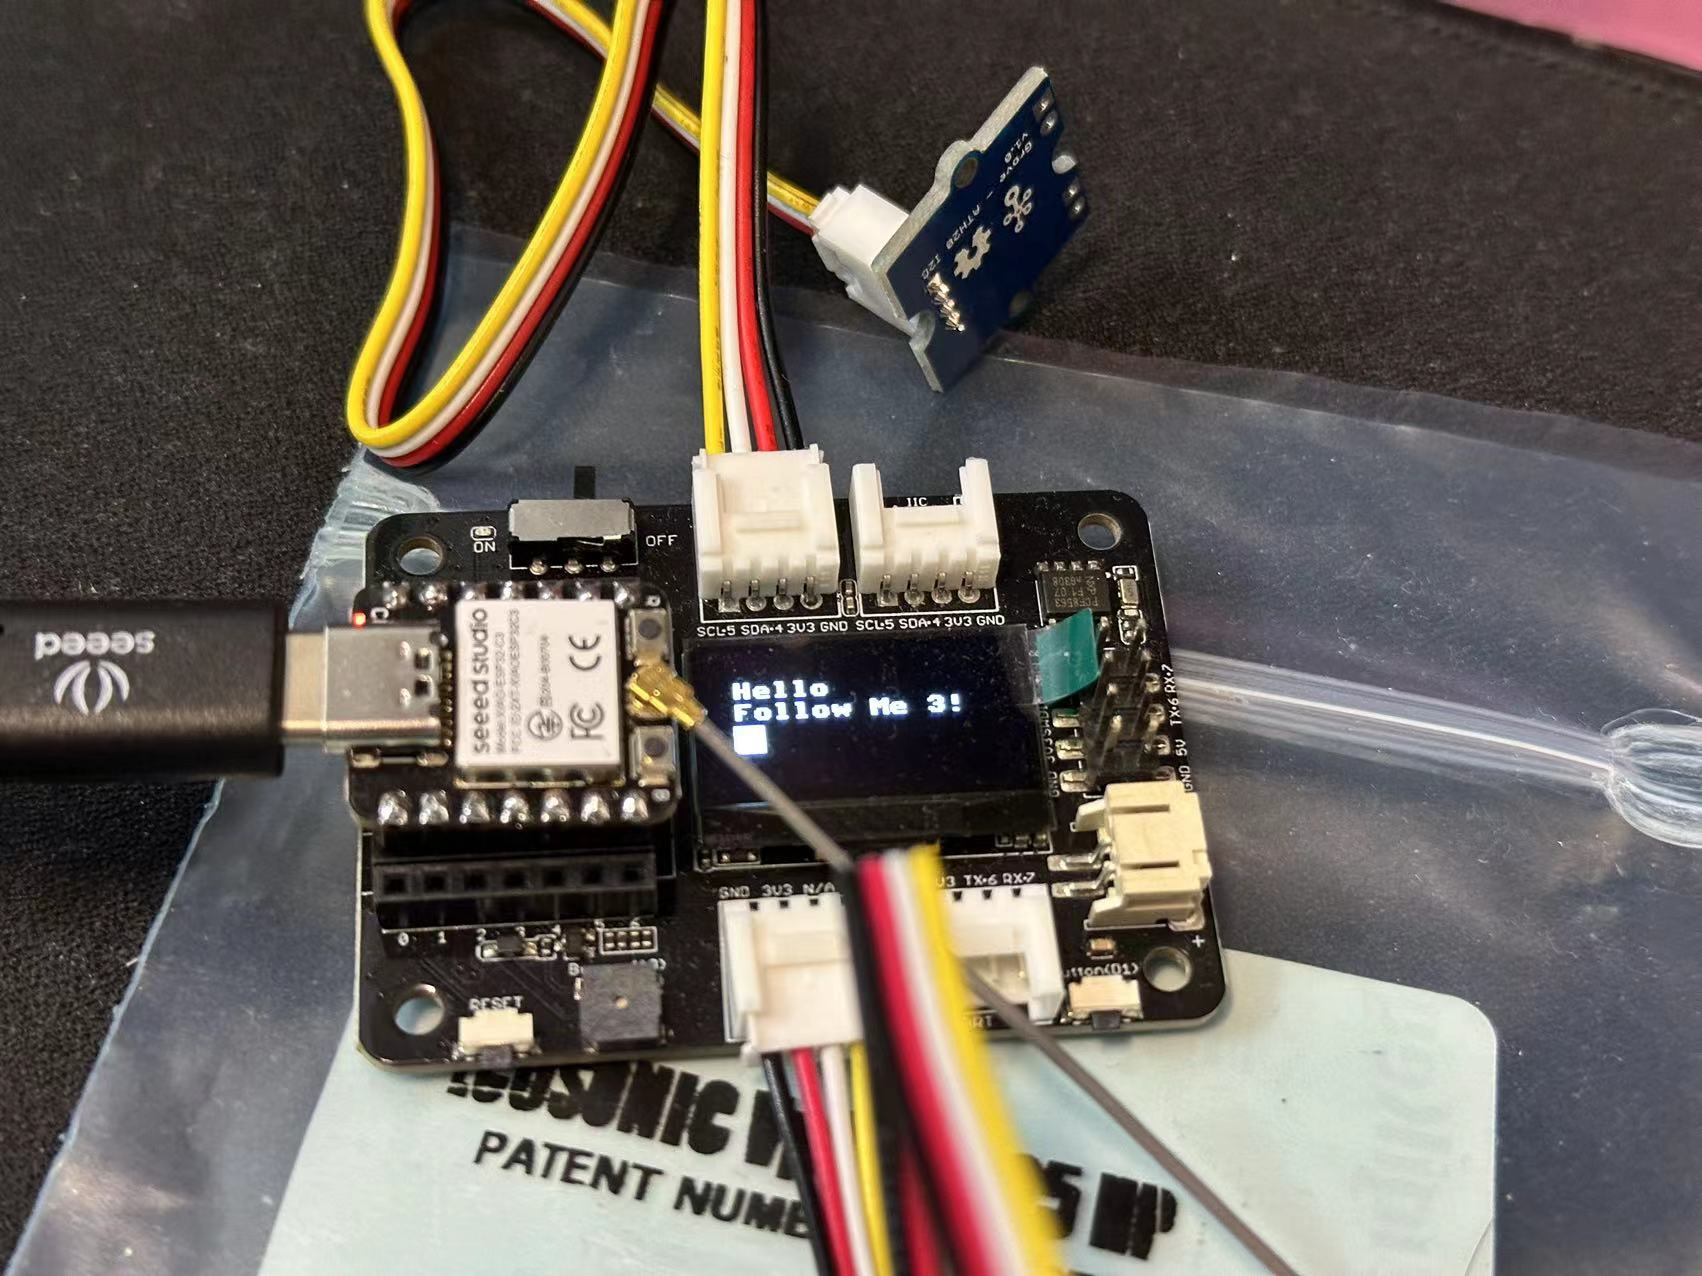
oled.text("Hello", 10, 15)
oled.text("Follow Me 3!", 10, 25)
# 填充正方形
oled.fill_rect(10, 35, 12, 12, 1)
oled.show()
参考:
# 任务 3:控制蜂鸣器播放音乐(必做任务)
任务要求:使用 Seeed Studio XIAO ESP32C3 控制蜂鸣器发出不同频率的声音,并播放一段音乐
搭配器件:Seeed Studio XIAO ESP32C3、Seeed Studio Expansion Board Base for XIAO
播放三次 1000, 2000, 3000 赫兹的声音后,播放音乐《小星星》
import machine
import time

# 蜂鸣器
buzzer_pin = machine.Pin(5, machine.Pin.OUT)
buzzer = machine.PWM(buzzer_pin)
buzzer.freq(1047)

# 定义每个音符的频率
NOTE_C4 = 262
NOTE_D4 = 294
NOTE_E4 = 330
NOTE_F4 = 349
NOTE_G4 = 392
NOTE_A4 = 440
NOTE_B4 = 494
NOTE_C5 = 523

# 歌曲的音符,0是一个休息/脉冲
notes = [
    NOTE_C4, NOTE_C4, NOTE_G4, NOTE_G4, NOTE_A4, NOTE_A4, NOTE_G4,
    NOTE_F4, NOTE_F4, NOTE_E4, NOTE_E4, NOTE_D4, NOTE_D4, NOTE_C4,
    NOTE_G4, NOTE_G4, NOTE_F4, NOTE_F4, NOTE_E4, NOTE_E4, NOTE_D4,
    NOTE_G4, NOTE_G4, NOTE_F4, NOTE_F4, NOTE_E4, NOTE_E4, NOTE_D4,
    NOTE_C4, NOTE_C4, NOTE_G4, NOTE_G4, NOTE_A4, NOTE_A4, NOTE_G4,
    NOTE_F4, NOTE_F4, NOTE_E4, NOTE_E4, NOTE_D4, NOTE_D4, NOTE_C4
]

# 歌曲中每个音符的持续时间(毫秒)
durations = [
    500, 500, 500, 500, 500, 500, 1000,
    500, 500, 500, 500, 500, 500, 1000,
    500, 500, 500, 500, 500, 500, 1000,
    500, 500, 500, 500, 500, 500, 1000,
    500, 500, 500, 500, 500, 500, 1000,
    500, 500, 500, 500, 500, 500, 1000
]

def play_song():
    total_notes = len(notes)
    for i in range(total_notes):
        current_note = notes[i]
        wait = durations[i]
        if current_note != 0:
            # 设置声音占空比
            buzzer.duty(512)
            # 设置音符的频率
            buzzer.freq(current_note)
        else:
            # 关闭声音
            buzzer.duty(0)
        time.sleep_ms(wait)
        # 关闭声音
        buzzer.duty(0)


# 依次发出1000, 2000, 3000赫兹的声音
freqArr = [1000, 2000, 3000]
for freq in freqArr:
    buzzer.freq(freq)
    buzzer.duty(255)
    time.sleep(1)
    buzzer.duty(0)
    time.sleep(1)

# 播放歌曲
play_song()
# 任务 4:连接 WiFi 网络(必做任务)
任务要求:将 Seeed Studio XIAO ESP32C3 连接到 WiFi 网络,并访问互联网信息
搭配器件:Seeed Studio XIAO ESP32C3、Seeed Studio Expansion Board Base for XIAO、RF ANT 2.4GHZ/5.5GHZ PCB TRACE
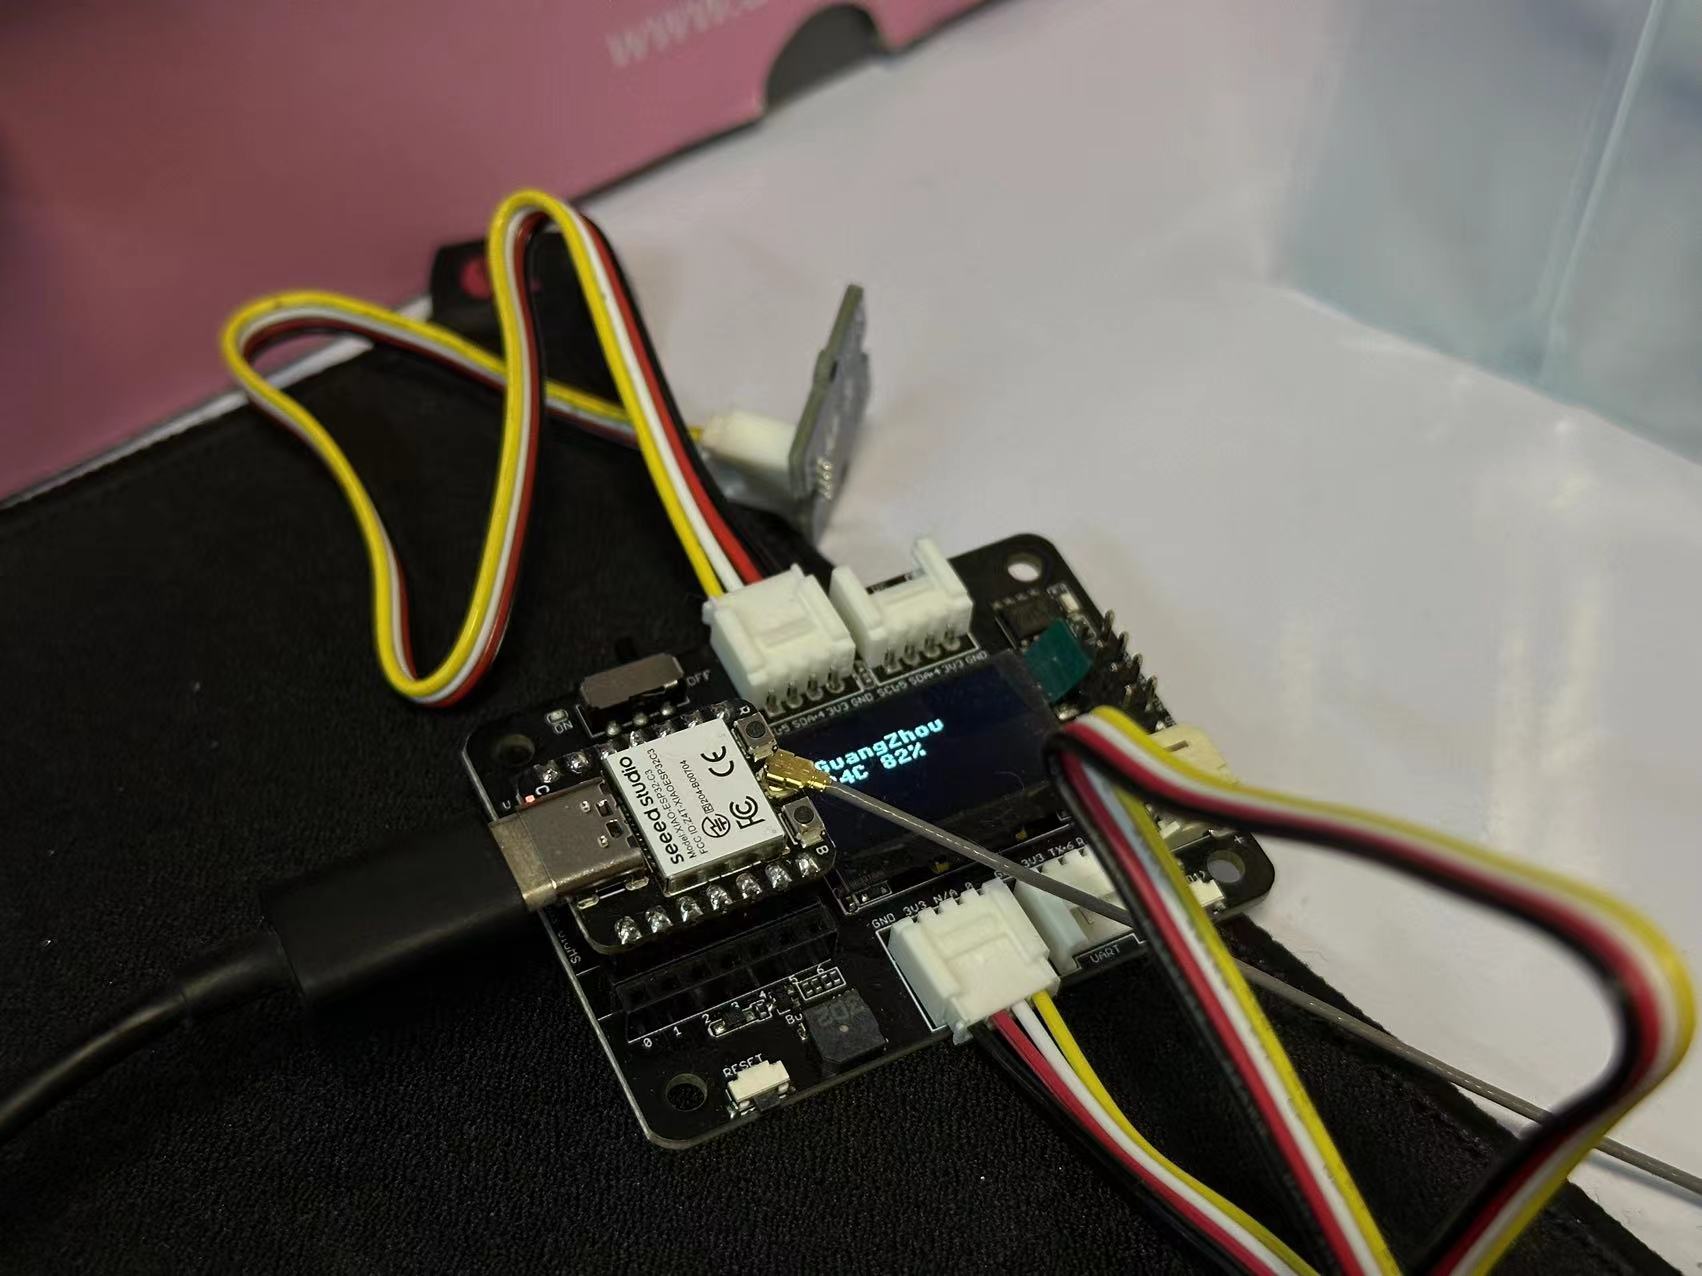
实现效果:使用 WIFI 连接互联网,获取当前广州的温湿度信息,并显示到屏幕上。
import ujson as json
import utime as time
import urequests
import network
from machine import Pin, SoftI2C
import ssd1306

# i2c引脚
i2c = SoftI2C(scl=Pin(7), sda=Pin(6))
oled_width = 128
oled_height = 64
oled = ssd1306.SSD1306_I2C(oled_width, oled_height, i2c)


# WIFI信息设置
wifi_ssid = "@NipGeihou"
wifi_password = "01230123"

station = network.WLAN(network.STA_IF)
station.active(True)

while not station.isconnected():
    print("Connecting...")
    station.connect(wifi_ssid, wifi_password)
    time.sleep(10)

print("Connected!")
# 获取广州天气信息
response = urequests.get(
    "https://aider.meizu.com/app/weather/listWeather?cityIds=101280101")
res = json.loads(response.text)
temp = res.get("value", [{}])[0].get("realtime", {}).get("temp")
sd = res.get("value", [{}])[0].get("realtime", {}).get("sD")

# 清除屏幕
oled.fill(0)
# 显示内容
oled.text("GuangZhou", 10, 15)
oled.text(temp+"C "+sd+"%", 10, 25)
oled.show()
# 任务 5:使用外部传感器(必做任务)
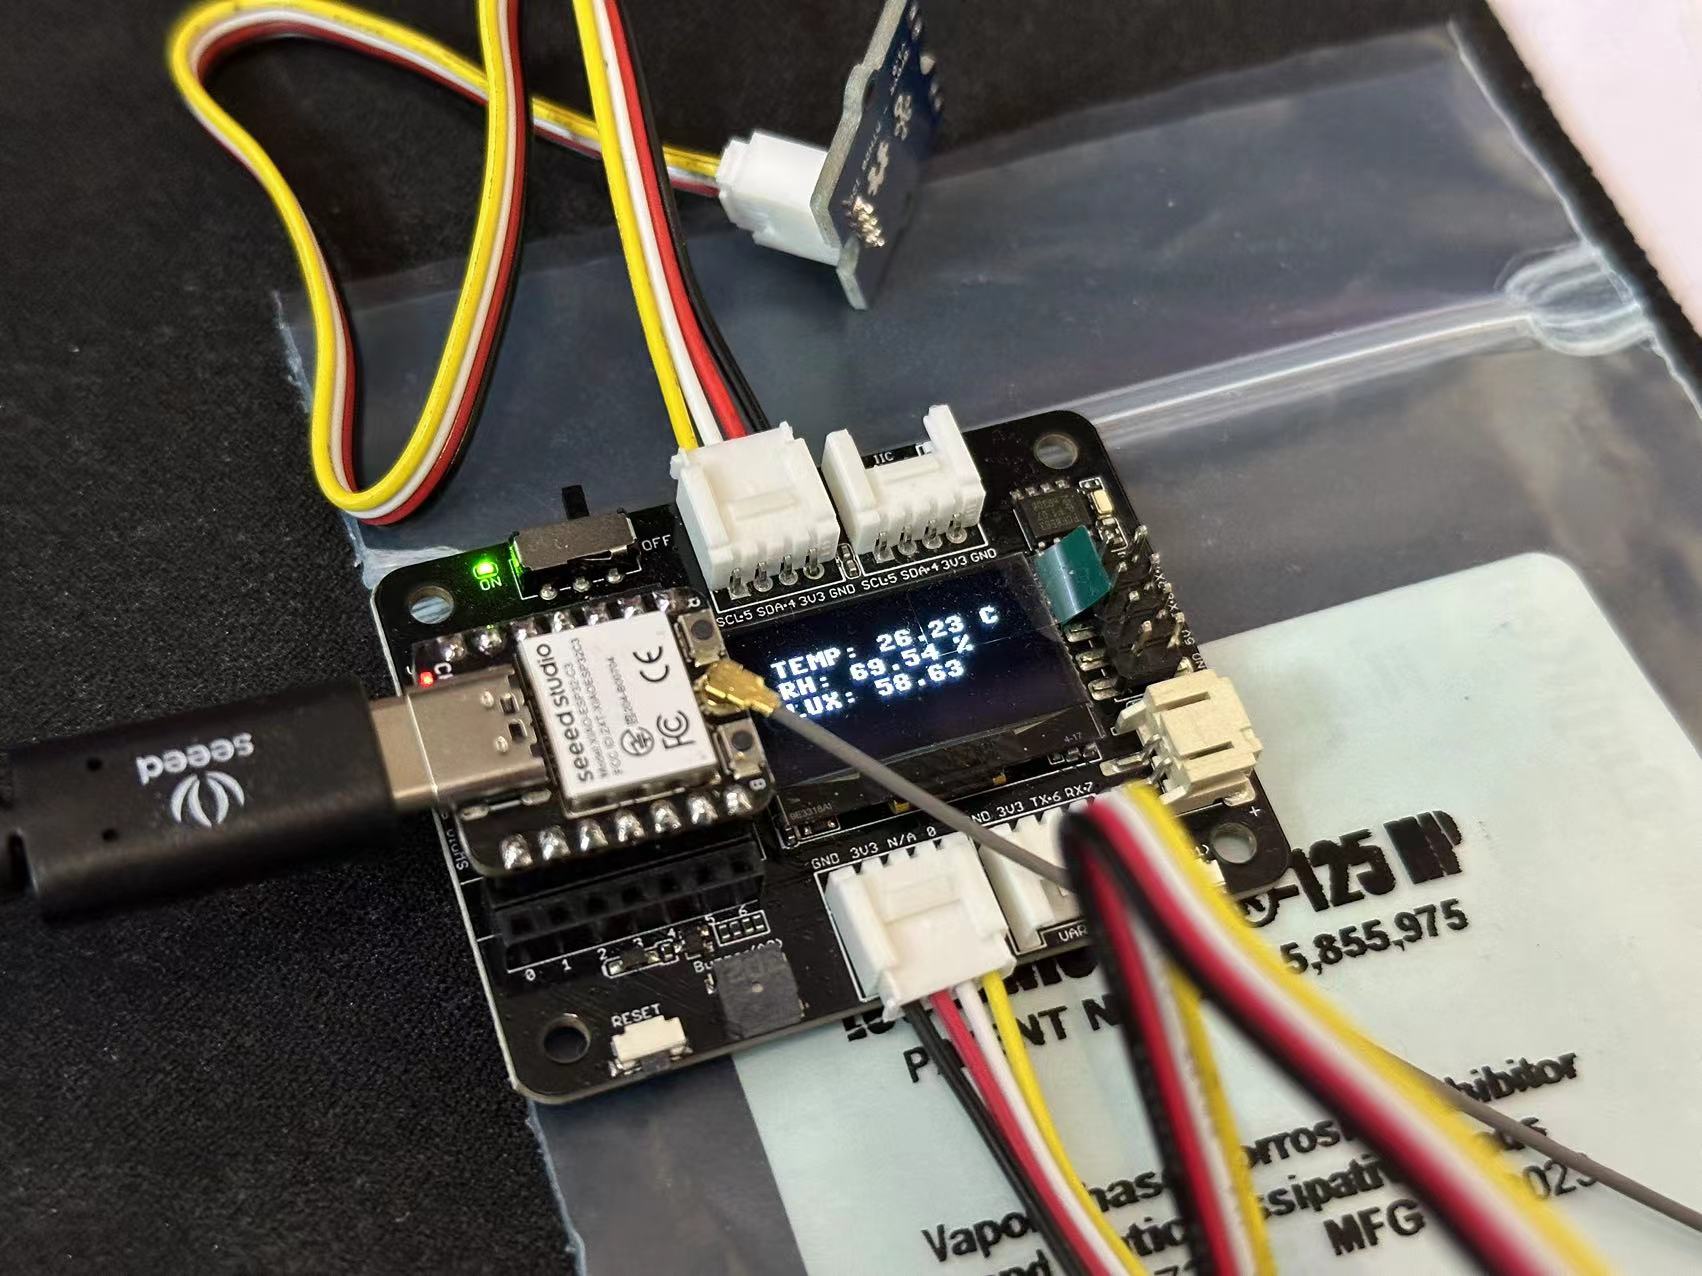
任务要求:连接环境光传感器或温湿度传感器,获取传感器的数值,并转换成真实的物理量
搭配器件: Seeed Studio XIAO ESP32C3、Seeed Studio Expansion Board Base for XIAO、 Grove - AHT20 I2C Industrial Grade Temperature and Humidity Sensor、Grove - Light Sensor v1.2
温湿度传感器
通过查阅 Grove - AHT20 I2C Industrial Grade Temperature&Humidity Sensor | Seeed Studio Wiki (opens new window) 可知传感器使用的 i2c 协议 ,需连接到扩展板上方的接口。
- 通过在 PyPI・The Python Package Index (opens new window) 搜索
aht20可找到 micropython-ahtx0 0.1.2 (opens new window) - 下载驱动 micropython-ahtx0-0.1.2.tar.gz
- Thonny - 工具 - 包管理 - 从本地文件中安装,选择下载的驱动安装
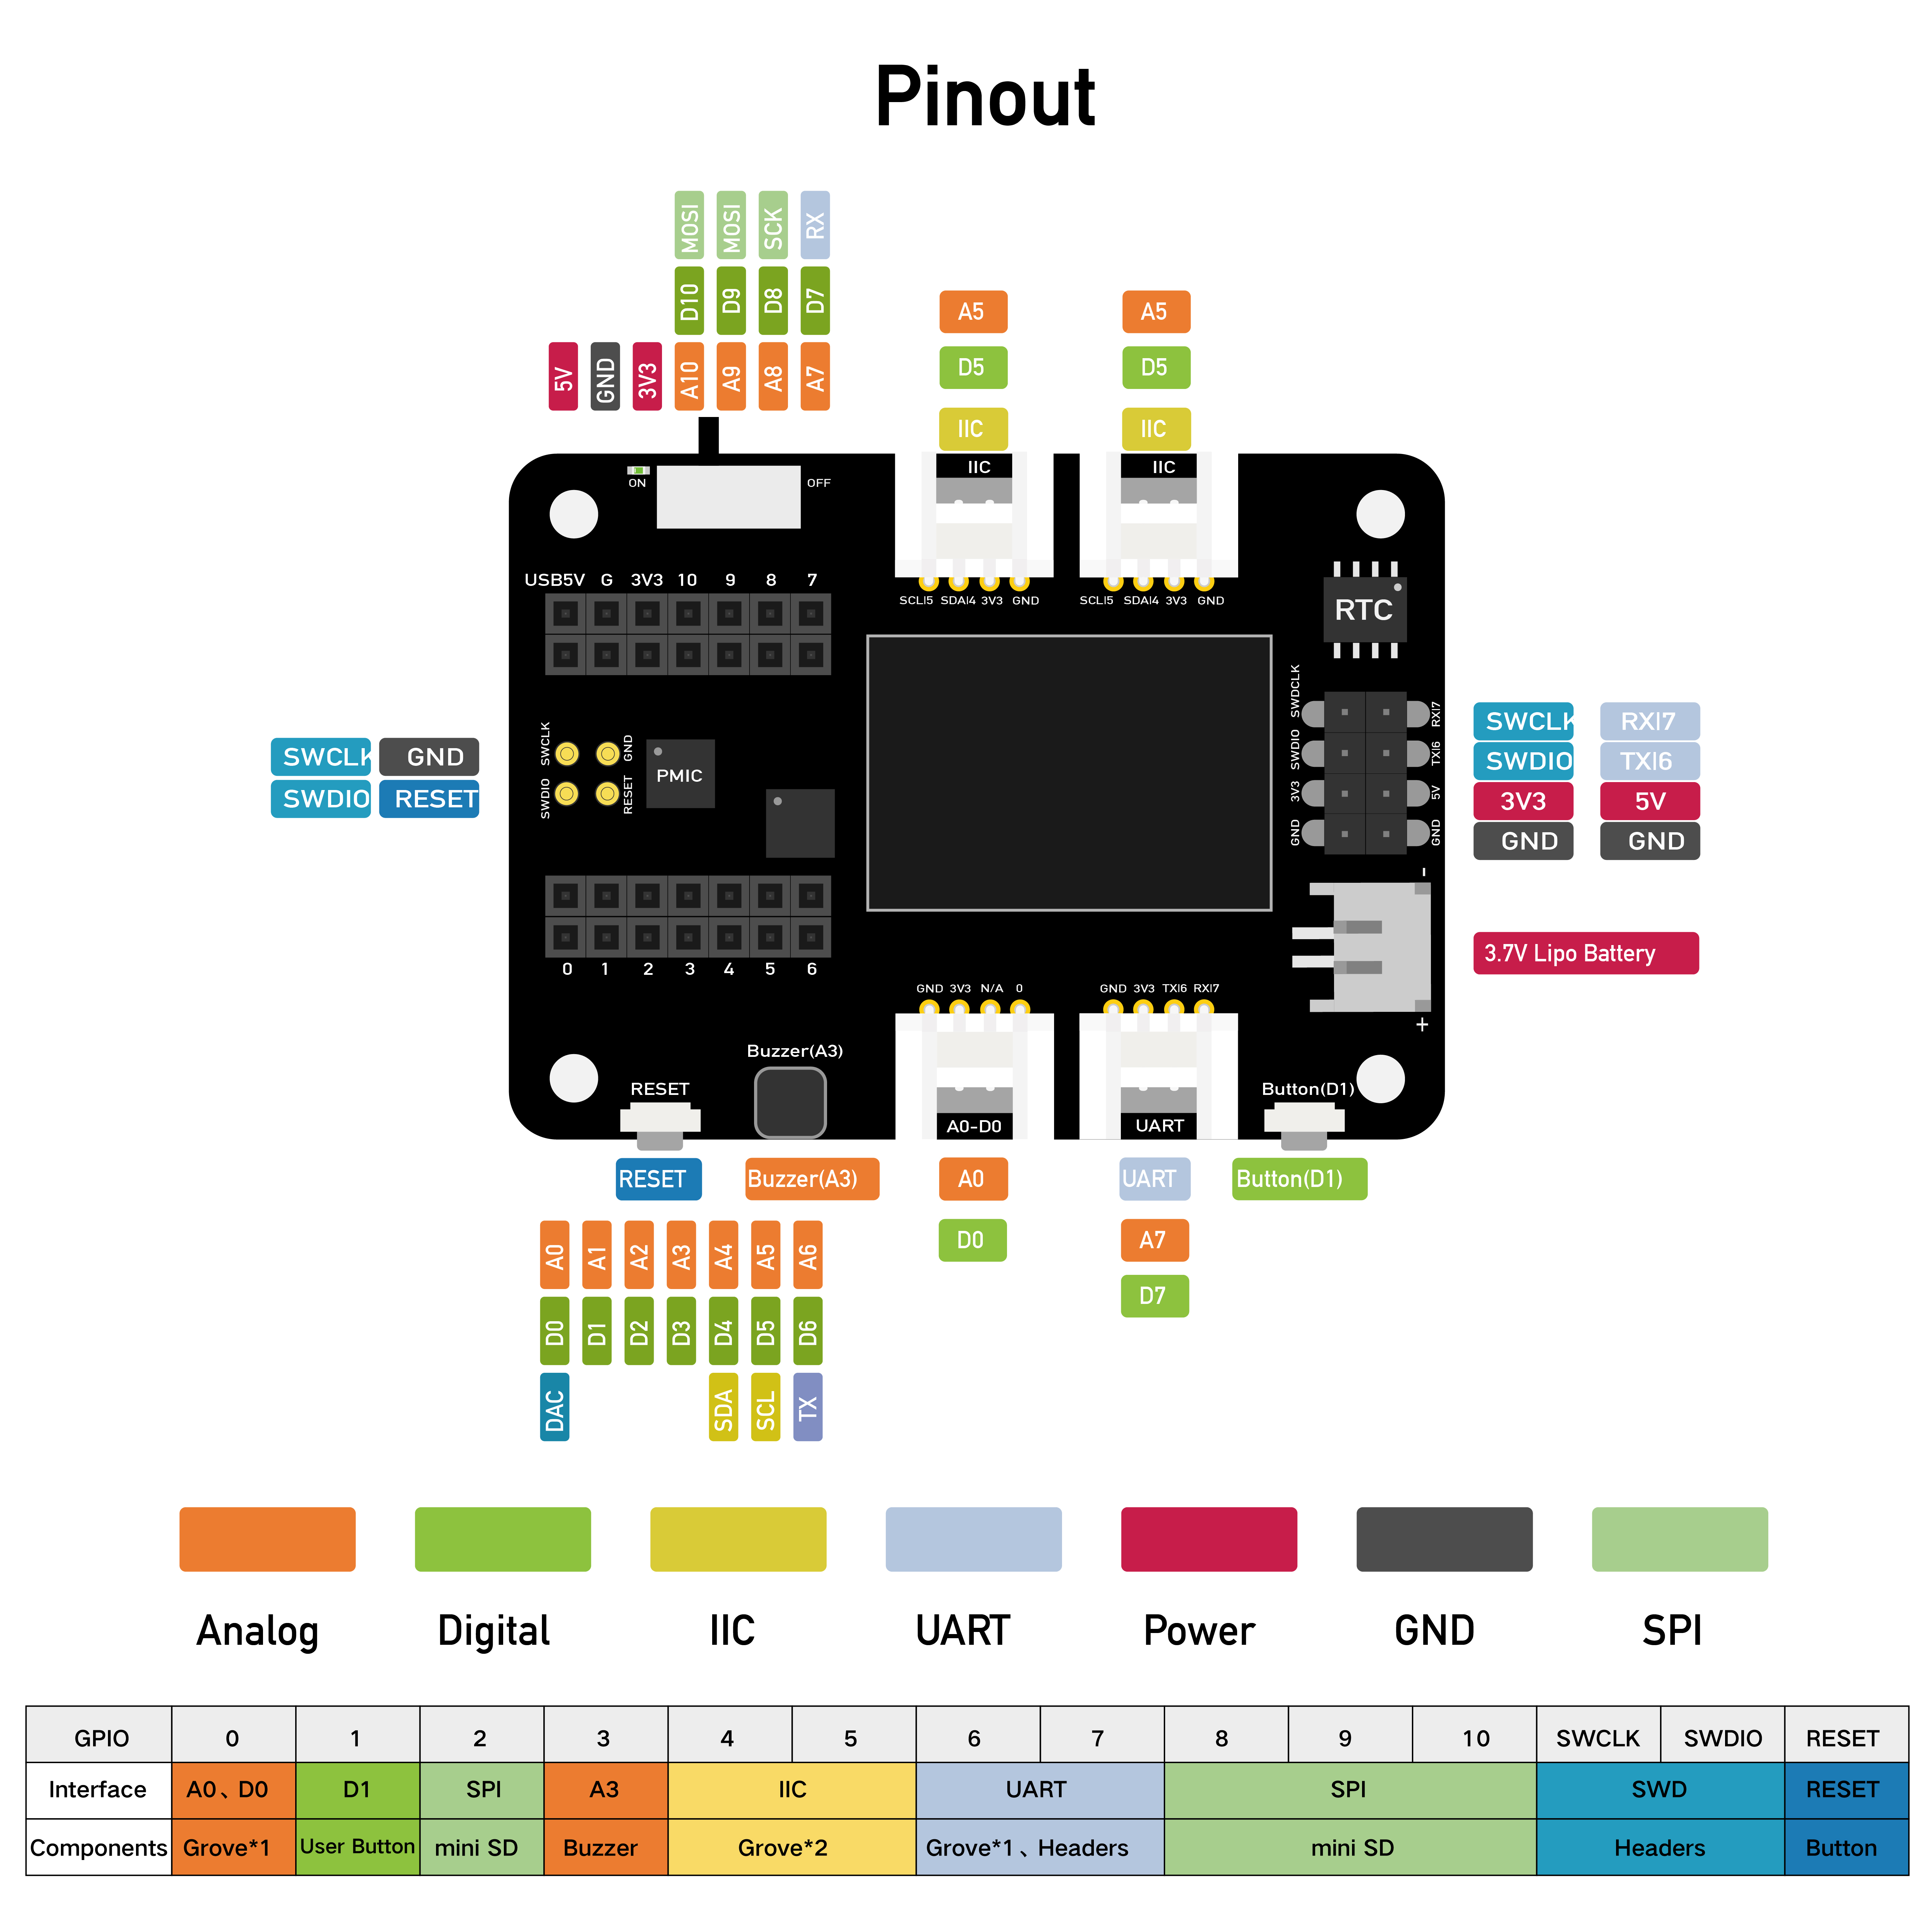
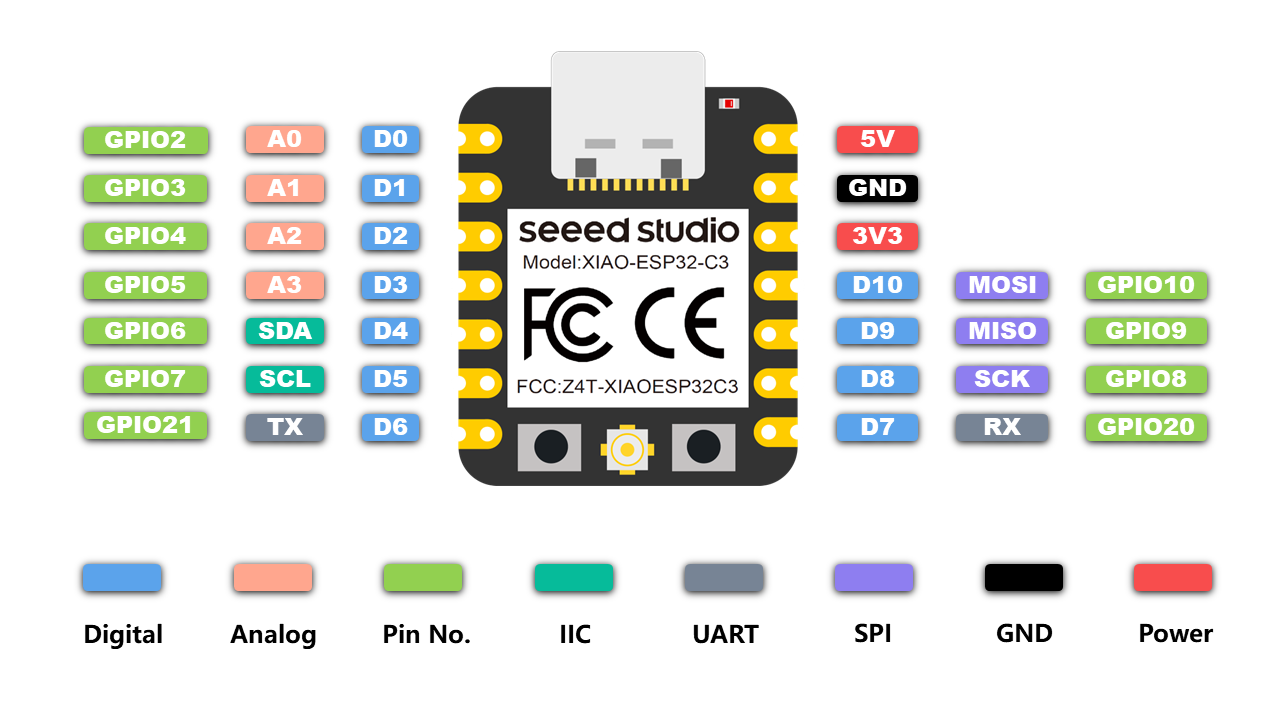
- 根据上图的引脚可知,i2c 对应的引脚为
SDA:GPIO6,SCL:GPIO7
光线传感器
查阅 Grove - Light Sensor | Seeed Studio Wiki (opens new window) 文档可知,此传感器使用 ADC。将传感器接到左下方接口,即 A0 GPIO2 。
import machine
adc = machine.ADC(0)
print(adc.read())
Grove - Light Sensor | Seeed Studio Wiki (opens new window) 文档中的示例似乎是旧的版本的,在 v1.2 版本的模块将传感器更改为 LS06-S光敏传感器 ,一番查找后,也没弄找到什么有用的信息,在他人的任务帖中说到这个传感器的 最大量程为 350 Lux ,在网上找来找去都没看到有说 350 Lux 的,最后在传感器包装袋里的纸中看到 Maxlue detected:350 lux 。因此可知 读值0 -> 0 lux 4095->350 lux 。
参考:
代码
from machine import Pin, SoftI2C,ADC
import ssd1306
import ahtx0
import time

# i2c引脚
i2c = SoftI2C(scl=Pin(7), sda=Pin(6))
# 温湿度传感器
tempSensor = ahtx0.AHT20(i2c)
# 光线传感器
lightSensor = ADC(Pin(2))
# 应用输入衰减, 11dB 衰减, 允许输入电压范围 (150mV - 2450mV)
lightSensor.atten(ADC.ATTN_11DB)
# ESP32C3 为12位ADC  4095
lightSensor.width(ADC.WIDTH_12BIT)
# 屏幕
oled_width = 128
oled_height = 64
oled = ssd1306.SSD1306_I2C(oled_width, oled_height, i2c)

while True:
    # 清除屏幕
    oled.fill(0)
    # 显示内容
    # 温湿度数据
    oled.text("TEMP: %0.2f C" % tempSensor.temperature, 10, 15)
    oled.text("RH: %0.2f %%" % tempSensor.relative_humidity, 10, 25)

    # 光线数据
    lightSensorValue = lightSensor.read()
    lux = lightSensorValue / 4095 * 350
    oled.text("LUX: %0.2f" % lux, 10, 35)
    oled.show()
    time.sleep(1)
# 分任务 1:寻找 WiFi 发射源的位置
实时测量 WiFi 信号强度,同时移动开发板位置,找到 WiFi 发射源(例如路由器)的位置。
import network
import time
from time import sleep
import machine
from machine import Pin, SoftI2C
import ssd1306
import math

# ESP32C3 Pin assignment
i2c = SoftI2C(scl=Pin(7), sda=Pin(6))  # Adjust the Pin numbers based on your connections
oled_width = 128
oled_height = 64
oled = ssd1306.SSD1306_I2C(oled_width, oled_height, i2c)

# Network settings
wifi_ssid = "Your Own SSID"
wifi_password = "Your Own Password"
machine.freq(160000000)  # Set CPU frequency to 160 MHz (ESP8266 specific)
oled.text("Starting up...", 0, 0)
oled.show()

station = network.WLAN(network.STA_IF)
station.active(True)
station.connect(wifi_ssid, wifi_password)
time.sleep(1)

while not station.isconnected():
    time.sleep(1)

oled.fill(0)
oled.text("Connecting to", 0, 0)
oled.text(wifi_ssid, 0, 20)
oled.show()
time.sleep(2)

oled.fill(0)
ip_address = station.ifconfig()[0]  # Get the IP address
oled.text("Connected! ", 0, 0)
oled.text("IP Address:", 0, 20)
oled.text(ip_address, 0, 40)
oled.show()
time.sleep(2)

# Buzzer settings
buzzer_pin = machine.Pin(5, machine.Pin.OUT)
buzzer = machine.PWM(buzzer_pin)
buzzer.freq(1047)
buzzer.duty(0)

center_x = oled_width // 2
center_y = oled_height // 2
square_size = 6  # Size of each square
num_squares = 12  # Number of squares
angle_increment = 2 * math.pi / num_squares

x_pos = [12, 38, 64, 90]
statuses = ["poor", "normal", "good", "excellent"]

def calculate_block_count(rssi):
    # Determine the number of blocks based on RSSI values
    if -80 <= rssi < -60:
        return 1
    elif -60 <= rssi < -40:
        return 2
    elif -40 <= rssi < -20:
        return 3
    elif -20 <= rssi <= 10:
        return 4

def draw_blocks(count):
    for i in range(count):
        y_pos = 50 - calculate_block_height(i)
        oled.fill_rect(x_pos[i], y_pos, 24, calculate_block_height(i), 1)
    for i in range(count, 4):  # Clear unused area
        y_pos = 50 - calculate_block_height(i)
        oled.fill_rect(x_pos[i], y_pos, 24, calculate_block_height(i), 0)

def calculate_block_height(index):
    return 10 * (index + 1)

loop_count = 0  # Initialize loop count

while loop_count < 2:  # Execute the loop 24 times
    oled.fill(0)  # Clear the screen

    for i in range(num_squares):
        angle = i * angle_increment
        x = int(center_x + (center_x - square_size-30) * math.cos(angle))
        y = int(center_y + (center_x - square_size-30) * math.sin(angle))

        # Draw all squares
        for j in range(num_squares):
            angle_j = j * angle_increment
            x_j = int(center_x + (center_x - square_size-30) * math.cos(angle_j))
            y_j = int(center_y + (center_x - square_size-30) * math.sin(angle_j))

            oled.fill_rect(x_j, y_j, square_size, square_size, 1)  # Draw the square

        oled.fill_rect(x, y, square_size, square_size, 0)  # Erase the current square
        oled.show()
        time.sleep_ms(100)  # Pause before next iteration

    loop_count += 1  # Increase loop count

oled.fill(0)  # Clear the screen after finishing the loops
oled.show()

while True:
    oled.fill(0)
    station = network.WLAN(network.STA_IF)
    time.sleep(0.1)
    rssi = station.status('rssi')
    rssi_duty = 160 + 2 * int(rssi)
    rssi_duty_2 = int(rssi_duty / 2)
    rssi_abs = abs(int(rssi)) / 100

    block_count = calculate_block_count(rssi)
    status = statuses[block_count - 1]  # Get the status text based on block count

    draw_blocks(block_count)

    oled.text(status, 11, 56)

    oled.text("RSSI:", 0, 0)
    oled.text(str(rssi), 40, 0)
    # Update the display
    oled.show()

    buzzer.duty(rssi_duty)
    time.sleep(rssi_abs)
    buzzer.duty(0)
    time.sleep(rssi_abs)
    buzzer.duty(rssi_duty_2)
    time.sleep(rssi_abs)
    buzzer.duty(0)
    time.sleep(rssi_abs)
# 分任务 2:温湿度数据记录仪
任务要求:定时记录温湿度传感器的值,并展示出来。可记录到开发板内置存储中,也可以通过物联网服务发送数据到云端。
笔记
这个我选的分任务跟 2 期的是类似的,甚至说更简单,因为只要求使用一个传感器,不需要用到光线传感器,为了提升自己,在这里我选择加入光线传感器,并使用物联网服务发送数据到云端。
# 分任务 3:开灯提醒器
任务要求:监测环境光强度,如果光线太暗,通过屏幕和蜂鸣器提醒用户开灯,达到保护视力的效果。
搭配器件: Seeed Studio XIAO ESP32C3、Seeed Studio Expansion Board Base for XIAO、Grove - Light Sensor v1.2

from machine import Pin, SoftI2C,ADC,PWM
import ssd1306
import time

# i2c引脚
i2c = SoftI2C(scl=Pin(7), sda=Pin(6))
# 蜂鸣器
buzzer_pin = Pin(5, Pin.OUT)
buzzer = PWM(buzzer_pin)
buzzer.freq(1047)
# 光线传感器
lightSensor = ADC(Pin(2))
# 应用输入衰减, 11dB 衰减, 允许输入电压范围 (150mV - 2450mV)
lightSensor.atten(ADC.ATTN_11DB)
# ESP32C3 为12位ADC  4095
lightSensor.width(ADC.WIDTH_12BIT)
# 屏幕
oled_width = 128
oled_height = 64
oled = ssd1306.SSD1306_I2C(oled_width, oled_height, i2c)

while True:
    # 清除屏幕
    oled.fill(0)
    # 显示内容
    # 温湿度数据
    # 光线数据
    lightSensorValue = lightSensor.read()
    lux = lightSensorValue / 4095 * 350
    oled.text("LUX: %0.2f" % lux, 10, 15)
    text = "Normal"
    # 高于200时提示
    if lux > 200:
        text = "Too Bright!!"
        buzzer.duty(512)
    # 低于50时提示
    elif lux < 50:
        text = "Too Dark!!"
        buzzer.duty(512)
    else:
        buzzer.duty(0)
    oled.text(text, 10, 25)

    oled.show()
    time.sleep(1)